
หน้านี้อธิบายวิธีใช้ Federated Learning API ที่ On-Device Personalization จัดเตรียมไว้เพื่อฝึกโมเดลด้วยกระบวนการเรียนรู้การหาค่าเฉลี่ยแบบรวมศูนย์และสัญญาณรบกวนแบบ Gaussian คงที่
ก่อนเริ่มต้น
ก่อนเริ่มต้น ให้ทำตามขั้นตอนต่อไปนี้ในอุปกรณ์ทดสอบ
ตรวจสอบว่าได้ติดตั้งโมดูล OnDevicePersonalization แล้ว โมดูลนี้พร้อมใช้งานเป็นการอัปเดตอัตโนมัติในเดือนเมษายน 2024
# List the modules installed on the device
adb shell pm list packages --apex-only --show-versioncode
ตรวจสอบว่าโมดูลต่อไปนี้แสดงพร้อมรหัสเวอร์ชัน 341717000 ขึ้นไป
package:com.google.android.ondevicepersonalization versionCode:341717000หากไม่เห็นโมดูลดังกล่าว ให้ไปที่การตั้งค่า > ความปลอดภัยและความเป็นส่วนตัว > การอัปเดต > การอัปเดตระบบ Google Play เพื่อให้แน่ใจว่าอุปกรณ์เป็นเวอร์ชันล่าสุด เลือกอัปเดตตามที่จำเป็น
เปิดใช้ฟีเจอร์ใหม่ทั้งหมดที่เกี่ยวข้องกับการเรียนรู้แบบรวม
# Enable On-Device Personalization apk.
adb shell device_config put on_device_personalization global_kill_switch false
# Enable On-Device Personalization APIs.
adb shell device_config put on_device_personalization enable_ondevicepersonalization_apis true
# Enable On-Device Personalization overriding.
adb shell device_config put on_device_personalization enable_personalization_status_override true
adb shell device_config put on_device_personalization personalization_status_override_value true
# Enable Federated Compute apk.
adb shell device_config put on_device_personalization federated_compute_kill_switch false
สร้างงานการเรียนรู้แบบรวมศูนย์

เราจะอธิบายตัวเลขในแผนภาพโดยละเอียดใน 8 ขั้นตอนต่อไปนี้
กำหนดค่าเซิร์ฟเวอร์การคำนวณแบบรวมศูนย์
การเรียนรู้แบบสมาพันธ์คือการลดการแมปที่ทำงานบนเซิร์ฟเวอร์การคำนวณแบบสมาพันธ์ (ตัวลด) และชุดไคลเอ็นต์ (ตัวแมป) เซิร์ฟเวอร์การประมวลผลแบบรวมศูนย์จะดูแลข้อมูลเมตาที่กำลังทำงานและข้อมูลโมเดลของแต่ละงานการเรียนรู้แบบรวมศูนย์ ในระดับสูง
- นักพัฒนาแอปการเรียนรู้แบบรวมศูนย์สร้างงานใหม่และอัปโหลดทั้งข้อมูลเมตาที่ใช้เรียกใช้งานและข้อมูลโมเดลไปยังเซิร์ฟเวอร์
- เมื่อไคลเอ็นต์ Federated Compute เริ่มคำขอการกำหนดงานใหม่ไปยังเซิร์ฟเวอร์ เซิร์ฟเวอร์จะตรวจสอบสิทธิ์ของงานและแสดงข้อมูลงานที่มีสิทธิ์
- เมื่อไคลเอ็นต์ Federated Compute ทำการคำนวณในเครื่องเสร็จแล้ว ก็จะส่งผลการคำนวณเหล่านี้ไปยังเซิร์ฟเวอร์ จากนั้นเซิร์ฟเวอร์จะทำการรวบรวมและเพิ่มสัญญาณรบกวนในผลลัพธ์การคำนวณเหล่านี้ และนำผลลัพธ์ไปใช้กับโมเดลสุดท้าย
ดูข้อมูลเพิ่มเติมเกี่ยวกับแนวคิดเหล่านี้ได้ที่
- Federated Learning: Collaborative Machine Learning without Centralized Training Data
- Towards Federated Learning at Scale: System Design (SysML 2019)
ODP ใช้การเรียนรู้แบบรวมศูนย์เวอร์ชันที่ได้รับการปรับปรุง ซึ่งจะใช้สัญญาณรบกวนที่ปรับเทียบแล้ว (ส่วนกลาง) กับการรวบรวมข้อมูลก่อนที่จะนำไปใช้กับโมเดล ขนาดของสัญญาณรบกวนช่วยให้มั่นใจได้ว่าข้อมูลรวมจะยังคงรักษา Differential Privacy ไว้
ขั้นตอนที่ 1 สร้างเซิร์ฟเวอร์การประมวลผลแบบรวม
ทำตามวิธีการในโปรเจ็กต์ Federated Compute เพื่อตั้งค่า Federated Compute Server ของคุณเอง
ขั้นตอนที่ 2 เตรียม FunctionalModel ที่บันทึกไว้
เตรียมไฟล์ 'FunctionalModel' ที่บันทึกไว้ คุณใช้ 'functional_model_from_keras' เพื่อแปลง 'Model' เป็น 'FunctionalModel' และใช้ 'save_functional_model' เพื่อเปลี่ยน 'FunctionalModel' นี้เป็นรูปแบบ 'SavedModel' ได้
functional_model = tff.learning.models.functional_model_from_keras(keras_model=model)
tff.learning.models.save_functional_model(functional_model, saved_model_path)
ขั้นตอนที่ 3 สร้างการกำหนดค่าเซิร์ฟเวอร์การประมวลผลแบบรวม
เตรียมfcp_server_config.json ซึ่งรวมถึงนโยบาย การตั้งค่าการเรียนรู้แบบรวมศูนย์ และการตั้งค่าความเป็นส่วนตัวเชิงอนุพันธ์ ตัวอย่าง
  # Identifies the set of client devices that will participate.
  population_name: "my_new_population"
  # Options you can choose:
  # * TRAINING_ONLY: Only one training task will be generated under this
  #                  population.
  # * TRAINING_AND_EVAL: One training task and one evaluation task will be
  #                      generated under this population.
  # * EVAL_ONLY: Only one evaluation task will be generated under this
  #              population.
  mode: TRAINING_AND_EVAL
  policies {
    # Policy for sampling on-device examples. It is checked every time a
    # device attempts to start a new training.
    min_separation_policy {
      # The minimum number of rounds before the same client participated.
      minimum_separation: 3
    }
    # Policy for releasing training results to developers. It is checked
    # when uploading a new task to the Federated Compute Server.
    model_release_policy {
      # Server stops training when number of training rounds reaches this
      # number.
      num_max_training_rounds: 1000
    }
  }
  # Federated learning setups. They are applied inside Task Builder.
  federated_learning {
    learning_process {
      # Use FED_AVG to build federated learning process. Options you can
      # choose:
      # * FED_AVG: Federated Averaging algorithm
      #            (https://arxiv.org/abs/2003.00295)
      # * FED_SDG: Federated SGD algorithm
      #            (https://arxiv.org/abs/1602.05629)
      type: FED_AVG
      # Optimizer used at client side training. Options you can choose:
      # * ADAM
      # * SGD
      client_optimizer: SGD
      # Learning rate used at client side training.
      client_learning_rate: 0.01
      # Optimizer used at server side training. Options you can choose:
      # * ADAM
      # * SGD
      server_optimizer: ADAM
      # Learning rate used at server side training.
      sever_learning_rate: 1
      runtime_config {
        # Number of participating devices for each round of training.
        report_goal: 2000
      }
      # List of metrics to be evaluated by the model during training and
      # evaluation. Federated Compute Server provides a list of allowed
      # metrics.
      metrics {
        name: "auc-roc"
      }
      metrics {
        name: "binary_accuracy"
      }
    }
    # Whether or not to generate a corresponding evaluation task under the same
    # population. If this field isn't set, only one training task is
    # generated under this population.
    evaluation {
      # The task id under the same population of the source training task that
      # this evaluation task evaluates.
      source_training_task_id: 1
      # Decides how checkpoints from the training task are chosen for
      # evaluation.
      # * every_k_round: the evaluation task randomly picks one checkpoint
      #                  from the past k rounds of training task checkpoints.
      # * every_k_hour: the evaluation task randomly picks one checkpoint
      #                 from the past k hours of training task checkpoints.
      checkpoint_selector: "every_1_round"
      # The traffic of this evaluation task in this population.
      evaluation_traffic: 0.1
      # Number of participating devices for each round of evaluation.
      report_goal: 200
    }
  }
  # Differential Privacy setups. They are applied inside the Task Builder.
  differential_privacy {
    # The DP aggregation algorithm you want to use. Options you can choose:
    # * FIXED_GAUSSIAN: Federated Learning DP-SGD with fixed clipping norm
    #                   described in "Learning Differentially Private Recurrent
    #                   Language Models" (https://arxiv.org/abs/1710.06963).
    # * ADAPTIVE_GAUSSIAN: Federated Learning DP-SGD with quantile-based clip
    #                      norm estimation described in "Differentially Private
    #                      Learning with Adaptive Clipping"
    #                      (https://arxiv.org/abs/1905.03871).
    # * TREE: DP-FTRL algorithm described in "Practical and Private (Deep)
    #         Learning without Sampling or Shuffling"
    #         (https://arxiv.org/abs/2103.00039).
    # * ADADPTIVE_TREE: DP-FTRL with adaptive clipping norm descirbed in
    #                  "Differentially Private Learning with Adaptive Clipping"
    #                  (https://arxiv.org/abs/1905.03871).
    type: FIXED_GAUSSIAN
    # Noise multiplier for the Gaussian noise.
    noise_multiplier: 0.1
    #   The value of the clipping norm.
    clip_norm: 0.1
  }
ขั้นตอนที่ 4 ส่งการกำหนดค่า ZIP ไปยังเซิร์ฟเวอร์ Federated Compute
ส่งไฟล์ ZIP และ fcp_server_config.json ไปยังเซิร์ฟเวอร์ Federated Compute
task_builder_client --task_builder_server='http://{federated_compute_server_endpoint}' --saved_model='saved_model' --task_config='fcp_server_config.json'
ปลายทางของเซิร์ฟเวอร์การประมวลผลแบบรวมคือเซิร์ฟเวอร์ที่คุณตั้งค่าไว้ในขั้นตอนที่ 1
ไลบรารีโอเปอเรเตอร์ในตัวของ LiteRT รองรับเฉพาะโอเปอเรเตอร์ TensorFlow จำนวนจำกัด (เลือกโอเปอเรเตอร์ TensorFlow) ชุดโอเปอเรเตอร์ที่รองรับอาจแตกต่างกันไปในโมดูล OnDevicePersonalization เวอร์ชันต่างๆ เพื่อให้มั่นใจถึงความเข้ากันได้ เราจึงดำเนินการยืนยันผู้ให้บริการภายในเครื่องมือสร้างงานในระหว่างการสร้างงาน
เวอร์ชันโมดูล OnDevicePersonalization ขั้นต่ำที่รองรับจะรวมอยู่ในข้อมูลเมตาของงาน คุณดูข้อมูลนี้ได้ในข้อความข้อมูลของเครื่องมือสร้างงาน
I1023 22:16:53.058027 139653371516736 task_builder_client.py:109] Success! Tasks are built, and artifacts are uploaded to the cloud.
I1023 22:16:53.058399 139653371516736 task_builder_client.py:112] applied_algorithms {
  learning_algo: FED_AVG
  client_optimizer: SGD
  server_optimizer: SGD
  dp_aggregator: FIXED_GAUSSIAN
}
metric_results {
  accepted_metrics: "binary_accuracy, binary_crossentropy, recall, precision, auc-roc, auc-pr"
}
dp_hyperparameters {
  dp_delta: 0.000001
  dp_epsilon: 6.4
  noise_multiplier: 1.0
  dp_clip_norm: 1.0
  num_training_rounds: 10000
}

I1023 22:16:53.058594 139653371516736 task_builder_client.py:113] training_task {
  min_client_version: "341912000"
}
eval_task {
  min_client_version: "341812000"
}
เซิร์ฟเวอร์ Federated Compute จะมอบหมายงานนี้ให้กับอุปกรณ์ทุกเครื่องที่มีโมดูล OnDevicePersonalization ที่มีเวอร์ชันสูงกว่า 341812000
หากโมเดลมีการดำเนินการที่โมดูล OnDevicePersonalization ไม่รองรับ ข้อความแสดงข้อผิดพลาดจะสร้างขึ้นระหว่างการสร้างงาน
common.TaskBuilderException: Cannot build the ClientOnlyPlan: Please contact Google to register these ops: {'L2Loss': 'L2LossOp<CPUDevice, float>'}
. Stop building remaining artifacts.
ดูรายการการดำเนินการที่ยืดหยุ่นที่รองรับโดยละเอียดได้ใน GitHub
สร้าง APK การประมวลผลแบบรวมของ Android
หากต้องการสร้าง APK ของ Federated Compute สำหรับ Android คุณต้องระบุปลายทาง URL ของเซิร์ฟเวอร์ Federated Compute ใน AndroidManifest.xml ซึ่งไคลเอ็นต์ Federated Compute จะเชื่อมต่อด้วย
ขั้นตอนที่ 5 ระบุปลายทาง URL ของเซิร์ฟเวอร์การประมวลผลแบบรวม
ระบุปลายทาง URL ของเซิร์ฟเวอร์การประมวลผลแบบรวม (ซึ่งคุณตั้งค่าไว้ในขั้นตอนที่ 1) ใน AndroidManifest.xml ซึ่งไคลเอ็นต์การประมวลผลแบบรวมเชื่อมต่อด้วย
<!-- Contents of AndroidManifest.xml -->
<manifest xmlns:android="http://schemas.android.com/apk/res/android"
          package="com.example.odpsample" >
    <application android:label="OdpSample">
        <!-- XML resource that contains other ODP settings. -->
        <property android:name="android.ondevicepersonalization.ON_DEVICE_PERSONALIZATION_CONFIG"
                  android:resource="@xml/OdpSettings"></property>
        <!-- The service that ODP will bind to. -->
        <service android:name="com.example.odpsample.SampleService"
                android:exported="true" android:isolatedProcess="true" />
    </application>
</manifest>
ไฟล์ทรัพยากร XML ที่ระบุในแท็ก <property> ต้องประกาศคลาสบริการในแท็ก <service> และระบุปลายทาง URL ของเซิร์ฟเวอร์ Compute ที่เชื่อมโยงซึ่งไคลเอ็นต์ Compute ที่เชื่อมโยงจะเชื่อมต่อด้วย
<!-- Contents of res/xml/OdpSettings.xml -->
<on-device-personalization>
   <!-- Name of the service subclass -->
   <service name="com.example.odpsample.SampleService">
     <!-- If you want to use federated compute feature to train a model,
          specify this tag. -->
     <federated-compute-settings url="https://fcpserver.com/" />
   </service>
</on-device-personalization>
ขั้นตอนที่ 6 ติดตั้งใช้งาน IsolatedWorker#onTrainingExample API
ใช้ API สาธารณะสำหรับการปรับเปลี่ยนในอุปกรณ์ให้เหมาะกับแต่ละบุคคลIsolatedWorker#onTrainingExampleเพื่อสร้างข้อมูลการฝึก
โค้ดที่ทำงานใน IsolatedProcess จะไม่มีสิทธิ์เข้าถึงเครือข่าย, ดิสก์ในเครื่อง หรือบริการอื่นๆ ที่ทำงานในอุปกรณ์โดยตรง แต่จะมี API ต่อไปนี้ให้ใช้งาน
- "getRemoteData" - ข้อมูลคีย์-ค่าที่ไม่เปลี่ยนแปลงซึ่งดาวน์โหลดจากแบ็กเอนด์ระยะไกลที่นักพัฒนาแอปดำเนินการ (หากมี)
- "getLocalData" - ข้อมูลคีย์-ค่าที่เปลี่ยนแปลงได้ซึ่งนักพัฒนาซอฟต์แวร์จัดเก็บไว้ในเครื่อง หากมี
- "UserData" - ข้อมูลผู้ใช้ที่แพลตฟอร์มระบุ
- 'getLogReader' - แสดงผล DAO สำหรับตาราง REQUESTS และ EVENTS
ตัวอย่าง
@Override public void onTrainingExample(
            @NonNull TrainingExampleInput input,
            @NonNull Consumer<TrainingExampleOutput> consumer) {
    // Check if the incoming training task is the task we want.
    if (input.getPopulationName() == "my_new_population") {
        TrainingExampleOutput result = new TrainingExampleOutput.Builder():
        RequestLogRecord record = this.getLogReader().getRequestLogRecord(1);
        int count = 1;
        // Iterate logging event table.
        for (ContentValues contentValues: record.rows()) {
            Features features = Features.newBuilder()
                // Retrieve carrier from user info.
                .putFeature("carrier", buildFeature(mUserData.getCarrier()))
                // Retrieve features from logging info.
                .putFeature("int_feature_1",
                    buildFeature(contentValues.get("int_feature_1")
            result.addTrainingExample(
                    Example.newBuilder()
                        .setFeatures(features).build().toByteArray())
                .addResumptionToken(
                    String.format("token%d", count).getBytes()))
                .build();
            count++;
        }
        consumer.accept(result.build());
    }
}
ขั้นตอนที่ 7 กำหนดเวลางานการฝึกที่เกิดซ้ำ
การปรับเปลี่ยนในแบบของคุณบนอุปกรณ์มี FederatedComputeScheduler สำหรับนักพัฒนาแอปในการกำหนดเวลาหรือยกเลิกงานการประมวลผลแบบรวม คุณมีตัวเลือกต่างๆ ในการเรียกใช้ผ่าน IsolatedWorker ไม่ว่าจะตามกำหนดเวลาหรือเมื่อการดาวน์โหลดแบบไม่พร้อมกันเสร็จสมบูรณ์ ดูตัวอย่างของทั้ง 2 อย่างได้ที่ด้านล่าง
ตัวเลือกตามกำหนดการ โทรหา
FederatedComputeScheduler#scheduleในIsolatedWorker#onExecute@Override public void onExecute( @NonNull ExecuteInput input, @NonNull Consumer<ExecuteOutput> consumer ) { if (input != null && input.getAppParams() != null && input.getAppParams().getString("schedule_training") != null) { if (input.getAppParams().getString("schedule_training").isEmpty()) { consumer.accept(null); return; } TrainingInterval interval = new TrainingInterval.Builder() .setMinimumInterval(Duration.ofSeconds(10)) .setSchedulingMode(2) .build(); FederatedComputeScheduler.Params params = new FederatedComputeScheduler .Params(interval); FederatedComputeInput fcInput = new FederatedComputeInput.Builder() .setPopulationName( input.getAppParams().getString("schedule_training")).build(); mFCScheduler.schedule(params, fcInput); ExecuteOutput result = new ExecuteOutput.Builder().build(); consumer.accept(result); } }ตัวเลือกการดาวน์โหลดเสร็จสมบูรณ์ โทรหา
FederatedComputeScheduler#scheduleในIsolatedWorker#onDownloadCompletedหากการกำหนดเวลางานการฝึกขึ้นอยู่กับข้อมูลหรือกระบวนการแบบอะซิงโครนัส
การตรวจสอบความถูกต้อง
ขั้นตอนต่อไปนี้จะอธิบายวิธีตรวจสอบว่างานการเรียนรู้แบบสหพันธ์ทำงานอย่างถูกต้องหรือไม่
ขั้นตอนที่ 8 ตรวจสอบว่างาน Federated Learning ทำงานอย่างถูกต้องหรือไม่
ระบบจะสร้างจุดตรวจสอบโมเดลใหม่และไฟล์เมตริกใหม่ในแต่ละรอบของการรวมฝั่งเซิร์ฟเวอร์
เมตริกอยู่ในไฟล์คู่คีย์-ค่าที่จัดรูปแบบ JSON ระบบจะสร้างไฟล์จากรายการ Metrics ที่คุณกำหนดในขั้นตอนที่ 3 ตัวอย่างไฟล์ JSON ของเมตริกที่เป็นตัวแทนมีดังนี้
{"server/client_work/train/binary_accuracy":0.5384615659713745, "server/client_work/train/binary_crossentropy":0.694046676158905, "server/client_work/train/recall":0.20000000298023224, "server/client_work/train/precision":0.3333333432674408, "server/client_work/train/auc-roc":0.3500000238418579, "server/client_work/train/auc-pr":0.44386863708496094, "server/finalizer/update_non_finite":0.0}
คุณใช้สคริปต์ที่คล้ายกับสคริปต์ต่อไปนี้เพื่อรับเมตริกของโมเดลและตรวจสอบประสิทธิภาพการฝึกได้
import collections
import json
import matplotlib.pyplot as plt
from google.cloud import storage

# The population_name you set in fcp_server_config.json in Step 3.
POPULATION_NAME = 'my_new_population'
# The Google Cloud storage you set in Step 1.
GCS_BUCKET_NAME = 'fcp-gcs'
NUM_TRAINING_ROUND = 1000

storage_client = storage.Client()
bucket = storage_client.bucket(GCS_BUCKET_NAME)

metrics = collections.defaultdict(list)
for i in range(NUM_TRAINING_ROUND):
    blob = bucket.blob('{}/{}/1/{}/s/0/metrics'.format(GCS_BUCKET_NAME, POPULATION_NAME, i+1))
    with blob.open("r") as f:
                     metric = json.loads(f.read())
                    for metric_name in metric.keys():
                             metrics[metric_name].append(metric[metric_name])

for metric_name in metrics:
         print(metric_name)
         plt.plot(metrics[metric_name])
         plt.show()
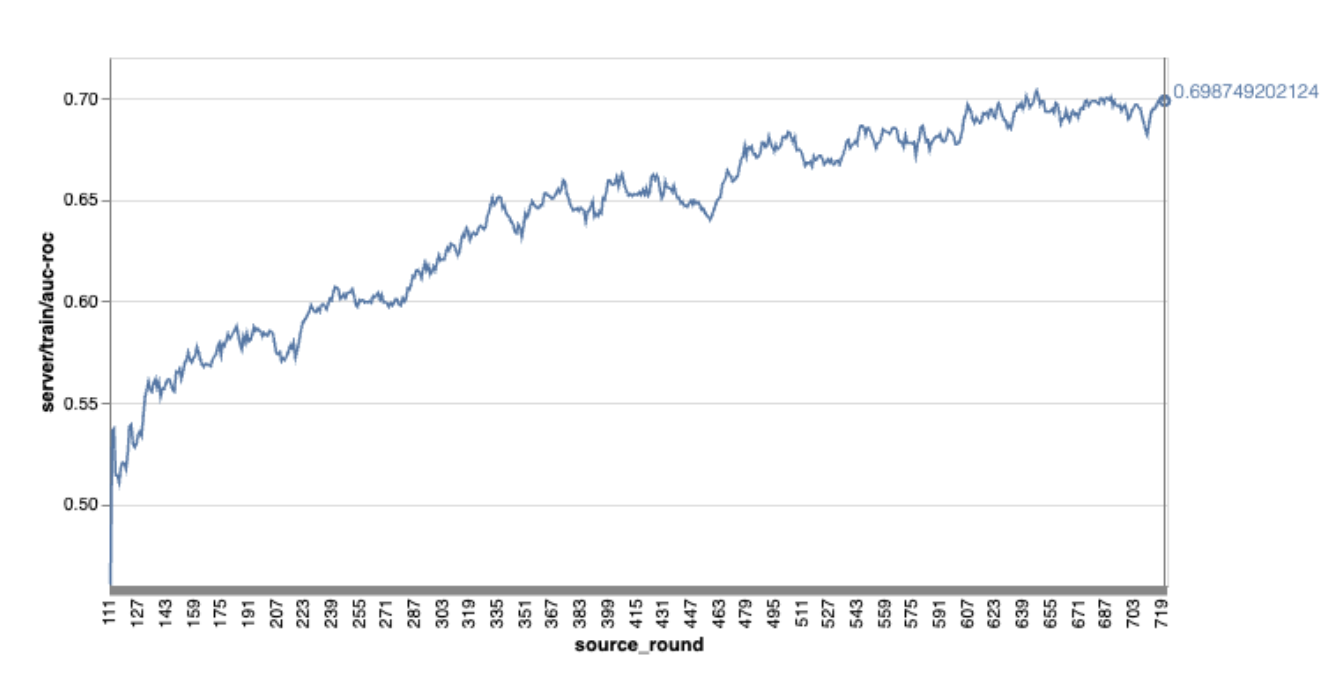
โปรดทราบว่าในกราฟตัวอย่างก่อนหน้า
- แกน X คือจำนวนการฝึกแบบวนรอบ
- แกน y คือค่าของ AUC-ROC ของแต่ละรอบ
การฝึกโมเดลการแยกประเภทรูปภาพในการปรับเปลี่ยนในอุปกรณ์ให้เป็นแบบเฉพาะบุคคล
ในบทแนะนำนี้ เราจะใช้ชุดข้อมูล EMNIST เพื่อสาธิตวิธีเรียกใช้งานการเรียนรู้แบบรวมศูนย์ใน ODP
ขั้นตอนที่ 1 สร้าง tff.learning.models.FunctionalModel
def get_image_classification_input_spec():
  return (
      tf.TensorSpec([None, 28, 28, 1], tf.float32),
      tf.TensorSpec([None, 1], tf.int64),
  )

def create_and_save_image_classification_functional_model(
    model_path: str,
) -> None:
  keras_model =  emnist_models.create_original_fedavg_cnn_model(
      only_digits=True
  )
  functional_model = tff.learning.models.functional_model_from_keras(
      keras_model=keras_model,
      input_spec=get_image_classification_input_spec(),
      loss_fn=tf.keras.losses.SparseCategoricalCrossentropy(),
  )
  tff.learning.models.save_functional_model(functional_model, model_path)
- ดูรายละเอียดโมเดล Keras ของ EMNIST ได้ใน emnist_models
- TfLite ยังไม่รองรับ tf.sparse.SparseTensor หรือ tf.RaggedTensor พยายามใช้ tf.Tensor ให้ได้มากที่สุดเมื่อสร้างโมเดล
- เครื่องมือสร้างงาน ODP จะเขียนทับเมตริกทั้งหมดเมื่อสร้างกระบวนการเรียนรู้ จึงไม่จำเป็นต้องระบุเมตริกใดๆ เราจะอธิบายหัวข้อนี้เพิ่มเติมในขั้นตอนที่ 2 สร้างการกำหนดค่าเครื่องมือสร้างงาน
ระบบรองรับอินพุตโมเดล 2 ประเภท ได้แก่
ประเภทที่ 1 A tuple(features_tensor, label_tensor)
- เมื่อสร้างโมเดล input_spec จะมีลักษณะดังนี้
def get_input_spec(): return ( tf.TensorSpec([None, 28, 28, 1], tf.float32), tf.TensorSpec([None, 1], tf.int64), )- จับคู่รายการก่อนหน้ากับการติดตั้งใช้งาน ODP Public API IsolatedWorker#onTrainingExamples ต่อไปนี้เพื่อสร้างข้อมูลการฝึกบนอุปกรณ์
return tf.train.Example(
    features=tf.train.Features(
        feature={
            'x': tf.train.Feature(
                float_list=tf.train.FloatList(value=[1.0] * 784)
            ),
            'y': tf.train.Feature(
                int64_list=tf.train.Int64List(
                    value=[1]
                )
            ),
        }
    )
).SerializeToString()
ประเภท 2 A
Tuple(Dict[feature_name, feature_tensor], label_tensor)- เมื่อสร้างโมเดล input_spec จะมีลักษณะดังนี้
def get_input_spec() -> ( Tuple[collections.OrderedDict[str, tf.TensorSpec], tf.TensorSpec] ): return ( collections.OrderedDict( [('feature-1', tf.TensorSpec([None, 1], tf.float32)), ('feature-2', tf.TensorSpec([None, 1], tf.float32))] ), tf.TensorSpec([None, 1], tf.int64), )- จับคู่รายการก่อนหน้ากับการติดตั้งใช้งาน ODP Public API IsolatedWorker#onTrainingExamples ต่อไปนี้เพื่อสร้างข้อมูลการฝึก
return tf.train.Example( features=tf.train.Features( feature={ 'feature-1': tf.train.Feature( float_list=tf.train.FloatList(value=[1.0]) ), 'feature-2': tf.train.Feature( float_list=tf.train.FloatList(value=[2.0]) ), 'my_label': tf.train.Feature( int64_list=tf.train.Int64List( value=[1] ) ), } ) ).SerializeToString()- อย่าลืมลงทะเบียน label_name ในการกำหนดค่าเครื่องมือสร้างงาน
mode: TRAINING_AND_EVAL  # Task execution mode
population_name: "my_example_model"
label_name: "my_label"
ODP จะจัดการ DP โดยอัตโนมัติเมื่อสร้างกระบวนการเรียนรู้ จึงไม่จำเป็นต้องเพิ่มสัญญาณรบกวนเมื่อสร้างโมเดลที่ใช้งานได้
เอาต์พุตของโมเดลฟังก์ชันที่บันทึกนี้ควรมีลักษณะเหมือนตัวอย่างในที่เก็บ GitHub ของเรา
ขั้นตอนที่ 2 สร้างการกำหนดค่าเครื่องมือสร้างงาน
คุณดูตัวอย่างการกำหนดค่าเครื่องมือสร้างงานได้ในที่เก็บ GitHub ของเรา
เมตริกการฝึกและการประเมิน
เนื่องจากเมตริกอาจทำให้ข้อมูลผู้ใช้รั่วไหล ตัวสร้างงานจะมีรายการเมตริกที่กระบวนการเรียนรู้สามารถสร้างและเผยแพร่ได้ ดูรายการทั้งหมดได้ในที่เก็บ GitHub ของเรา
ต่อไปนี้คือตัวอย่างรายการเมตริกเมื่อสร้างการกำหนดค่าเครื่องมือสร้างงานใหม่
federated_learning {
  learning_process {
    metrics {
      name: "binary_accuracy"
    }
    metrics {
      name: "binary_crossentropy"
    }
    metrics {
      name: "recall"
    }
    metrics {
      name: "precision"
    }
    metrics {
      name: "auc-roc"
    }
    metrics {
      name: "auc-pr"
    }
  }
}
หากเมตริกที่คุณสนใจไม่อยู่ในรายการปัจจุบัน โปรดติดต่อเรา
การกำหนดค่า DP
การกำหนดค่าที่เกี่ยวข้องกับ DP ที่ต้องระบุมีดังนี้
policies { min_separation_policy { minimum_separation: 1 } model_release_policy { num_max_training_rounds: 1000 dp_target_epsilon: 10 dp_delta: 0.000001 } } differential_privacy { type: FIXED_GAUSSIAN clip_norm: 0.1 noise_multiplier: 0.1 }- ต้องมี
dp_target_epsilonหรือnoise_mulitipilerเพื่อให้ผ่านการตรวจสอบ: (noise_to_epsilonepislon_to_noise) - คุณดูการตั้งค่าเริ่มต้นเหล่านี้ได้ในที่เก็บ GitHub ของเรา
- ต้องมี
ขั้นตอนที่ 3 อัปโหลดโมเดลที่บันทึกไว้และการกำหนดค่าเครื่องมือสร้างงานไปยังพื้นที่เก็บข้อมูลระบบคลาวด์ของนักพัฒนาแอป
อย่าลืมอัปเดตฟิลด์ artifact_building เมื่ออัปโหลดการกำหนดค่าเครื่องมือสร้างงาน
ขั้นตอนที่ 4 (ไม่บังคับ) ทดสอบการสร้างอาร์ติแฟกต์โดยไม่ต้องสร้างงานใหม่
cd ${odp_fcp_github_repo}/python
bazel run //python/taskbuilder:task_builder_client -- --saved_model=${path_of_cloud_storage}/mnist_model/ --task_config=${path_of_cloud_storage}/mnist_cnn_task_config_build_artifact_only.pbtxt --build_artifact_only=true --task_builder_server=${task_builder_server_endpoint}
โมเดลตัวอย่างได้รับการตรวจสอบผ่านทั้งการตรวจสอบ flex ops และการตรวจสอบ dp คุณสามารถเพิ่ม skip_flex_ops_check และ skip_dp_check เพื่อข้ามระหว่างการตรวจสอบได้ (โมเดลนี้ไม่สามารถนําไปใช้กับไคลเอ็นต์ ODP เวอร์ชันปัจจุบันได้เนื่องจากไม่มี flex ops บางรายการ)
cd ${odp_fcp_github_repo}/python
bazel run //python/taskbuilder:task_builder_client -- --saved_model=${path_of_cloud_storage}/mnist_model/ --task_config=${path_of_cloud_storage}/mnist_cnn_task_config_build_artifact_only.pbtxt --build_artifact_only=true --task_builder_server=${task_builder_server_endpoint} --skip_flex_ops_check=True --skip_dp_check=True
flex_ops_check: ไลบรารีตัวดำเนินการในตัวของ TensorFlow Lite รองรับตัวดำเนินการ TensorFlow จำนวนจำกัดเท่านั้น (ความเข้ากันได้ของตัวดำเนินการ TensorFlow Lite และ TensorFlow) ต้องติดตั้งการดำเนินการ TensorFlow ที่เข้ากันไม่ได้ทั้งหมดโดยใช้ Flex Delegate (Android.bp) หากโมเดลมี Op ที่ไม่รองรับ โปรดติดต่อเราเพื่อลงทะเบียน Op ดังกล่าว
Cannot build the ClientOnlyPlan: Please contact Google to register these ops: {...}วิธีที่ดีที่สุดในการแก้ไขข้อบกพร่องของเครื่องมือสร้างงานคือการเริ่มต้นเครื่องมือนี้ในเครื่อง
# Starts a server at localhost:5000
bazel run //python/taskbuilder:task_builder
# Links to a server at localhost:5000 by removing task_builder_server flag
bazel run //python/taskbuilder:task_builder_client -- --saved_model=${path_of_cloud_storage}/mnist_model/ --task_config=${path_of_cloud_storage}/mnist_cnn_task_config_build_artifact_only.pbtxt --build_artifact_only=true --skip_flex_ops_check=True --skip_dp_check=True
คุณดูอาร์ติแฟกต์ที่ได้ได้ในที่เก็บข้อมูลระบบคลาวด์ที่ระบุในการกำหนดค่า โดยควรมีลักษณะคล้ายกับตัวอย่างในที่เก็บ GitHub
ขั้นตอนที่ 5 สร้างอาร์ติแฟกต์และสร้างคู่ใหม่ของงานการฝึกและงานการประเมินในเซิร์ฟเวอร์ FCP
นำbuild_artifact_only Flag ออก แล้วระบบจะอัปโหลดอาร์ติแฟกต์ที่สร้างขึ้นไปยังเซิร์ฟเวอร์ FCP คุณควรตรวจสอบว่าสร้างคู่ของงานการฝึกและงานประเมินเรียบร้อยแล้ว
cd ${odp_fcp_github_repo}/python
bazel run //python/taskbuilder:task_builder_client -- --saved_model=${path_of_cloud_storage}/mnist_model/ --task_config=${path_of_cloud_storage}/mnist_cnn_task_config.pbtxt --task_builder_server=${task_builder_server_endpoint}
ขั้นตอนที่ 6 เตรียมฝั่งไคลเอ็นต์ของ FCP ให้พร้อม
- ใช้ ODP Public API
IsolatedWorker#onTrainingExamplesเพื่อสร้างข้อมูลการฝึก - โทรหา
FederatedComputeScheduler#schedule - ดูตัวอย่างบางส่วนได้ในที่เก็บแหล่งที่มาของ Android
ขั้นตอนที่ 7 การตรวจสอบ
เมตริกเซิร์ฟเวอร์
ดูวิธีการตั้งค่าได้ในที่เก็บ GitHub ของเรา
- เมตริกโมเดล
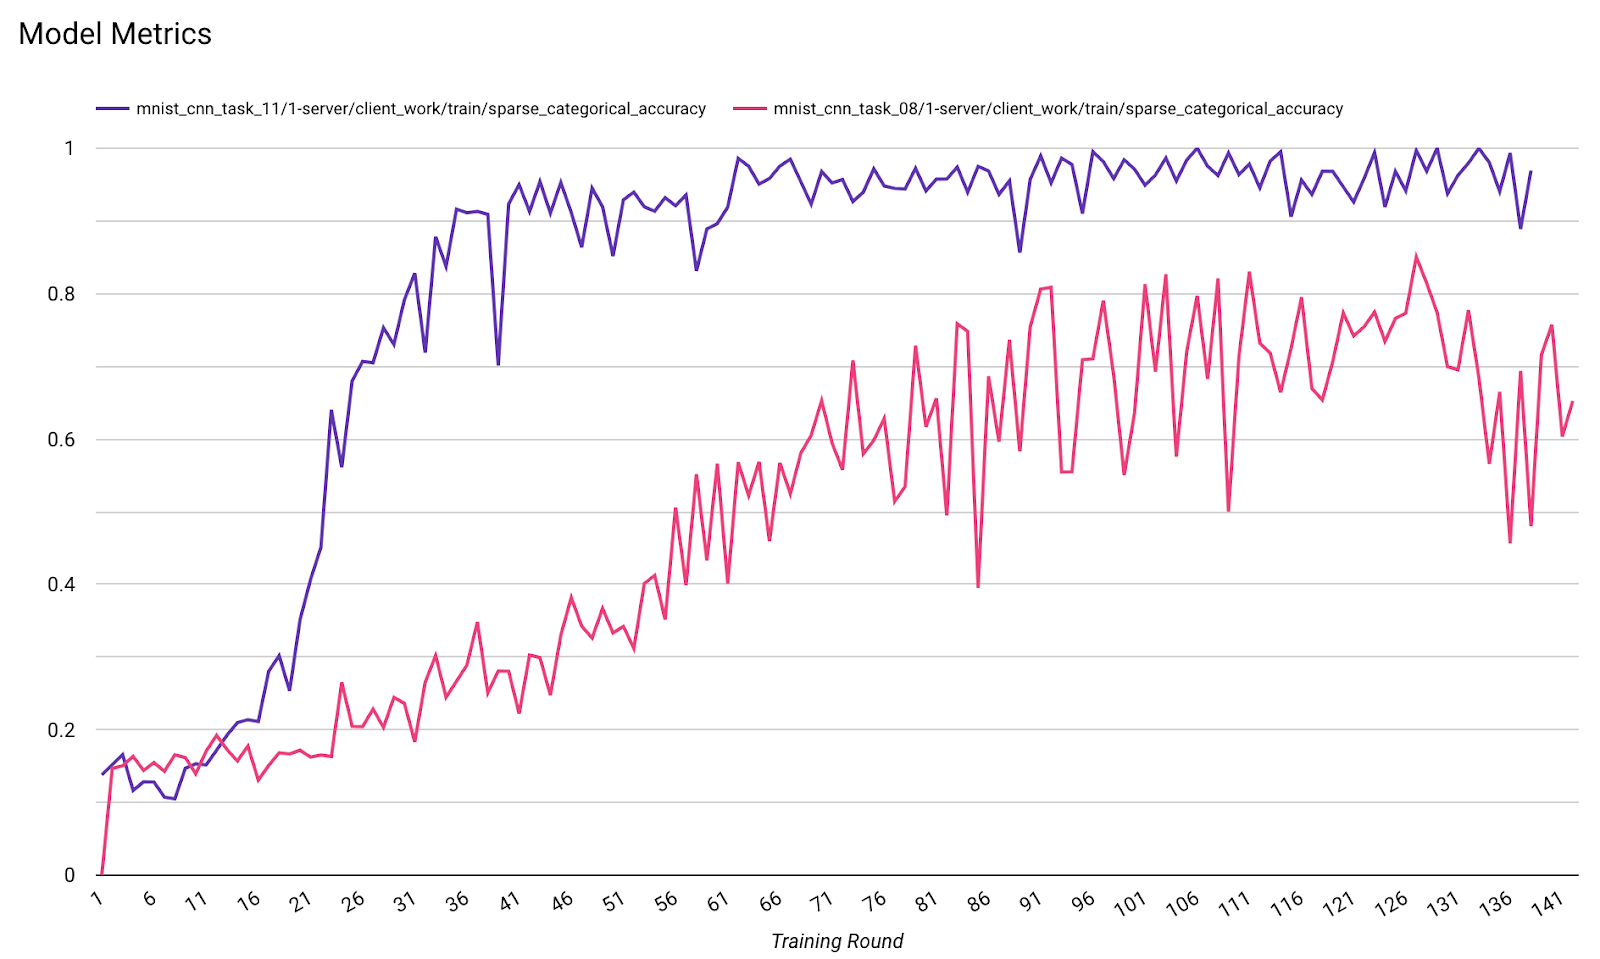
คุณเปรียบเทียบเมตริกจากการเรียกใช้ที่แตกต่างกันในไดอะแกรมเดียวได้ เช่น
- เส้นสีม่วงมีค่า
noise_multiplier0.1 - เส้นสีชมพูคือ
noise_multipiler0.3