
本頁面說明如何使用 On-Device Personalization 提供的聯合學習 API,透過聯合平均學習程序和固定高斯雜訊訓練模型。
事前準備
開始前,請先在測試裝置上完成下列步驟:
確認已安裝 OnDevicePersonalization 模組。這項模組已於 2024 年 4 月透過自動更新推出。
# List the modules installed on the device
adb shell pm list packages --apex-only --show-versioncode
確認下列模組列於其中,且版本代碼為 341717000 以上:
package:com.google.android.ondevicepersonalization versionCode:341717000如果未列出該模組,請依序前往「設定」>「安全性和隱私權」>「更新」>「Google Play 系統更新」,確保裝置使用的是最新版本。視需要選取「Update」。
啟用所有與聯合學習相關的新功能。
# Enable On-Device Personalization apk.
adb shell device_config put on_device_personalization global_kill_switch false
# Enable On-Device Personalization APIs.
adb shell device_config put on_device_personalization enable_ondevicepersonalization_apis true
# Enable On-Device Personalization overriding.
adb shell device_config put on_device_personalization enable_personalization_status_override true
adb shell device_config put on_device_personalization personalization_status_override_value true
# Enable Federated Compute apk.
adb shell device_config put on_device_personalization federated_compute_kill_switch false
建立聯合學習工作

下方的八個步驟會詳細說明圖表中的數字。
設定 Federated Compute Server
聯合學習是地圖縮減作業,會在聯合運算伺服器 (縮減器) 和一組用戶端 (對應器) 上執行。聯合運算伺服器會維護每項聯合學習工作的執行中繼資料和模型資訊。大致來說:
- 聯合學習開發人員會建立新工作,並將工作執行中繼資料和模型資訊上傳至伺服器。
- 當聯邦運算用戶端向伺服器發出新的工作指派要求時,伺服器會檢查工作是否符合資格,並傳回符合資格的工作資訊。
- 當聯邦運算用戶端完成本機計算後,就會將這些計算結果傳送至伺服器。接著,伺服器會對這些運算結果執行匯總和加入雜訊作業,並將結果套用至最終模型。
如要進一步瞭解這些概念,請參閱:
ODP 使用強化版聯合學習技術,先將經過校正 (集中式) 的雜訊套用至匯總資料,再套用至模型。雜訊的規模可確保匯總資料保留差異化隱私。
步驟 1:建立聯合運算伺服器
請按照 Federated Compute 專案中的操作說明,設定自己的 Federated Compute 伺服器。
步驟 2:準備 Saved FunctionalModel
準備已儲存的 'FunctionalModel' 檔案。您可以使用 'functional_model_from_keras' 將 'Model' 轉換為 'FunctionalModel',並使用 'save_functional_model' 將這個 'FunctionalModel' 序列化為 'SavedModel'。
functional_model = tff.learning.models.functional_model_from_keras(keras_model=model)
tff.learning.models.save_functional_model(functional_model, saved_model_path)
步驟 3:建立聯合運算伺服器設定
準備fcp_server_config.json,包括政策、聯合學習設定和差異化隱私設定。範例:
  # Identifies the set of client devices that will participate.
  population_name: "my_new_population"
  # Options you can choose:
  # * TRAINING_ONLY: Only one training task will be generated under this
  #                  population.
  # * TRAINING_AND_EVAL: One training task and one evaluation task will be
  #                      generated under this population.
  # * EVAL_ONLY: Only one evaluation task will be generated under this
  #              population.
  mode: TRAINING_AND_EVAL
  policies {
    # Policy for sampling on-device examples. It is checked every time a
    # device attempts to start a new training.
    min_separation_policy {
      # The minimum number of rounds before the same client participated.
      minimum_separation: 3
    }
    # Policy for releasing training results to developers. It is checked
    # when uploading a new task to the Federated Compute Server.
    model_release_policy {
      # Server stops training when number of training rounds reaches this
      # number.
      num_max_training_rounds: 1000
    }
  }
  # Federated learning setups. They are applied inside Task Builder.
  federated_learning {
    learning_process {
      # Use FED_AVG to build federated learning process. Options you can
      # choose:
      # * FED_AVG: Federated Averaging algorithm
      #            (https://arxiv.org/abs/2003.00295)
      # * FED_SDG: Federated SGD algorithm
      #            (https://arxiv.org/abs/1602.05629)
      type: FED_AVG
      # Optimizer used at client side training. Options you can choose:
      # * ADAM
      # * SGD
      client_optimizer: SGD
      # Learning rate used at client side training.
      client_learning_rate: 0.01
      # Optimizer used at server side training. Options you can choose:
      # * ADAM
      # * SGD
      server_optimizer: ADAM
      # Learning rate used at server side training.
      sever_learning_rate: 1
      runtime_config {
        # Number of participating devices for each round of training.
        report_goal: 2000
      }
      # List of metrics to be evaluated by the model during training and
      # evaluation. Federated Compute Server provides a list of allowed
      # metrics.
      metrics {
        name: "auc-roc"
      }
      metrics {
        name: "binary_accuracy"
      }
    }
    # Whether or not to generate a corresponding evaluation task under the same
    # population. If this field isn't set, only one training task is
    # generated under this population.
    evaluation {
      # The task id under the same population of the source training task that
      # this evaluation task evaluates.
      source_training_task_id: 1
      # Decides how checkpoints from the training task are chosen for
      # evaluation.
      # * every_k_round: the evaluation task randomly picks one checkpoint
      #                  from the past k rounds of training task checkpoints.
      # * every_k_hour: the evaluation task randomly picks one checkpoint
      #                 from the past k hours of training task checkpoints.
      checkpoint_selector: "every_1_round"
      # The traffic of this evaluation task in this population.
      evaluation_traffic: 0.1
      # Number of participating devices for each round of evaluation.
      report_goal: 200
    }
  }
  # Differential Privacy setups. They are applied inside the Task Builder.
  differential_privacy {
    # The DP aggregation algorithm you want to use. Options you can choose:
    # * FIXED_GAUSSIAN: Federated Learning DP-SGD with fixed clipping norm
    #                   described in "Learning Differentially Private Recurrent
    #                   Language Models" (https://arxiv.org/abs/1710.06963).
    # * ADAPTIVE_GAUSSIAN: Federated Learning DP-SGD with quantile-based clip
    #                      norm estimation described in "Differentially Private
    #                      Learning with Adaptive Clipping"
    #                      (https://arxiv.org/abs/1905.03871).
    # * TREE: DP-FTRL algorithm described in "Practical and Private (Deep)
    #         Learning without Sampling or Shuffling"
    #         (https://arxiv.org/abs/2103.00039).
    # * ADADPTIVE_TREE: DP-FTRL with adaptive clipping norm descirbed in
    #                  "Differentially Private Learning with Adaptive Clipping"
    #                  (https://arxiv.org/abs/1905.03871).
    type: FIXED_GAUSSIAN
    # Noise multiplier for the Gaussian noise.
    noise_multiplier: 0.1
    #   The value of the clipping norm.
    clip_norm: 0.1
  }
步驟 4:將 zip 設定提交至聯合運算伺服器。
將 ZIP 檔案和 fcp_server_config.json 提交至聯合運算伺服器。
task_builder_client --task_builder_server='http://{federated_compute_server_endpoint}' --saved_model='saved_model' --task_config='fcp_server_config.json'
聯合運算伺服器端點是您在步驟 1 中設定的伺服器。
LiteRT 內建運算子程式庫僅支援少數 TensorFlow 運算子 (選取 TensorFlow 運算子)。OnDevicePersonalization 模組的不同版本可能支援不同的運算符集。為確保相容性,系統會在建立工作時,在工作建構工具中進行運算子驗證程序。
支援的最低 OnDevicePersonalization 模組版本會納入工作的中繼資料。這項資訊會顯示在工作建立工具的資訊訊息中。
I1023 22:16:53.058027 139653371516736 task_builder_client.py:109] Success! Tasks are built, and artifacts are uploaded to the cloud.
I1023 22:16:53.058399 139653371516736 task_builder_client.py:112] applied_algorithms {
  learning_algo: FED_AVG
  client_optimizer: SGD
  server_optimizer: SGD
  dp_aggregator: FIXED_GAUSSIAN
}
metric_results {
  accepted_metrics: "binary_accuracy, binary_crossentropy, recall, precision, auc-roc, auc-pr"
}
dp_hyperparameters {
  dp_delta: 0.000001
  dp_epsilon: 6.4
  noise_multiplier: 1.0
  dp_clip_norm: 1.0
  num_training_rounds: 10000
}

I1023 22:16:53.058594 139653371516736 task_builder_client.py:113] training_task {
  min_client_version: "341912000"
}
eval_task {
  min_client_version: "341812000"
}
聯合運算伺服器會將這項工作指派給所有搭載 OnDevicePersonalization 模組的裝置,且模組版本必須高於 341812000。
如果模型包含任何 OnDevicePersonalization 模組不支援的運算,系統會在建立工作時產生錯誤訊息。
common.TaskBuilderException: Cannot build the ClientOnlyPlan: Please contact Google to register these ops: {'L2Loss': 'L2LossOp<CPUDevice, float>'}
. Stop building remaining artifacts.
如需支援的彈性作業詳細清單,請前往 GitHub。
建立 Android 聯邦運算 APK
如要建立 Android 聯合運算 APK,您需要在 AndroidManifest.xml 中指定聯合運算伺服器網址端點,聯合運算用戶端會連線至該端點。
步驟 5:指定聯合運算伺服器網址端點
在 AndroidManifest.xml 中指定 Federated Compute Server 網址端點 (您在步驟 1 中設定),Federated Compute Client 會連線至該端點。
<!-- Contents of AndroidManifest.xml -->
<manifest xmlns:android="http://schemas.android.com/apk/res/android"
          package="com.example.odpsample" >
    <application android:label="OdpSample">
        <!-- XML resource that contains other ODP settings. -->
        <property android:name="android.ondevicepersonalization.ON_DEVICE_PERSONALIZATION_CONFIG"
                  android:resource="@xml/OdpSettings"></property>
        <!-- The service that ODP will bind to. -->
        <service android:name="com.example.odpsample.SampleService"
                android:exported="true" android:isolatedProcess="true" />
    </application>
</manifest>
<property> 標記中指定的 XML 資源檔案也必須在 <service> 標記中宣告服務類別,並指定聯邦運算用戶端要連線的聯邦運算伺服器網址端點:
<!-- Contents of res/xml/OdpSettings.xml -->
<on-device-personalization>
   <!-- Name of the service subclass -->
   <service name="com.example.odpsample.SampleService">
     <!-- If you want to use federated compute feature to train a model,
          specify this tag. -->
     <federated-compute-settings url="https://fcpserver.com/" />
   </service>
</on-device-personalization>
步驟 6:實作 IsolatedWorker#onTrainingExample API
實作裝置端個人化公開 API IsolatedWorker#onTrainingExample,產生訓練資料。
在 IsolatedProcess 中執行的程式碼無法直接存取網路、本機磁碟或裝置上執行的其他服務,但可以使用下列 API:
- 「getRemoteData」:從遠端下載的不可變更鍵/值資料 (如適用),由開發人員操作後端。
- 「getLocalData」:開發人員在本機保存的可變動鍵/值資料 (如適用)。
- 「UserData」:平台提供的使用者資料。
- 'getLogReader' - Returns a DAO for the REQUESTS and EVENTS tables.
範例:
@Override public void onTrainingExample(
            @NonNull TrainingExampleInput input,
            @NonNull Consumer<TrainingExampleOutput> consumer) {
    // Check if the incoming training task is the task we want.
    if (input.getPopulationName() == "my_new_population") {
        TrainingExampleOutput result = new TrainingExampleOutput.Builder():
        RequestLogRecord record = this.getLogReader().getRequestLogRecord(1);
        int count = 1;
        // Iterate logging event table.
        for (ContentValues contentValues: record.rows()) {
            Features features = Features.newBuilder()
                // Retrieve carrier from user info.
                .putFeature("carrier", buildFeature(mUserData.getCarrier()))
                // Retrieve features from logging info.
                .putFeature("int_feature_1",
                    buildFeature(contentValues.get("int_feature_1")
            result.addTrainingExample(
                    Example.newBuilder()
                        .setFeatures(features).build().toByteArray())
                .addResumptionToken(
                    String.format("token%d", count).getBytes()))
                .build();
            count++;
        }
        consumer.accept(result.build());
    }
}
步驟 7:排定週期性訓練工作。
開發人員可透過裝置端個人化功能提供的 FederatedComputeScheduler,排定或取消聯合運算工作。您可以透過 IsolatedWorker 呼叫此函式,無論是排定時間或非同步下載完成時都可以。以下是這兩種做法的範例。
依據時間表。致電位於
IsolatedWorker#onExecute的「FederatedComputeScheduler#schedule」。@Override public void onExecute( @NonNull ExecuteInput input, @NonNull Consumer<ExecuteOutput> consumer ) { if (input != null && input.getAppParams() != null && input.getAppParams().getString("schedule_training") != null) { if (input.getAppParams().getString("schedule_training").isEmpty()) { consumer.accept(null); return; } TrainingInterval interval = new TrainingInterval.Builder() .setMinimumInterval(Duration.ofSeconds(10)) .setSchedulingMode(2) .build(); FederatedComputeScheduler.Params params = new FederatedComputeScheduler .Params(interval); FederatedComputeInput fcInput = new FederatedComputeInput.Builder() .setPopulationName( input.getAppParams().getString("schedule_training")).build(); mFCScheduler.schedule(params, fcInput); ExecuteOutput result = new ExecuteOutput.Builder().build(); consumer.accept(result); } }下載完成選項。如果排定訓練工作時需要任何非同步資料或程序,請在
IsolatedWorker#onDownloadCompleted中呼叫FederatedComputeScheduler#schedule。
驗證
下列步驟說明如何驗證聯邦學習工作是否正常運作。
步驟 8:確認聯邦學習工作是否正常運作。
在每一輪伺服器端彙整作業中,系統都會產生新的模型檢查點和新的指標檔案。
指標會以 JSON 格式的鍵/值組合檔案呈現。檔案是由您在步驟 3 中定義的 Metrics 清單產生。代表性指標的 JSON 檔案範例如下:
{"server/client_work/train/binary_accuracy":0.5384615659713745, "server/client_work/train/binary_crossentropy":0.694046676158905, "server/client_work/train/recall":0.20000000298023224, "server/client_work/train/precision":0.3333333432674408, "server/client_work/train/auc-roc":0.3500000238418579, "server/client_work/train/auc-pr":0.44386863708496094, "server/finalizer/update_non_finite":0.0}
您可以使用類似下列指令碼的內容,取得模型指標並監控訓練成效:
import collections
import json
import matplotlib.pyplot as plt
from google.cloud import storage

# The population_name you set in fcp_server_config.json in Step 3.
POPULATION_NAME = 'my_new_population'
# The Google Cloud storage you set in Step 1.
GCS_BUCKET_NAME = 'fcp-gcs'
NUM_TRAINING_ROUND = 1000

storage_client = storage.Client()
bucket = storage_client.bucket(GCS_BUCKET_NAME)

metrics = collections.defaultdict(list)
for i in range(NUM_TRAINING_ROUND):
    blob = bucket.blob('{}/{}/1/{}/s/0/metrics'.format(GCS_BUCKET_NAME, POPULATION_NAME, i+1))
    with blob.open("r") as f:
                     metric = json.loads(f.read())
                    for metric_name in metric.keys():
                             metrics[metric_name].append(metric[metric_name])

for metric_name in metrics:
         print(metric_name)
         plt.plot(metrics[metric_name])
         plt.show()
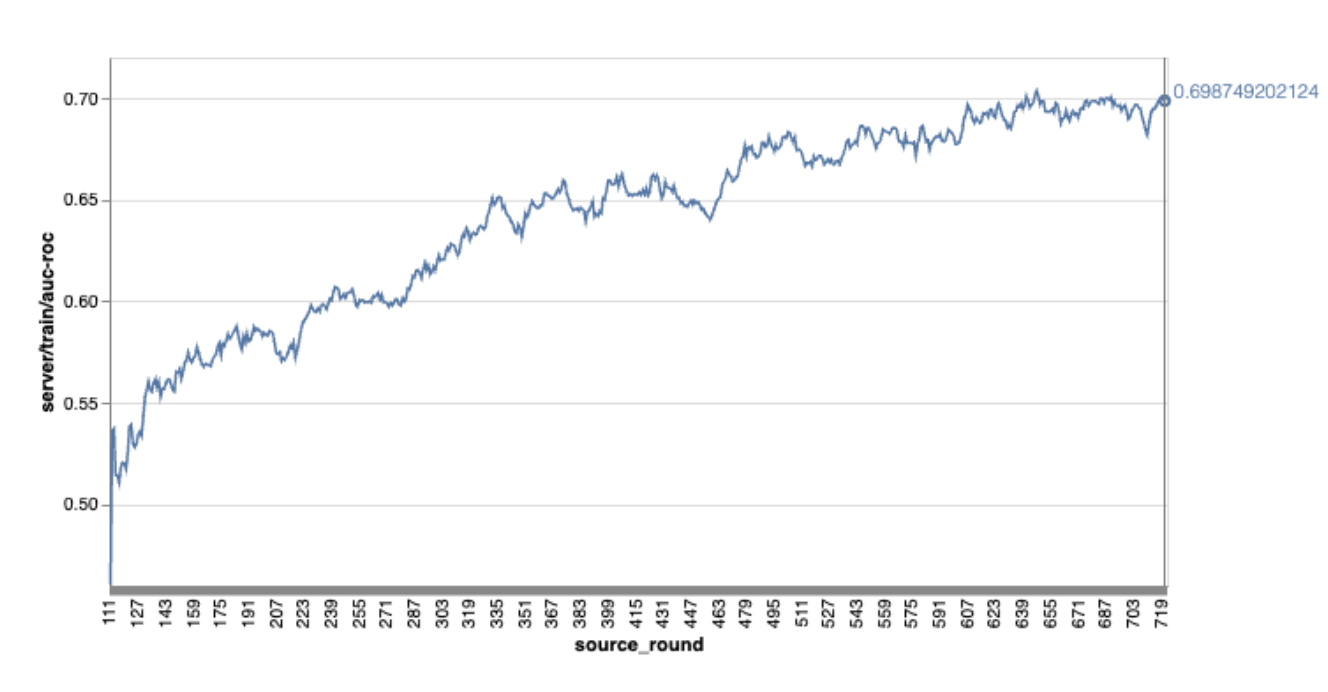
請注意,在上述範例圖表中:
- X 軸是訓練回合數。
- y 軸是每一輪的 AUC-ROC 值。
在裝置端個人化功能上訓練圖片分類模型
在本教學課程中,我們使用 EMNIST 資料集,示範如何在 ODP 上執行聯邦式學習工作。
步驟 1:建立 tff.learning.models.FunctionalModel
def get_image_classification_input_spec():
  return (
      tf.TensorSpec([None, 28, 28, 1], tf.float32),
      tf.TensorSpec([None, 1], tf.int64),
  )

def create_and_save_image_classification_functional_model(
    model_path: str,
) -> None:
  keras_model =  emnist_models.create_original_fedavg_cnn_model(
      only_digits=True
  )
  functional_model = tff.learning.models.functional_model_from_keras(
      keras_model=keras_model,
      input_spec=get_image_classification_input_spec(),
      loss_fn=tf.keras.losses.SparseCategoricalCrossentropy(),
  )
  tff.learning.models.save_functional_model(functional_model, model_path)
- 您可以在 emnist_models 中找到 emnist keras 模型詳細資料。
- TfLite 目前尚未良好支援 tf.sparse.SparseTensor 或 tf.RaggedTensor。建構模型時,請盡可能使用 tf.Tensor。
- ODP 工作建立工具會在建構學習程序時覆寫所有指標,因此不需要指定任何指標。我們會在步驟 2 中詳細說明這個主題。建立工作建構工具設定。
支援兩種模型輸入內容:
類型 1。元組(features_tensor, label_tensor)。
- 建立模型時,input_spec 看起來會像這樣:
def get_input_spec(): return ( tf.TensorSpec([None, 28, 28, 1], tf.float32), tf.TensorSpec([None, 1], tf.int64), )- 將上述內容與 ODP Public API IsolatedWorker#onTrainingExamples 的下列實作項目配對,即可在裝置上產生訓練資料:
return tf.train.Example(
    features=tf.train.Features(
        feature={
            'x': tf.train.Feature(
                float_list=tf.train.FloatList(value=[1.0] * 784)
            ),
            'y': tf.train.Feature(
                int64_list=tf.train.Int64List(
                    value=[1]
                )
            ),
        }
    )
).SerializeToString()
類型 2:A
Tuple(Dict[feature_name, feature_tensor], label_tensor)- 建立模型時,input_spec 看起來會像這樣:
def get_input_spec() -> ( Tuple[collections.OrderedDict[str, tf.TensorSpec], tf.TensorSpec] ): return ( collections.OrderedDict( [('feature-1', tf.TensorSpec([None, 1], tf.float32)), ('feature-2', tf.TensorSpec([None, 1], tf.float32))] ), tf.TensorSpec([None, 1], tf.int64), )- 將上述內容與 ODP 公開 API IsolatedWorker#onTrainingExamples 的下列實作項目配對,即可產生訓練資料:
return tf.train.Example( features=tf.train.Features( feature={ 'feature-1': tf.train.Feature( float_list=tf.train.FloatList(value=[1.0]) ), 'feature-2': tf.train.Feature( float_list=tf.train.FloatList(value=[2.0]) ), 'my_label': tf.train.Feature( int64_list=tf.train.Int64List( value=[1] ) ), } ) ).SerializeToString()- 別忘了在工作建構工具設定中註冊 label_name。
mode: TRAINING_AND_EVAL  # Task execution mode
population_name: "my_example_model"
label_name: "my_label"
建構學習程序時,ODP 會自動處理 DP。因此建立功能模型時,不需要新增任何雜訊。
儲存的功能模型輸出內容應與 GitHub 存放區中的範例類似。
步驟 2:建立工作建構工具設定
您可以在 GitHub 存放區中找到工作建構工具設定範例。
訓練和評估指標
由於指標可能會洩漏使用者資料,工作建立工具會列出學習程序可產生及發布的指標。如需完整清單,請前往 GitHub 存放區。
以下是建立新工作建構工具設定時的指標清單範例:
federated_learning {
  learning_process {
    metrics {
      name: "binary_accuracy"
    }
    metrics {
      name: "binary_crossentropy"
    }
    metrics {
      name: "recall"
    }
    metrics {
      name: "precision"
    }
    metrics {
      name: "auc-roc"
    }
    metrics {
      name: "auc-pr"
    }
  }
}
如果目前清單中沒有您感興趣的指標,請與我們聯絡。
DP 設定
您需要指定幾項與 DP 相關的設定:
policies { min_separation_policy { minimum_separation: 1 } model_release_policy { num_max_training_rounds: 1000 dp_target_epsilon: 10 dp_delta: 0.000001 } } differential_privacy { type: FIXED_GAUSSIAN clip_norm: 0.1 noise_multiplier: 0.1 }- 必須提供
dp_target_epsilon或noise_mulitipiler才能通過驗證:(noise_to_epsilonepislon_to_noise)。 - 您可以在 GitHub 存放區中找到這些預設設定。
- 必須提供
步驟 3:將儲存的模型和工作建立工具設定上傳到任何開發人員的雲端儲存空間
上傳工作建立工具設定時,請記得更新 artifact_building 欄位。
步驟 4:(選用) 測試構件建構作業,不必建立新工作
cd ${odp_fcp_github_repo}/python
bazel run //python/taskbuilder:task_builder_client -- --saved_model=${path_of_cloud_storage}/mnist_model/ --task_config=${path_of_cloud_storage}/mnist_cnn_task_config_build_artifact_only.pbtxt --build_artifact_only=true --task_builder_server=${task_builder_server_endpoint}
範例模型會透過彈性作業檢查和 dp 檢查進行驗證;您可以在驗證期間新增 skip_flex_ops_check 和 skip_dp_check 來略過驗證 (由於缺少幾個彈性作業,這個模型無法部署至目前版本的 ODP 用戶端)。
cd ${odp_fcp_github_repo}/python
bazel run //python/taskbuilder:task_builder_client -- --saved_model=${path_of_cloud_storage}/mnist_model/ --task_config=${path_of_cloud_storage}/mnist_cnn_task_config_build_artifact_only.pbtxt --build_artifact_only=true --task_builder_server=${task_builder_server_endpoint} --skip_flex_ops_check=True --skip_dp_check=True
flex_ops_check:TensorFlow Lite 內建運算子程式庫僅支援少數 TensorFlow 運算子 (TensorFlow Lite 和 TensorFlow 運算子相容性)。所有不相容的 TensorFlow 運算元都必須使用彈性委派 (Android.bp) 安裝。如果模型包含不支援的作業,請與我們聯絡以註冊作業:
Cannot build the ClientOnlyPlan: Please contact Google to register these ops: {...}偵錯工作建構工具的最佳方法,就是在本機啟動建構工具:
# Starts a server at localhost:5000
bazel run //python/taskbuilder:task_builder
# Links to a server at localhost:5000 by removing task_builder_server flag
bazel run //python/taskbuilder:task_builder_client -- --saved_model=${path_of_cloud_storage}/mnist_model/ --task_config=${path_of_cloud_storage}/mnist_cnn_task_config_build_artifact_only.pbtxt --build_artifact_only=true --skip_flex_ops_check=True --skip_dp_check=True
您可以在設定中指定的 Cloud Storage 找到產生的構件。應該會類似我們 GitHub 存放區中的範例。
步驟 5:建構構件,並在 FCP 伺服器上建立新的訓練和評估工作配對。
移除 build_artifact_only 旗標,建構的構件就會上傳至 FCP 伺服器。請確認訓練和評估工作是否已順利建立
cd ${odp_fcp_github_repo}/python
bazel run //python/taskbuilder:task_builder_client -- --saved_model=${path_of_cloud_storage}/mnist_model/ --task_config=${path_of_cloud_storage}/mnist_cnn_task_config.pbtxt --task_builder_server=${task_builder_server_endpoint}
步驟 6:準備好 FCP 用戶端
- 實作 ODP 公開 API
IsolatedWorker#onTrainingExamples,產生訓練資料。 - 呼叫
FederatedComputeScheduler#schedule。 - 您可以在 Android 來源存放區中找到幾個範例。
步驟 7:監控
- 模型指標
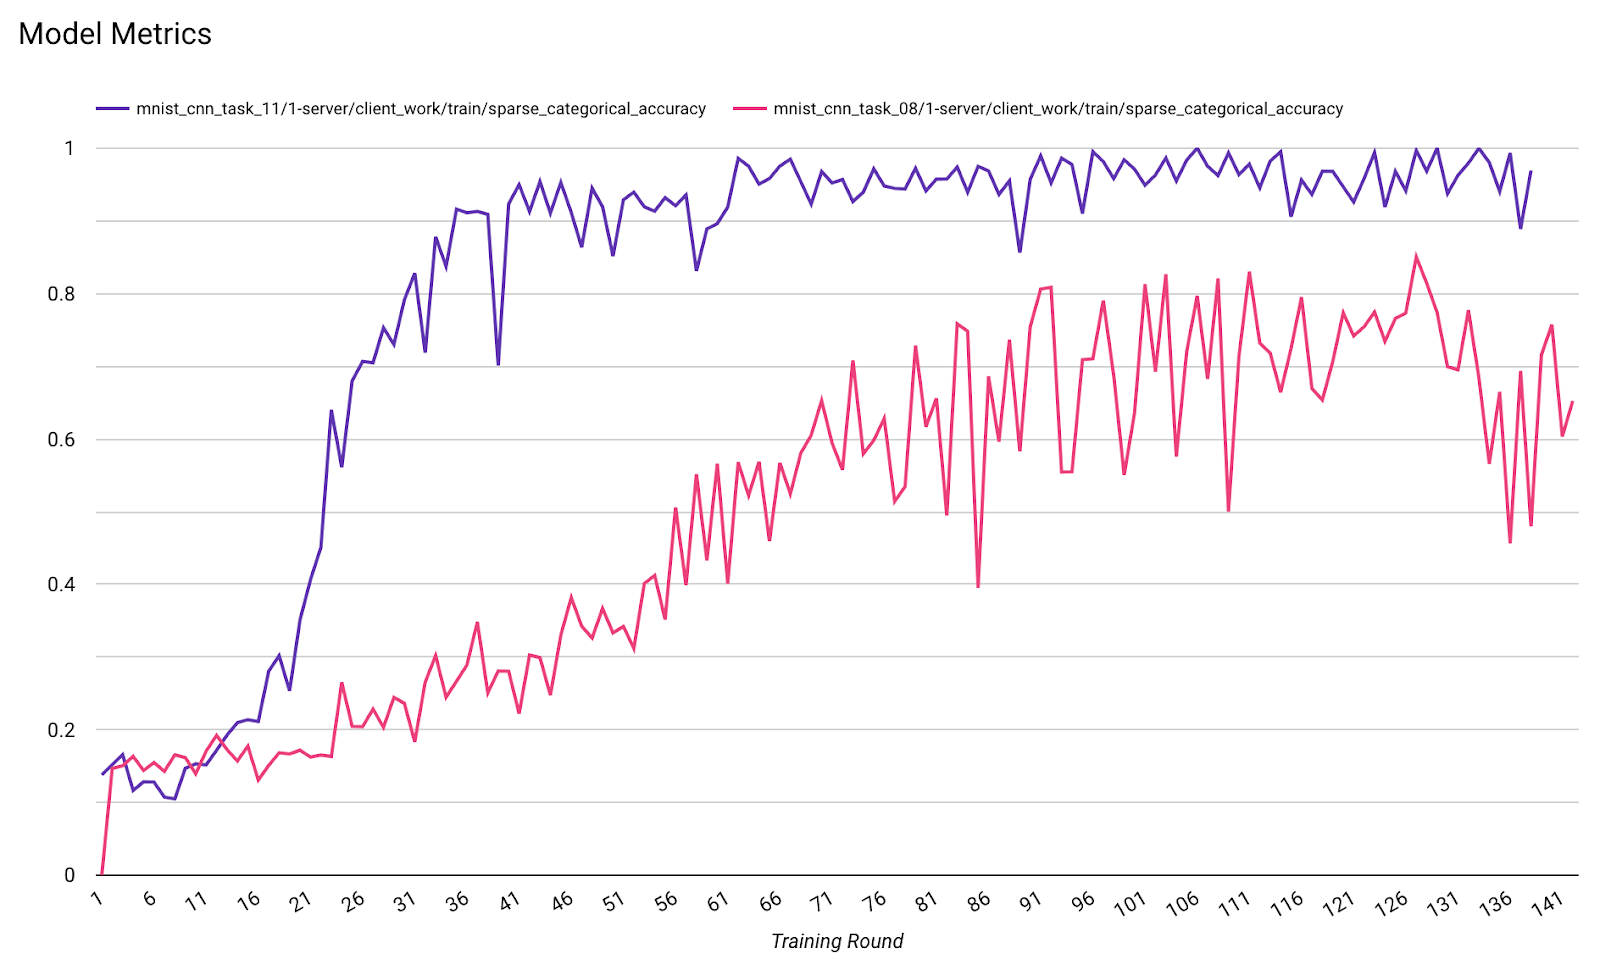
您可以在一個圖表中比較不同執行作業的指標。例如:
- 紫線的
noise_multiplier為 0.1 - 粉紅色線條為
noise_multipiler0.3