
Trang này mô tả cách sử dụng các API Học liên kết do tính năng Cá nhân hoá trên thiết bị cung cấp để huấn luyện một mô hình bằng quy trình học trung bình liên kết và nhiễu Gaussian cố định.
Trước khi bắt đầu
Trước khi bắt đầu, hãy hoàn tất các bước sau trên thiết bị thử nghiệm:
Đảm bảo bạn đã cài đặt mô-đun OnDevicePersonalization. Mô-đun này được cung cấp dưới dạng bản cập nhật tự động từ tháng 4 năm 2024.
# List the modules installed on the device
adb shell pm list packages --apex-only --show-versioncode
Đảm bảo mô-đun sau đây được liệt kê với mã phiên bản từ 341717000 trở lên:
package:com.google.android.ondevicepersonalization versionCode:341717000Nếu không thấy mô-đun đó, hãy chuyển đến phần Cài đặt > Bảo mật và quyền riêng tư > Bản cập nhật > Bản cập nhật hệ thống Google Play để đảm bảo thiết bị của bạn đang dùng phiên bản mới nhất. Chọn Cập nhật nếu cần.
Bật tất cả các tính năng mới liên quan đến Học liên kết.
# Enable On-Device Personalization apk.
adb shell device_config put on_device_personalization global_kill_switch false
# Enable On-Device Personalization APIs.
adb shell device_config put on_device_personalization enable_ondevicepersonalization_apis true
# Enable On-Device Personalization overriding.
adb shell device_config put on_device_personalization enable_personalization_status_override true
adb shell device_config put on_device_personalization personalization_status_override_value true
# Enable Federated Compute apk.
adb shell device_config put on_device_personalization federated_compute_kill_switch false
Tạo một nhiệm vụ Học liên kết

Các con số trong sơ đồ được giải thích chi tiết hơn trong 8 bước sau.
Định cấu hình Máy chủ điện toán liên kết
Học liên kết là một quy trình giảm tải dữ liệu chạy trên Máy chủ điện toán liên kết (trình giảm tải) và một nhóm ứng dụng khách (trình ánh xạ). Máy chủ Điện toán liên kết duy trì siêu dữ liệu đang chạy và thông tin mô hình của từng tác vụ Học liên kết. Nhìn chung:
- Nhà phát triển Học liên kết tạo một tác vụ mới và tải cả siêu dữ liệu chạy tác vụ cũng như thông tin mô hình lên máy chủ.
- Khi một ứng dụng Federated Compute khởi tạo một yêu cầu chỉ định tác vụ mới cho máy chủ, máy chủ sẽ kiểm tra tính đủ điều kiện của tác vụ và trả về thông tin tác vụ đủ điều kiện.
- Sau khi hoàn tất các phép tính cục bộ, ứng dụng Federated Compute sẽ gửi các kết quả tính toán này đến máy chủ. Sau đó, máy chủ sẽ thực hiện quy trình tổng hợp và làm nhiễu đối với những kết quả tính toán này, đồng thời áp dụng kết quả cho mô hình cuối cùng.
Để tìm hiểu thêm về những khái niệm này, hãy xem:
- Học liên kết: Học máy cộng tác mà không cần dữ liệu huấn luyện tập trung
- Hướng đến việc học liên kết ở quy mô lớn: Thiết kế hệ thống (SysML 2019)
ODP sử dụng phiên bản nâng cao của công nghệ Học liên kết, trong đó nhiễu được hiệu chỉnh (tập trung) sẽ được áp dụng cho các giá trị tổng hợp trước khi áp dụng cho mô hình. Quy mô của độ nhiễu đảm bảo rằng các giá trị tổng hợp duy trì sự riêng tư biệt lập.
Bước 1. Tạo một Máy chủ điện toán liên kết
Làm theo hướng dẫn trong dự án Điện toán liên kết để thiết lập Máy chủ điện toán liên kết của riêng bạn.
Bước 2. Chuẩn bị một FunctionalModel đã lưu
Chuẩn bị một tệp "FunctionalModel" đã lưu. Bạn có thể sử dụng 'functional_model_from_keras' để chuyển đổi một 'Model' thành 'FunctionalModel' và sử dụng 'save_functional_model' để chuyển đổi tuần tự 'FunctionalModel' này thành một 'SavedModel'.
functional_model = tff.learning.models.functional_model_from_keras(keras_model=model)
tff.learning.models.save_functional_model(functional_model, saved_model_path)
Bước 3. Tạo cấu hình Máy chủ điện toán liên kết
Chuẩn bị một fcp_server_config.json bao gồm các chính sách, chế độ thiết lập học liên kết và chế độ thiết lập quyền riêng tư vi phân. Ví dụ:
  # Identifies the set of client devices that will participate.
  population_name: "my_new_population"
  # Options you can choose:
  # * TRAINING_ONLY: Only one training task will be generated under this
  #                  population.
  # * TRAINING_AND_EVAL: One training task and one evaluation task will be
  #                      generated under this population.
  # * EVAL_ONLY: Only one evaluation task will be generated under this
  #              population.
  mode: TRAINING_AND_EVAL
  policies {
    # Policy for sampling on-device examples. It is checked every time a
    # device attempts to start a new training.
    min_separation_policy {
      # The minimum number of rounds before the same client participated.
      minimum_separation: 3
    }
    # Policy for releasing training results to developers. It is checked
    # when uploading a new task to the Federated Compute Server.
    model_release_policy {
      # Server stops training when number of training rounds reaches this
      # number.
      num_max_training_rounds: 1000
    }
  }
  # Federated learning setups. They are applied inside Task Builder.
  federated_learning {
    learning_process {
      # Use FED_AVG to build federated learning process. Options you can
      # choose:
      # * FED_AVG: Federated Averaging algorithm
      #            (https://arxiv.org/abs/2003.00295)
      # * FED_SDG: Federated SGD algorithm
      #            (https://arxiv.org/abs/1602.05629)
      type: FED_AVG
      # Optimizer used at client side training. Options you can choose:
      # * ADAM
      # * SGD
      client_optimizer: SGD
      # Learning rate used at client side training.
      client_learning_rate: 0.01
      # Optimizer used at server side training. Options you can choose:
      # * ADAM
      # * SGD
      server_optimizer: ADAM
      # Learning rate used at server side training.
      sever_learning_rate: 1
      runtime_config {
        # Number of participating devices for each round of training.
        report_goal: 2000
      }
      # List of metrics to be evaluated by the model during training and
      # evaluation. Federated Compute Server provides a list of allowed
      # metrics.
      metrics {
        name: "auc-roc"
      }
      metrics {
        name: "binary_accuracy"
      }
    }
    # Whether or not to generate a corresponding evaluation task under the same
    # population. If this field isn't set, only one training task is
    # generated under this population.
    evaluation {
      # The task id under the same population of the source training task that
      # this evaluation task evaluates.
      source_training_task_id: 1
      # Decides how checkpoints from the training task are chosen for
      # evaluation.
      # * every_k_round: the evaluation task randomly picks one checkpoint
      #                  from the past k rounds of training task checkpoints.
      # * every_k_hour: the evaluation task randomly picks one checkpoint
      #                 from the past k hours of training task checkpoints.
      checkpoint_selector: "every_1_round"
      # The traffic of this evaluation task in this population.
      evaluation_traffic: 0.1
      # Number of participating devices for each round of evaluation.
      report_goal: 200
    }
  }
  # Differential Privacy setups. They are applied inside the Task Builder.
  differential_privacy {
    # The DP aggregation algorithm you want to use. Options you can choose:
    # * FIXED_GAUSSIAN: Federated Learning DP-SGD with fixed clipping norm
    #                   described in "Learning Differentially Private Recurrent
    #                   Language Models" (https://arxiv.org/abs/1710.06963).
    # * ADAPTIVE_GAUSSIAN: Federated Learning DP-SGD with quantile-based clip
    #                      norm estimation described in "Differentially Private
    #                      Learning with Adaptive Clipping"
    #                      (https://arxiv.org/abs/1905.03871).
    # * TREE: DP-FTRL algorithm described in "Practical and Private (Deep)
    #         Learning without Sampling or Shuffling"
    #         (https://arxiv.org/abs/2103.00039).
    # * ADADPTIVE_TREE: DP-FTRL with adaptive clipping norm descirbed in
    #                  "Differentially Private Learning with Adaptive Clipping"
    #                  (https://arxiv.org/abs/1905.03871).
    type: FIXED_GAUSSIAN
    # Noise multiplier for the Gaussian noise.
    noise_multiplier: 0.1
    #   The value of the clipping norm.
    clip_norm: 0.1
  }
Bước 4. Gửi cấu hình zip đến máy chủ Điện toán liên kết.
Gửi tệp zip và fcp_server_config.json đến máy chủ Điện toán liên kết.
task_builder_client --task_builder_server='http://{federated_compute_server_endpoint}' --saved_model='saved_model' --task_config='fcp_server_config.json'
Điểm cuối của Máy chủ điện toán liên kết là máy chủ mà bạn thiết lập ở bước 1.
Thư viện toán tử tích hợp LiteRT chỉ hỗ trợ một số toán tử TensorFlow (Chọn toán tử TensorFlow). Tập hợp toán tử được hỗ trợ có thể khác nhau giữa các phiên bản của mô-đun OnDevicePersonalization. Để đảm bảo khả năng tương thích, quy trình xác minh toán tử sẽ được thực hiện trong trình tạo tác vụ trong quá trình tạo tác vụ.
Phiên bản tối thiểu được hỗ trợ của mô-đun OnDevicePersonalization sẽ có trong siêu dữ liệu của tác vụ. Bạn có thể tìm thấy thông tin này trong thông báo của trình tạo tác vụ.
I1023 22:16:53.058027 139653371516736 task_builder_client.py:109] Success! Tasks are built, and artifacts are uploaded to the cloud.
I1023 22:16:53.058399 139653371516736 task_builder_client.py:112] applied_algorithms {
  learning_algo: FED_AVG
  client_optimizer: SGD
  server_optimizer: SGD
  dp_aggregator: FIXED_GAUSSIAN
}
metric_results {
  accepted_metrics: "binary_accuracy, binary_crossentropy, recall, precision, auc-roc, auc-pr"
}
dp_hyperparameters {
  dp_delta: 0.000001
  dp_epsilon: 6.4
  noise_multiplier: 1.0
  dp_clip_norm: 1.0
  num_training_rounds: 10000
}

I1023 22:16:53.058594 139653371516736 task_builder_client.py:113] training_task {
  min_client_version: "341912000"
}
eval_task {
  min_client_version: "341812000"
}
Máy chủ Điện toán liên kết sẽ chỉ định nhiệm vụ này cho tất cả thiết bị được trang bị mô-đun OnDevicePersonalization có phiên bản cao hơn 341812000.
Nếu mô hình của bạn có các thao tác không được bất kỳ mô-đun OnDevicePersonalization nào hỗ trợ, thì một thông báo lỗi sẽ được tạo trong quá trình tạo tác vụ.
common.TaskBuilderException: Cannot build the ClientOnlyPlan: Please contact Google to register these ops: {'L2Loss': 'L2LossOp<CPUDevice, float>'}
. Stop building remaining artifacts.
Bạn có thể xem danh sách chi tiết về các thao tác linh hoạt được hỗ trợ trong GitHub.
Tạo APK Điện toán liên kết Android
Để tạo một APK Điện toán liên kết trên Android, bạn cần chỉ định điểm cuối URL của Máy chủ điện toán liên kết trong AndroidManifest.xml mà Điện toán liên kết Client kết nối.
Bước 5. Chỉ định điểm cuối URL của Máy chủ điện toán liên kết
Chỉ định điểm cuối URL của Máy chủ tính toán liên kết (bạn thiết lập ở Bước 1) trong AndroidManifest.xml mà Máy khách tính toán liên kết của bạn kết nối.
<!-- Contents of AndroidManifest.xml -->
<manifest xmlns:android="http://schemas.android.com/apk/res/android"
          package="com.example.odpsample" >
    <application android:label="OdpSample">
        <!-- XML resource that contains other ODP settings. -->
        <property android:name="android.ondevicepersonalization.ON_DEVICE_PERSONALIZATION_CONFIG"
                  android:resource="@xml/OdpSettings"></property>
        <!-- The service that ODP will bind to. -->
        <service android:name="com.example.odpsample.SampleService"
                android:exported="true" android:isolatedProcess="true" />
    </application>
</manifest>
Tệp tài nguyên XML được chỉ định trong thẻ <property> cũng phải khai báo lớp dịch vụ trong thẻ <service> và chỉ định điểm cuối URL của Máy chủ tính toán liên kết mà Máy khách tính toán liên kết sẽ kết nối:
<!-- Contents of res/xml/OdpSettings.xml -->
<on-device-personalization>
   <!-- Name of the service subclass -->
   <service name="com.example.odpsample.SampleService">
     <!-- If you want to use federated compute feature to train a model,
          specify this tag. -->
     <federated-compute-settings url="https://fcpserver.com/" />
   </service>
</on-device-personalization>
Bước 6. Triển khai API IsolatedWorker#onTrainingExample
Triển khai API công khai Cá nhân hoá trên thiết bị IsolatedWorker#onTrainingExample để tạo dữ liệu huấn luyện.
Mã chạy trong IsolatedProcess không có quyền truy cập trực tiếp vào mạng, ổ đĩa cục bộ hoặc các dịch vụ khác đang chạy trên thiết bị; tuy nhiên, các API sau đây có sẵn:
- "getRemoteData" – Dữ liệu khoá-giá trị bất biến được tải xuống từ các phần phụ trợ từ xa do nhà phát triển vận hành (nếu có).
- "getLocalData" – Dữ liệu khoá-giá trị có thể thay đổi được nhà phát triển duy trì cục bộ (nếu có).
- "UserData" – Dữ liệu người dùng do nền tảng cung cấp.
- 'getLogReader' – Trả về một DAO cho các bảng YÊU CẦU và SỰ KIỆN.
Ví dụ:
@Override public void onTrainingExample(
            @NonNull TrainingExampleInput input,
            @NonNull Consumer<TrainingExampleOutput> consumer) {
    // Check if the incoming training task is the task we want.
    if (input.getPopulationName() == "my_new_population") {
        TrainingExampleOutput result = new TrainingExampleOutput.Builder():
        RequestLogRecord record = this.getLogReader().getRequestLogRecord(1);
        int count = 1;
        // Iterate logging event table.
        for (ContentValues contentValues: record.rows()) {
            Features features = Features.newBuilder()
                // Retrieve carrier from user info.
                .putFeature("carrier", buildFeature(mUserData.getCarrier()))
                // Retrieve features from logging info.
                .putFeature("int_feature_1",
                    buildFeature(contentValues.get("int_feature_1")
            result.addTrainingExample(
                    Example.newBuilder()
                        .setFeatures(features).build().toByteArray())
                .addResumptionToken(
                    String.format("token%d", count).getBytes()))
                .build();
            count++;
        }
        consumer.accept(result.build());
    }
}
Bước 7. Lên lịch cho một việc cần làm định kỳ về việc đào tạo.
Hoạt động Cá nhân hoá trên thiết bị cung cấp một FederatedComputeScheduler để nhà phát triển lập lịch hoặc huỷ các lệnh tính toán liên kết. Có nhiều lựa chọn để gọi phương thức này thông qua IsolatedWorker, theo lịch hoặc khi quá trình tải xuống không đồng bộ hoàn tất. Sau đây là ví dụ về cả hai.
Lựa chọn dựa trên lịch biểu. Gọi
FederatedComputeScheduler#scheduletrongIsolatedWorker#onExecute.@Override public void onExecute( @NonNull ExecuteInput input, @NonNull Consumer<ExecuteOutput> consumer ) { if (input != null && input.getAppParams() != null && input.getAppParams().getString("schedule_training") != null) { if (input.getAppParams().getString("schedule_training").isEmpty()) { consumer.accept(null); return; } TrainingInterval interval = new TrainingInterval.Builder() .setMinimumInterval(Duration.ofSeconds(10)) .setSchedulingMode(2) .build(); FederatedComputeScheduler.Params params = new FederatedComputeScheduler .Params(interval); FederatedComputeInput fcInput = new FederatedComputeInput.Builder() .setPopulationName( input.getAppParams().getString("schedule_training")).build(); mFCScheduler.schedule(params, fcInput); ExecuteOutput result = new ExecuteOutput.Builder().build(); consumer.accept(result); } }Lựa chọn Đã tải xuống xong. Gọi
FederatedComputeScheduler#scheduletrongIsolatedWorker#onDownloadCompletednếu việc lên lịch cho một tác vụ huấn luyện phụ thuộc vào bất kỳ dữ liệu hoặc quy trình không đồng bộ nào.
Xác thực
Các bước sau đây mô tả cách xác thực xem tác vụ Học liên kết có đang chạy đúng cách hay không.
Bước 8. Xác thực xem tác vụ Học liên kết có đang chạy đúng cách hay không.
Một điểm kiểm tra mô hình mới và một tệp chỉ số mới sẽ được tạo ở mỗi vòng tổng hợp phía máy chủ.
Các chỉ số nằm trong một tệp có định dạng JSON gồm các cặp khoá-giá trị. Tệp này được tạo từ danh sách Metrics mà bạn đã xác định ở Bước 3. Sau đây là ví dụ về tệp JSON chỉ số đại diện:
{"server/client_work/train/binary_accuracy":0.5384615659713745, "server/client_work/train/binary_crossentropy":0.694046676158905, "server/client_work/train/recall":0.20000000298023224, "server/client_work/train/precision":0.3333333432674408, "server/client_work/train/auc-roc":0.3500000238418579, "server/client_work/train/auc-pr":0.44386863708496094, "server/finalizer/update_non_finite":0.0}
Bạn có thể sử dụng một đoạn mã tương tự như đoạn mã sau để nhận các chỉ số về mô hình và theo dõi hiệu suất huấn luyện:
import collections
import json
import matplotlib.pyplot as plt
from google.cloud import storage

# The population_name you set in fcp_server_config.json in Step 3.
POPULATION_NAME = 'my_new_population'
# The Google Cloud storage you set in Step 1.
GCS_BUCKET_NAME = 'fcp-gcs'
NUM_TRAINING_ROUND = 1000

storage_client = storage.Client()
bucket = storage_client.bucket(GCS_BUCKET_NAME)

metrics = collections.defaultdict(list)
for i in range(NUM_TRAINING_ROUND):
    blob = bucket.blob('{}/{}/1/{}/s/0/metrics'.format(GCS_BUCKET_NAME, POPULATION_NAME, i+1))
    with blob.open("r") as f:
                     metric = json.loads(f.read())
                    for metric_name in metric.keys():
                             metrics[metric_name].append(metric[metric_name])

for metric_name in metrics:
         print(metric_name)
         plt.plot(metrics[metric_name])
         plt.show()
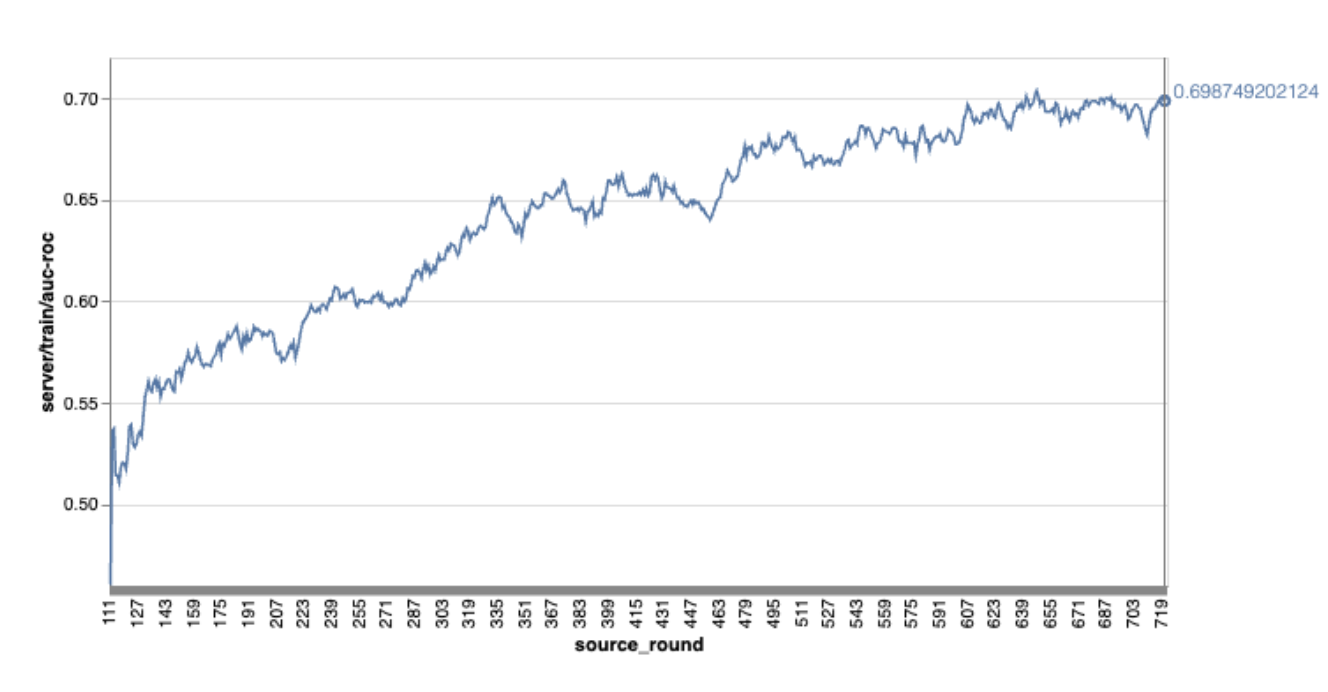
Xin lưu ý rằng trong biểu đồ ví dụ trước đó:
- Trục x là số vòng huấn luyện.
- Trục y là giá trị auc-roc của mỗi vòng.
Huấn luyện mô hình phân loại hình ảnh trên tính năng Cá nhân hoá trên thiết bị
Trong hướng dẫn này, tập dữ liệu EMNIST được dùng để minh hoạ cách chạy một tác vụ học liên kết trên ODP.
Bước 1. Tạo một tff.learning.models.FunctionalModel
def get_image_classification_input_spec():
  return (
      tf.TensorSpec([None, 28, 28, 1], tf.float32),
      tf.TensorSpec([None, 1], tf.int64),
  )

def create_and_save_image_classification_functional_model(
    model_path: str,
) -> None:
  keras_model =  emnist_models.create_original_fedavg_cnn_model(
      only_digits=True
  )
  functional_model = tff.learning.models.functional_model_from_keras(
      keras_model=keras_model,
      input_spec=get_image_classification_input_spec(),
      loss_fn=tf.keras.losses.SparseCategoricalCrossentropy(),
  )
  tff.learning.models.save_functional_model(functional_model, model_path)
- Bạn có thể tìm thấy thông tin chi tiết về mô hình emnist keras trong emnist_models.
- TfLite chưa hỗ trợ tốt cho tf.sparse.SparseTensor hoặc tf.RaggedTensor. Cố gắng sử dụng tf.Tensor nhiều nhất có thể khi xây dựng mô hình.
- Trình tạo tác vụ ODP sẽ ghi đè tất cả các chỉ số khi tạo quy trình học tập, bạn không cần chỉ định bất kỳ chỉ số nào. Chúng ta sẽ thảo luận kỹ hơn về chủ đề đó trong Bước 2. Tạo cấu hình trình tạo tác vụ.
Chúng tôi hỗ trợ 2 loại dữ liệu đầu vào của mô hình:
Loại 1. Một bộ dữ liệu(features_tensor, label_tensor).
- Khi tạo mô hình, input_spec sẽ có dạng như sau:
def get_input_spec(): return ( tf.TensorSpec([None, 28, 28, 1], tf.float32), tf.TensorSpec([None, 1], tf.int64), )- Ghép nối phần trước với việc triển khai sau đây của API công khai ODP IsolatedWorker#onTrainingExamples để tạo dữ liệu huấn luyện trên thiết bị:
return tf.train.Example(
    features=tf.train.Features(
        feature={
            'x': tf.train.Feature(
                float_list=tf.train.FloatList(value=[1.0] * 784)
            ),
            'y': tf.train.Feature(
                int64_list=tf.train.Int64List(
                    value=[1]
                )
            ),
        }
    )
).SerializeToString()
Loại 2.
Tuple(Dict[feature_name, feature_tensor], label_tensor)- Khi tạo mô hình, input_spec sẽ có dạng như sau:
def get_input_spec() -> ( Tuple[collections.OrderedDict[str, tf.TensorSpec], tf.TensorSpec] ): return ( collections.OrderedDict( [('feature-1', tf.TensorSpec([None, 1], tf.float32)), ('feature-2', tf.TensorSpec([None, 1], tf.float32))] ), tf.TensorSpec([None, 1], tf.int64), )- Ghép nối phần trên với cách triển khai sau đây của API công khai ODP IsolatedWorker#onTrainingExamples để tạo dữ liệu huấn luyện:
return tf.train.Example( features=tf.train.Features( feature={ 'feature-1': tf.train.Feature( float_list=tf.train.FloatList(value=[1.0]) ), 'feature-2': tf.train.Feature( float_list=tf.train.FloatList(value=[2.0]) ), 'my_label': tf.train.Feature( int64_list=tf.train.Int64List( value=[1] ) ), } ) ).SerializeToString()- Đừng quên đăng ký label_name trong cấu hình trình tạo tác vụ.
mode: TRAINING_AND_EVAL  # Task execution mode
population_name: "my_example_model"
label_name: "my_label"
ODP tự động xử lý DP khi xây dựng quy trình học tập. Vì vậy, bạn không cần thêm bất kỳ nhiễu nào khi tạo mô hình chức năng.
Đầu ra của mô hình chức năng đã lưu này sẽ giống như mẫu trong kho lưu trữ GitHub của chúng tôi.
Bước 2. Tạo cấu hình trình tạo tác vụ
Bạn có thể tìm thấy các mẫu cấu hình trình tạo tác vụ trong kho lưu trữ GitHub của chúng tôi.
Chỉ số đào tạo và đánh giá
Vì các chỉ số có thể làm lộ dữ liệu người dùng, nên Trình tạo tác vụ sẽ có một danh sách các chỉ số mà quy trình học có thể tạo và phát hành. Bạn có thể xem danh sách đầy đủ trong kho lưu trữ GitHub của chúng tôi.
Sau đây là danh sách chỉ số mẫu khi tạo cấu hình trình tạo tác vụ mới:
federated_learning {
  learning_process {
    metrics {
      name: "binary_accuracy"
    }
    metrics {
      name: "binary_crossentropy"
    }
    metrics {
      name: "recall"
    }
    metrics {
      name: "precision"
    }
    metrics {
      name: "auc-roc"
    }
    metrics {
      name: "auc-pr"
    }
  }
}
Nếu chỉ số mà bạn quan tâm không có trong danh sách hiện tại, hãy liên hệ với chúng tôi.
Cấu hình DP
Bạn cần chỉ định một số cấu hình liên quan đến DP:
policies { min_separation_policy { minimum_separation: 1 } model_release_policy { num_max_training_rounds: 1000 dp_target_epsilon: 10 dp_delta: 0.000001 } } differential_privacy { type: FIXED_GAUSSIAN clip_norm: 0.1 noise_multiplier: 0.1 }dp_target_epsilonhoặcnoise_mulitipilerphải có để vượt qua quy trình xác thực: (noise_to_epsilonepislon_to_noise).- Bạn có thể tìm thấy các chế độ cài đặt mặc định này trong kho lưu trữ GitHub của chúng tôi.
Bước 3. Tải mô hình đã lưu và cấu hình trình tạo tác vụ lên bộ nhớ đám mây của nhà phát triển bất kỳ
Hãy nhớ cập nhật các trường artifact_building khi tải cấu hình trình tạo tác vụ lên.
Bước 4. (không bắt buộc) Kiểm thử việc tạo cấu phần phần mềm mà không cần tạo một tác vụ mới
cd ${odp_fcp_github_repo}/python
bazel run //python/taskbuilder:task_builder_client -- --saved_model=${path_of_cloud_storage}/mnist_model/ --task_config=${path_of_cloud_storage}/mnist_cnn_task_config_build_artifact_only.pbtxt --build_artifact_only=true --task_builder_server=${task_builder_server_endpoint}
Mô hình mẫu được xác thực thông qua cả quy trình kiểm tra hoạt động linh hoạt và quy trình kiểm tra dp; bạn có thể thêm skip_flex_ops_check và skip_dp_check để bỏ qua trong quá trình xác thực (không thể triển khai mô hình này cho phiên bản hiện tại của ứng dụng ODP do thiếu một số hoạt động linh hoạt).
cd ${odp_fcp_github_repo}/python
bazel run //python/taskbuilder:task_builder_client -- --saved_model=${path_of_cloud_storage}/mnist_model/ --task_config=${path_of_cloud_storage}/mnist_cnn_task_config_build_artifact_only.pbtxt --build_artifact_only=true --task_builder_server=${task_builder_server_endpoint} --skip_flex_ops_check=True --skip_dp_check=True
flex_ops_check: thư viện toán tử tích hợp của TensorFlow Lite chỉ hỗ trợ một số lượng toán tử TensorFlow hạn chế (Khả năng tương thích giữa TensorFlow Lite và toán tử TensorFlow). Bạn cần cài đặt tất cả các thao tác tensorflow không tương thích bằng cách sử dụng uỷ quyền linh hoạt (Android.bp). Nếu một mô hình chứa các hoạt động không được hỗ trợ, hãy liên hệ với chúng tôi để đăng ký các hoạt động đó:
Cannot build the ClientOnlyPlan: Please contact Google to register these ops: {...}Cách tốt nhất để gỡ lỗi một trình tạo tác vụ là bắt đầu một trình tạo tác vụ cục bộ:
# Starts a server at localhost:5000
bazel run //python/taskbuilder:task_builder
# Links to a server at localhost:5000 by removing task_builder_server flag
bazel run //python/taskbuilder:task_builder_client -- --saved_model=${path_of_cloud_storage}/mnist_model/ --task_config=${path_of_cloud_storage}/mnist_cnn_task_config_build_artifact_only.pbtxt --build_artifact_only=true --skip_flex_ops_check=True --skip_dp_check=True
Bạn có thể tìm thấy các cấu phần phần mềm kết quả tại bộ nhớ đám mây được chỉ định trong cấu hình. Đó phải là một thứ trông giống như ví dụ trong kho lưu trữ GitHub của chúng tôi.
Bước 5. Tạo các cấu phần phần mềm và tạo một cặp nhiệm vụ huấn luyện và đánh giá mới trên máy chủ FCP.
Xoá cờ build_artifact_only và các cấu phần phần mềm đã tạo sẽ được tải lên máy chủ FCP. Bạn nên kiểm tra để đảm bảo rằng một cặp nhiệm vụ huấn luyện và đánh giá đã được tạo thành công
cd ${odp_fcp_github_repo}/python
bazel run //python/taskbuilder:task_builder_client -- --saved_model=${path_of_cloud_storage}/mnist_model/ --task_config=${path_of_cloud_storage}/mnist_cnn_task_config.pbtxt --task_builder_server=${task_builder_server_endpoint}
Bước 6. Chuẩn bị phía máy khách FCP
- Triển khai API công khai ODP
IsolatedWorker#onTrainingExamplesđể tạo dữ liệu huấn luyện. - Gọi
FederatedComputeScheduler#schedule. - Bạn có thể xem một số ví dụ trong kho lưu trữ mã nguồn Android của chúng tôi.
Bước 7. Giám sát
Chỉ số về máy chủ
Hãy xem hướng dẫn thiết lập trong kho lưu trữ GitHub của chúng tôi.
- Chỉ số mô hình
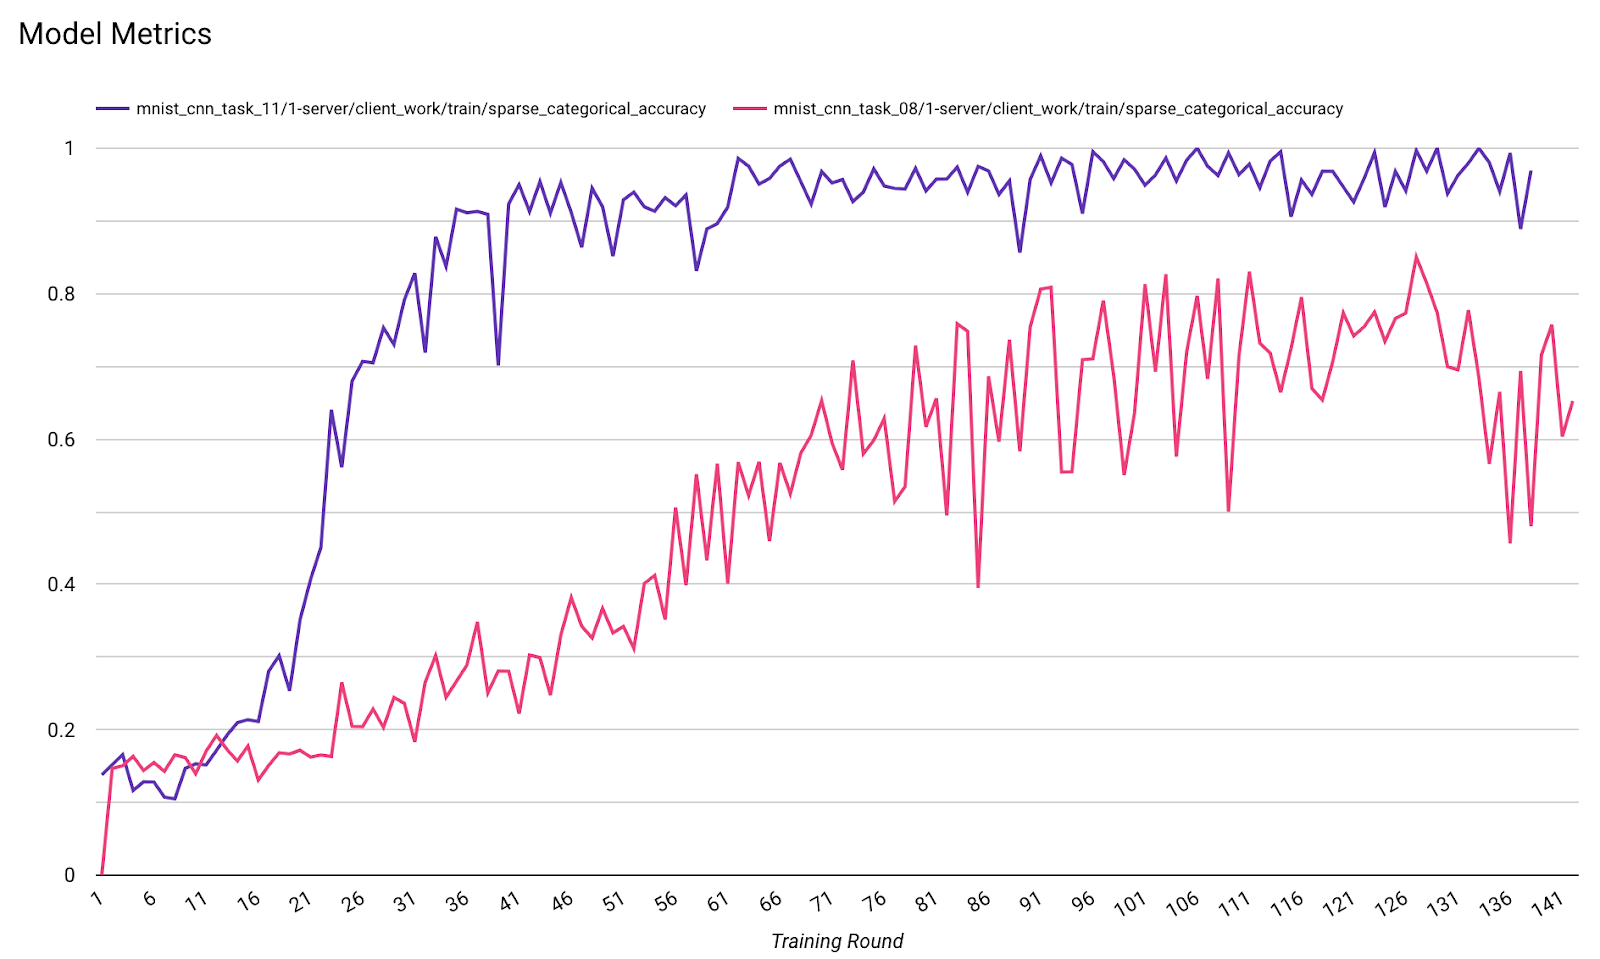
Bạn có thể so sánh các chỉ số của nhiều lần chạy trong một biểu đồ. Ví dụ:
- Đường màu tím có
noise_multiplier0,1 - Đường màu hồng có
noise_multipilerlà 0,3