
このページでは、オンデバイス パーソナライズによって提供されるフェデレーション ラーニング API を使用して、フェデレーション平均化学習プロセスと固定ガウス ノイズでモデルをトレーニングする方法について説明します。
始める前に
始める前に、テストデバイスで次の手順を完了します。
OnDevicePersonalization モジュールがインストールされていることを確認します。このモジュールは 2024 年 4 月に自動更新として提供されました。
# List the modules installed on the device
adb shell pm list packages --apex-only --show-versioncode
次のモジュールがバージョン コード 341717000 以上でリストされていることを確認します。
package:com.google.android.ondevicepersonalization versionCode:341717000そのモジュールがリストにない場合は、[設定] > [セキュリティとプライバシー] > [アップデート] > [Google Play システム アップデート] に移動し、デバイスが最新の状態であることを確認します。必要に応じて [アップデート] を選択します。
フェデレーション ラーニング関連のすべての新機能を有効にします。
# Enable On-Device Personalization apk.
adb shell device_config put on_device_personalization global_kill_switch false
# Enable On-Device Personalization APIs.
adb shell device_config put on_device_personalization enable_ondevicepersonalization_apis true
# Enable On-Device Personalization overriding.
adb shell device_config put on_device_personalization enable_personalization_status_override true
adb shell device_config put on_device_personalization personalization_status_override_value true
# Enable Federated Compute apk.
adb shell device_config put on_device_personalization federated_compute_kill_switch false
フェデレーション ラーニング タスクを作成する

図中の番号については、次の 8 つのステップで詳しく説明します。
連携コンピューティング サーバーを構成する
フェデレーション ラーニングは、フェデレーション コンピューティング サーバー(リデューサー)と一連のクライアント(マッパー)で実行される MapReduce です。フェデレーション コンピューティング サーバーは、各フェデレーション ラーニング タスクの実行中のメタデータとモデル情報を保持します。大まかな違いは次のとおりです。
- フェデレーション ラーニングのデベロッパーは、新しいタスクを作成し、タスク実行メタデータとモデル情報をサーバーにアップロードします。
- フェデレーション コンピューティング クライアントがサーバーに新しいタスク割り当てリクエストを開始すると、サーバーはタスクの適格性を確認し、適格なタスク情報を返します。
- フェデレーション コンピューティング クライアントがローカル計算を完了すると、計算結果がサーバーに送信されます。サーバーは、これらの計算結果に対して集計とノイズの追加を行い、その結果を最終モデルに適用します。
これらのコンセプトの詳細については、以下をご覧ください。
- フェデレーション ラーニング: トレーニング データを一元化しないコラボレーション機械学習
- Towards Federated Learning at Scale: System Design(SysML 2019)
ODP は、フェデレーション ラーニングの拡張バージョンを使用します。このバージョンでは、モデルに適用する前に、調整された(一元化された)ノイズが集計に適用されます。ノイズの規模により、集計で差分プライバシーが維持されます。
ステップ 1. 連携コンピューティング サーバーを作成する
Federated Compute プロジェクトの手順に沿って、独自の Federated Compute Server を設定します。
ステップ 2. 保存された FunctionalModel を準備する
保存された 'FunctionalModel' ファイルを準備します。'functional_model_from_keras' を使用して 'Model' を 'FunctionalModel' に変換し、'save_functional_model' を使用してこの 'FunctionalModel' を 'SavedModel' としてシリアル化できます。
functional_model = tff.learning.models.functional_model_from_keras(keras_model=model)
tff.learning.models.save_functional_model(functional_model, saved_model_path)
ステップ 3. 連携コンピューティング サーバー構成を作成する
ポリシー、フェデレーション ラーニングの設定、差分プライバシーの設定を含む fcp_server_config.json を準備します。例:
  # Identifies the set of client devices that will participate.
  population_name: "my_new_population"
  # Options you can choose:
  # * TRAINING_ONLY: Only one training task will be generated under this
  #                  population.
  # * TRAINING_AND_EVAL: One training task and one evaluation task will be
  #                      generated under this population.
  # * EVAL_ONLY: Only one evaluation task will be generated under this
  #              population.
  mode: TRAINING_AND_EVAL
  policies {
    # Policy for sampling on-device examples. It is checked every time a
    # device attempts to start a new training.
    min_separation_policy {
      # The minimum number of rounds before the same client participated.
      minimum_separation: 3
    }
    # Policy for releasing training results to developers. It is checked
    # when uploading a new task to the Federated Compute Server.
    model_release_policy {
      # Server stops training when number of training rounds reaches this
      # number.
      num_max_training_rounds: 1000
    }
  }
  # Federated learning setups. They are applied inside Task Builder.
  federated_learning {
    learning_process {
      # Use FED_AVG to build federated learning process. Options you can
      # choose:
      # * FED_AVG: Federated Averaging algorithm
      #            (https://arxiv.org/abs/2003.00295)
      # * FED_SDG: Federated SGD algorithm
      #            (https://arxiv.org/abs/1602.05629)
      type: FED_AVG
      # Optimizer used at client side training. Options you can choose:
      # * ADAM
      # * SGD
      client_optimizer: SGD
      # Learning rate used at client side training.
      client_learning_rate: 0.01
      # Optimizer used at server side training. Options you can choose:
      # * ADAM
      # * SGD
      server_optimizer: ADAM
      # Learning rate used at server side training.
      sever_learning_rate: 1
      runtime_config {
        # Number of participating devices for each round of training.
        report_goal: 2000
      }
      # List of metrics to be evaluated by the model during training and
      # evaluation. Federated Compute Server provides a list of allowed
      # metrics.
      metrics {
        name: "auc-roc"
      }
      metrics {
        name: "binary_accuracy"
      }
    }
    # Whether or not to generate a corresponding evaluation task under the same
    # population. If this field isn't set, only one training task is
    # generated under this population.
    evaluation {
      # The task id under the same population of the source training task that
      # this evaluation task evaluates.
      source_training_task_id: 1
      # Decides how checkpoints from the training task are chosen for
      # evaluation.
      # * every_k_round: the evaluation task randomly picks one checkpoint
      #                  from the past k rounds of training task checkpoints.
      # * every_k_hour: the evaluation task randomly picks one checkpoint
      #                 from the past k hours of training task checkpoints.
      checkpoint_selector: "every_1_round"
      # The traffic of this evaluation task in this population.
      evaluation_traffic: 0.1
      # Number of participating devices for each round of evaluation.
      report_goal: 200
    }
  }
  # Differential Privacy setups. They are applied inside the Task Builder.
  differential_privacy {
    # The DP aggregation algorithm you want to use. Options you can choose:
    # * FIXED_GAUSSIAN: Federated Learning DP-SGD with fixed clipping norm
    #                   described in "Learning Differentially Private Recurrent
    #                   Language Models" (https://arxiv.org/abs/1710.06963).
    # * ADAPTIVE_GAUSSIAN: Federated Learning DP-SGD with quantile-based clip
    #                      norm estimation described in "Differentially Private
    #                      Learning with Adaptive Clipping"
    #                      (https://arxiv.org/abs/1905.03871).
    # * TREE: DP-FTRL algorithm described in "Practical and Private (Deep)
    #         Learning without Sampling or Shuffling"
    #         (https://arxiv.org/abs/2103.00039).
    # * ADADPTIVE_TREE: DP-FTRL with adaptive clipping norm descirbed in
    #                  "Differentially Private Learning with Adaptive Clipping"
    #                  (https://arxiv.org/abs/1905.03871).
    type: FIXED_GAUSSIAN
    # Noise multiplier for the Gaussian noise.
    noise_multiplier: 0.1
    #   The value of the clipping norm.
    clip_norm: 0.1
  }
ステップ 4. zip 構成を連携コンピューティング サーバーに送信します。
zip ファイルと fcp_server_config.json を連携コンピューティング サーバーに送信します。
task_builder_client --task_builder_server='http://{federated_compute_server_endpoint}' --saved_model='saved_model' --task_config='fcp_server_config.json'
フェデレーション コンピューティング サーバー エンドポイントは、手順 1 で設定したサーバーです。
LiteRT の組み込み演算子ライブラリは、限られた数の TensorFlow 演算子(TensorFlow 演算子を選択)のみをサポートしています。サポートされている演算子のセットは、OnDevicePersonalization モジュールのバージョンによって異なる場合があります。互換性を確保するため、タスクの作成時にタスクビルダー内で演算子の検証プロセスが実行されます。
サポートされる OnDevicePersonalization モジュールの最小バージョンは、タスクのメタデータに含まれます。この情報は、タスクビルダーの情報メッセージで確認できます。
I1023 22:16:53.058027 139653371516736 task_builder_client.py:109] Success! Tasks are built, and artifacts are uploaded to the cloud.
I1023 22:16:53.058399 139653371516736 task_builder_client.py:112] applied_algorithms {
  learning_algo: FED_AVG
  client_optimizer: SGD
  server_optimizer: SGD
  dp_aggregator: FIXED_GAUSSIAN
}
metric_results {
  accepted_metrics: "binary_accuracy, binary_crossentropy, recall, precision, auc-roc, auc-pr"
}
dp_hyperparameters {
  dp_delta: 0.000001
  dp_epsilon: 6.4
  noise_multiplier: 1.0
  dp_clip_norm: 1.0
  num_training_rounds: 10000
}

I1023 22:16:53.058594 139653371516736 task_builder_client.py:113] training_task {
  min_client_version: "341912000"
}
eval_task {
  min_client_version: "341812000"
}
フェデレーテッド コンピューティング サーバーは、このタスクをバージョンが 341812000 より大きい OnDevicePersonalization モジュールを搭載したすべてのデバイスに割り当てます。
モデルに OnDevicePersonalization モジュールでサポートされていないオペレーションが含まれている場合、タスクの作成中にエラー メッセージが生成されます。
common.TaskBuilderException: Cannot build the ClientOnlyPlan: Please contact Google to register these ops: {'L2Loss': 'L2LossOp<CPUDevice, float>'}
. Stop building remaining artifacts.
サポートされている flex オペレーションの詳細なリストは、GitHub で確認できます。
Android のフェデレーション コンピューティング APK を作成する
Android Federated Compute APK を作成するには、AndroidManifest.xml で Federated Compute Server URL エンドポイントを指定する必要があります。このエンドポイントに Federated Compute Client が接続します。
ステップ 5. フェデレーション コンピューティング サーバーの URL エンドポイントを指定する
AndroidManifest.xml で、フェデレーション コンピューティング クライアントが接続するフェデレーション コンピューティング サーバーの URL エンドポイント(手順 1 で設定)を指定します。
<!-- Contents of AndroidManifest.xml -->
<manifest xmlns:android="http://schemas.android.com/apk/res/android"
          package="com.example.odpsample" >
    <application android:label="OdpSample">
        <!-- XML resource that contains other ODP settings. -->
        <property android:name="android.ondevicepersonalization.ON_DEVICE_PERSONALIZATION_CONFIG"
                  android:resource="@xml/OdpSettings"></property>
        <!-- The service that ODP will bind to. -->
        <service android:name="com.example.odpsample.SampleService"
                android:exported="true" android:isolatedProcess="true" />
    </application>
</manifest>
<property> タグで指定された XML リソース ファイルは、<service> タグでサービス クラスを宣言し、フェデレーション コンピューティング クライアントが接続するフェデレーション コンピューティング サーバーの URL エンドポイントを指定する必要があります。
<!-- Contents of res/xml/OdpSettings.xml -->
<on-device-personalization>
   <!-- Name of the service subclass -->
   <service name="com.example.odpsample.SampleService">
     <!-- If you want to use federated compute feature to train a model,
          specify this tag. -->
     <federated-compute-settings url="https://fcpserver.com/" />
   </service>
</on-device-personalization>
ステップ 6. IsolatedWorker#onTrainingExample API を実装する
オンデバイス パーソナライズの公開 API IsolatedWorker#onTrainingExample を実装して、トレーニング データを生成します。
IsolatedProcess で実行されるコードは、ネットワーク、ローカル ディスク、デバイスで実行される他のサービスに直接アクセスできません。ただし、次の API は利用できます。
- 'getRemoteData' - 該当する場合、デベロッパーが運用するリモート バックエンドからダウンロードされた不変の Key-Value データ。
- 'getLocalData' - デベロッパーがローカルで永続化する変更可能な Key-Value データ(該当する場合)。
- 'UserData' - プラットフォームから提供されるユーザーデータ。
- 'getLogReader' - REQUESTS テーブルと EVENTS テーブルの DAO を返します。
例:
@Override public void onTrainingExample(
            @NonNull TrainingExampleInput input,
            @NonNull Consumer<TrainingExampleOutput> consumer) {
    // Check if the incoming training task is the task we want.
    if (input.getPopulationName() == "my_new_population") {
        TrainingExampleOutput result = new TrainingExampleOutput.Builder():
        RequestLogRecord record = this.getLogReader().getRequestLogRecord(1);
        int count = 1;
        // Iterate logging event table.
        for (ContentValues contentValues: record.rows()) {
            Features features = Features.newBuilder()
                // Retrieve carrier from user info.
                .putFeature("carrier", buildFeature(mUserData.getCarrier()))
                // Retrieve features from logging info.
                .putFeature("int_feature_1",
                    buildFeature(contentValues.get("int_feature_1")
            result.addTrainingExample(
                    Example.newBuilder()
                        .setFeatures(features).build().toByteArray())
                .addResumptionToken(
                    String.format("token%d", count).getBytes()))
                .build();
            count++;
        }
        consumer.accept(result.build());
    }
}
ステップ 7. 定期的なトレーニング タスクをスケジュールします。
On-Device Personalization は、デベロッパーがフェデレーテッド コンピューティング ジョブのスケジュールを設定またはキャンセルするための FederatedComputeScheduler を提供します。IsolatedWorker を介して呼び出すには、スケジュールに従って呼び出す方法と、非同期ダウンロードが完了したときに呼び出す方法があります。以下に両方の例を示します。
スケジュールベースのオプション。
FederatedComputeScheduler#schedule(IsolatedWorker#onExecute)に電話で問い合わせる。@Override public void onExecute( @NonNull ExecuteInput input, @NonNull Consumer<ExecuteOutput> consumer ) { if (input != null && input.getAppParams() != null && input.getAppParams().getString("schedule_training") != null) { if (input.getAppParams().getString("schedule_training").isEmpty()) { consumer.accept(null); return; } TrainingInterval interval = new TrainingInterval.Builder() .setMinimumInterval(Duration.ofSeconds(10)) .setSchedulingMode(2) .build(); FederatedComputeScheduler.Params params = new FederatedComputeScheduler .Params(interval); FederatedComputeInput fcInput = new FederatedComputeInput.Builder() .setPopulationName( input.getAppParams().getString("schedule_training")).build(); mFCScheduler.schedule(params, fcInput); ExecuteOutput result = new ExecuteOutput.Builder().build(); consumer.accept(result); } }ダウンロード完了オプション。トレーニング タスクのスケジュール設定が非同期データまたはプロセスに依存する場合は、
IsolatedWorker#onDownloadCompletedでFederatedComputeScheduler#scheduleを呼び出します。
検証
次の手順では、フェデレーション ラーニング タスクが正しく実行されているかどうかを検証する方法について説明します。
手順 8. フェデレーション ラーニング タスクが正しく実行されているかどうかを確認します。
サーバーサイドの集計の各ラウンドで、新しいモデル チェックポイントと新しい指標ファイルが生成されます。
指標は、JSON 形式の Key-Value ペアのファイルにあります。このファイルは、手順 3 で定義した Metrics のリストから生成されます。代表的な指標の JSON ファイルの例は次のとおりです。
{"server/client_work/train/binary_accuracy":0.5384615659713745, "server/client_work/train/binary_crossentropy":0.694046676158905, "server/client_work/train/recall":0.20000000298023224, "server/client_work/train/precision":0.3333333432674408, "server/client_work/train/auc-roc":0.3500000238418579, "server/client_work/train/auc-pr":0.44386863708496094, "server/finalizer/update_non_finite":0.0}
次のスクリプトのようなものを使用して、モデル指標を取得し、トレーニング パフォーマンスをモニタリングできます。
import collections
import json
import matplotlib.pyplot as plt
from google.cloud import storage

# The population_name you set in fcp_server_config.json in Step 3.
POPULATION_NAME = 'my_new_population'
# The Google Cloud storage you set in Step 1.
GCS_BUCKET_NAME = 'fcp-gcs'
NUM_TRAINING_ROUND = 1000

storage_client = storage.Client()
bucket = storage_client.bucket(GCS_BUCKET_NAME)

metrics = collections.defaultdict(list)
for i in range(NUM_TRAINING_ROUND):
    blob = bucket.blob('{}/{}/1/{}/s/0/metrics'.format(GCS_BUCKET_NAME, POPULATION_NAME, i+1))
    with blob.open("r") as f:
                     metric = json.loads(f.read())
                    for metric_name in metric.keys():
                             metrics[metric_name].append(metric[metric_name])

for metric_name in metrics:
         print(metric_name)
         plt.plot(metrics[metric_name])
         plt.show()
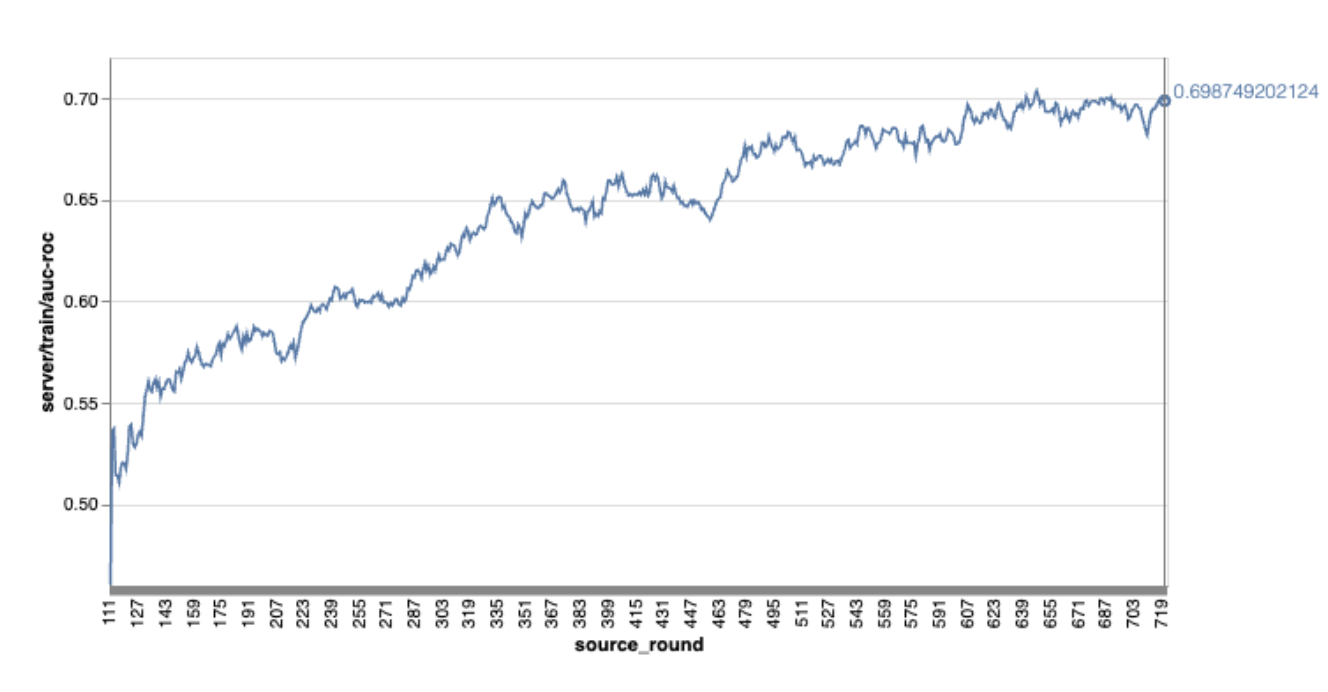
上記のグラフの例では、次の点に注意してください。
- 横軸はラウンド トレーニングの数です。
- y 軸は各ラウンドの auc-roc の値です。
オンデバイス パーソナライズでの画像分類モデルのトレーニング
このチュートリアルでは、EMNIST データセットを使用して、ODP でフェデレーション ラーニング タスクを実行する方法を示します。
ステップ 1. tff.learning.models.FunctionalModel を作成する
def get_image_classification_input_spec():
  return (
      tf.TensorSpec([None, 28, 28, 1], tf.float32),
      tf.TensorSpec([None, 1], tf.int64),
  )

def create_and_save_image_classification_functional_model(
    model_path: str,
) -> None:
  keras_model =  emnist_models.create_original_fedavg_cnn_model(
      only_digits=True
  )
  functional_model = tff.learning.models.functional_model_from_keras(
      keras_model=keras_model,
      input_spec=get_image_classification_input_spec(),
      loss_fn=tf.keras.losses.SparseCategoricalCrossentropy(),
  )
  tff.learning.models.save_functional_model(functional_model, model_path)
- emnist keras モデルの詳細については、emnist_models をご覧ください。
- TfLite は、tf.sparse.SparseTensor または tf.RaggedTensor をまだ十分にサポートしていません。モデルを構築する際は、できるだけ tf.Tensor を使用してください。
- ODP タスクビルダーは、学習プロセスを構築するときにすべての指標を上書きするため、指標を指定する必要はありません。このトピックについては、ステップ 2. タスクビルダー構成を作成します。
次の 2 種類のモデル入力がサポートされています。
タイプ 1。タプル(features_tensor、label_tensor)。
- モデルを作成するとき、input_spec は次のようになります。
def get_input_spec(): return ( tf.TensorSpec([None, 28, 28, 1], tf.float32), tf.TensorSpec([None, 1], tf.int64), )- 上記の処理と ODP 公開 API IsolatedWorker#onTrainingExamples の次の実装を組み合わせて、デバイス上でトレーニング データを生成します。
return tf.train.Example(
    features=tf.train.Features(
        feature={
            'x': tf.train.Feature(
                float_list=tf.train.FloatList(value=[1.0] * 784)
            ),
            'y': tf.train.Feature(
                int64_list=tf.train.Int64List(
                    value=[1]
                )
            ),
        }
    )
).SerializeToString()
タイプ 2。A:
Tuple(Dict[feature_name, feature_tensor], label_tensor)- モデルを作成するとき、input_spec は次のようになります。
def get_input_spec() -> ( Tuple[collections.OrderedDict[str, tf.TensorSpec], tf.TensorSpec] ): return ( collections.OrderedDict( [('feature-1', tf.TensorSpec([None, 1], tf.float32)), ('feature-2', tf.TensorSpec([None, 1], tf.float32))] ), tf.TensorSpec([None, 1], tf.int64), )- 上記の処理と ODP 公開 API IsolatedWorker#onTrainingExamples の次の実装を組み合わせて、トレーニング データを生成します。
return tf.train.Example( features=tf.train.Features( feature={ 'feature-1': tf.train.Feature( float_list=tf.train.FloatList(value=[1.0]) ), 'feature-2': tf.train.Feature( float_list=tf.train.FloatList(value=[2.0]) ), 'my_label': tf.train.Feature( int64_list=tf.train.Int64List( value=[1] ) ), } ) ).SerializeToString()- タスクビルダーの構成で label_name を登録することを忘れないでください。
mode: TRAINING_AND_EVAL  # Task execution mode
population_name: "my_example_model"
label_name: "my_label"
ODP は、学習プロセスを構築するときに DP を自動的に処理します。そのため、関数モデルを作成するときにノイズを追加する必要はありません。
保存された関数モデルの出力は、GitHub リポジトリのサンプルのようになります。
ステップ 2. タスクビルダー構成を作成する
タスクビルダー構成のサンプルは、GitHub リポジトリで確認できます。
トレーニングと評価の指標
指標からユーザーデータが漏洩する可能性があるため、タスクビルダーには、学習プロセスで生成してリリースできる指標のリストが用意されています。完全なリストは GitHub リポジトリで確認できます。
新しいタスクビルダー構成を作成する際の指標リストの例を次に示します。
federated_learning {
  learning_process {
    metrics {
      name: "binary_accuracy"
    }
    metrics {
      name: "binary_crossentropy"
    }
    metrics {
      name: "recall"
    }
    metrics {
      name: "precision"
    }
    metrics {
      name: "auc-roc"
    }
    metrics {
      name: "auc-pr"
    }
  }
}
ご希望の指標がこのリストにない場合は、お問い合わせください。
DP 構成
指定する必要がある DP 関連の構成がいくつかあります。
policies { min_separation_policy { minimum_separation: 1 } model_release_policy { num_max_training_rounds: 1000 dp_target_epsilon: 10 dp_delta: 0.000001 } } differential_privacy { type: FIXED_GAUSSIAN clip_norm: 0.1 noise_multiplier: 0.1 }- 検証に合格するには、
dp_target_epsilonまたはnoise_mulitipilerのいずれかが存在する必要があります(noise_to_epsilonepislon_to_noise)。 - これらのデフォルト設定は、GitHub リポジトリで確認できます。
- 検証に合格するには、
ステップ 3. 保存したモデルとタスクビルダーの構成をデベロッパーのクラウド ストレージにアップロードする
タスクビルダーの構成をアップロードするときは、artifact_building フィールドを更新してください。
ステップ 4. (省略可)新しいタスクを作成せずにアーティファクトのビルドをテストする
cd ${odp_fcp_github_repo}/python
bazel run //python/taskbuilder:task_builder_client -- --saved_model=${path_of_cloud_storage}/mnist_model/ --task_config=${path_of_cloud_storage}/mnist_cnn_task_config_build_artifact_only.pbtxt --build_artifact_only=true --task_builder_server=${task_builder_server_endpoint}
サンプルモデルは、flex ops チェックと dp チェックの両方で検証されます。検証中にバイパスするために skip_flex_ops_check と skip_dp_check を追加できます(いくつかの flex ops が欠落しているため、このモデルは現在のバージョンの ODP クライアントにデプロイできません)。
cd ${odp_fcp_github_repo}/python
bazel run //python/taskbuilder:task_builder_client -- --saved_model=${path_of_cloud_storage}/mnist_model/ --task_config=${path_of_cloud_storage}/mnist_cnn_task_config_build_artifact_only.pbtxt --build_artifact_only=true --task_builder_server=${task_builder_server_endpoint} --skip_flex_ops_check=True --skip_dp_check=True
flex_ops_check: TensorFlow Lite の組み込み演算子ライブラリは、限られた数の TensorFlow 演算子しかサポートしていません(TensorFlow Lite と TensorFlow 演算子の互換性)。互換性のない tensorflow オペレーションはすべて、flex デリゲート(Android.bp)を使用してインストールする必要があります。モデルにサポートされていないオペレーションが含まれている場合は、Google までお問い合わせのうえ、登録してください。
Cannot build the ClientOnlyPlan: Please contact Google to register these ops: {...}タスクビルダーをデバッグする最善の方法は、ローカルでタスクビルダーを開始することです。
# Starts a server at localhost:5000
bazel run //python/taskbuilder:task_builder
# Links to a server at localhost:5000 by removing task_builder_server flag
bazel run //python/taskbuilder:task_builder_client -- --saved_model=${path_of_cloud_storage}/mnist_model/ --task_config=${path_of_cloud_storage}/mnist_cnn_task_config_build_artifact_only.pbtxt --build_artifact_only=true --skip_flex_ops_check=True --skip_dp_check=True
結果のアーティファクトは、構成で指定された Cloud Storage にあります。GitHub リポジトリの例のようなものにする必要があります。
ステップ 5. アーティファクトをビルドし、FCP サーバーに新しいトレーニング タスクと評価タスクのペアを作成します。
build_artifact_only フラグを削除すると、ビルドされたアーティファクトが FCP サーバーにアップロードされます。トレーニング タスクと評価タスクのペアが正常に作成されたことを確認する必要があります。
cd ${odp_fcp_github_repo}/python
bazel run //python/taskbuilder:task_builder_client -- --saved_model=${path_of_cloud_storage}/mnist_model/ --task_config=${path_of_cloud_storage}/mnist_cnn_task_config.pbtxt --task_builder_server=${task_builder_server_endpoint}
ステップ 6. FCP クライアントサイドの準備
- ODP 公開 API
IsolatedWorker#onTrainingExamplesを実装して、トレーニング データを生成します。 FederatedComputeScheduler#scheduleを呼び出します。- Android ソース リポジトリでいくつかの例をご覧ください。
ステップ 7. モニタリング
サーバーの指標
セットアップ手順については、GitHub リポジトリをご覧ください。
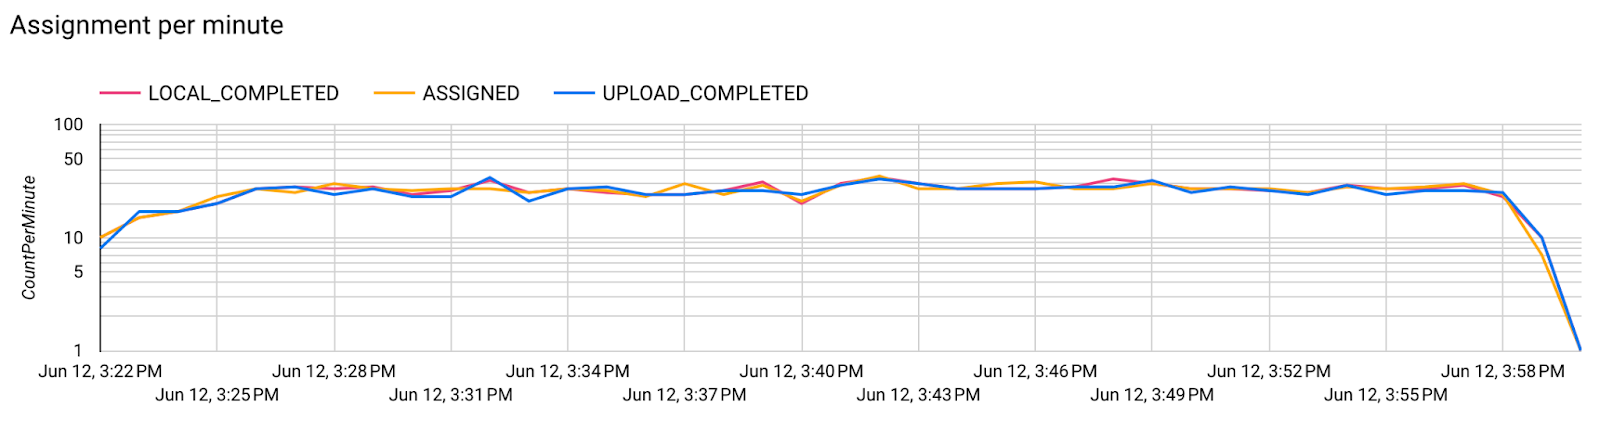 1 分あたりの割り当てのグラフ。
- モデルの指標
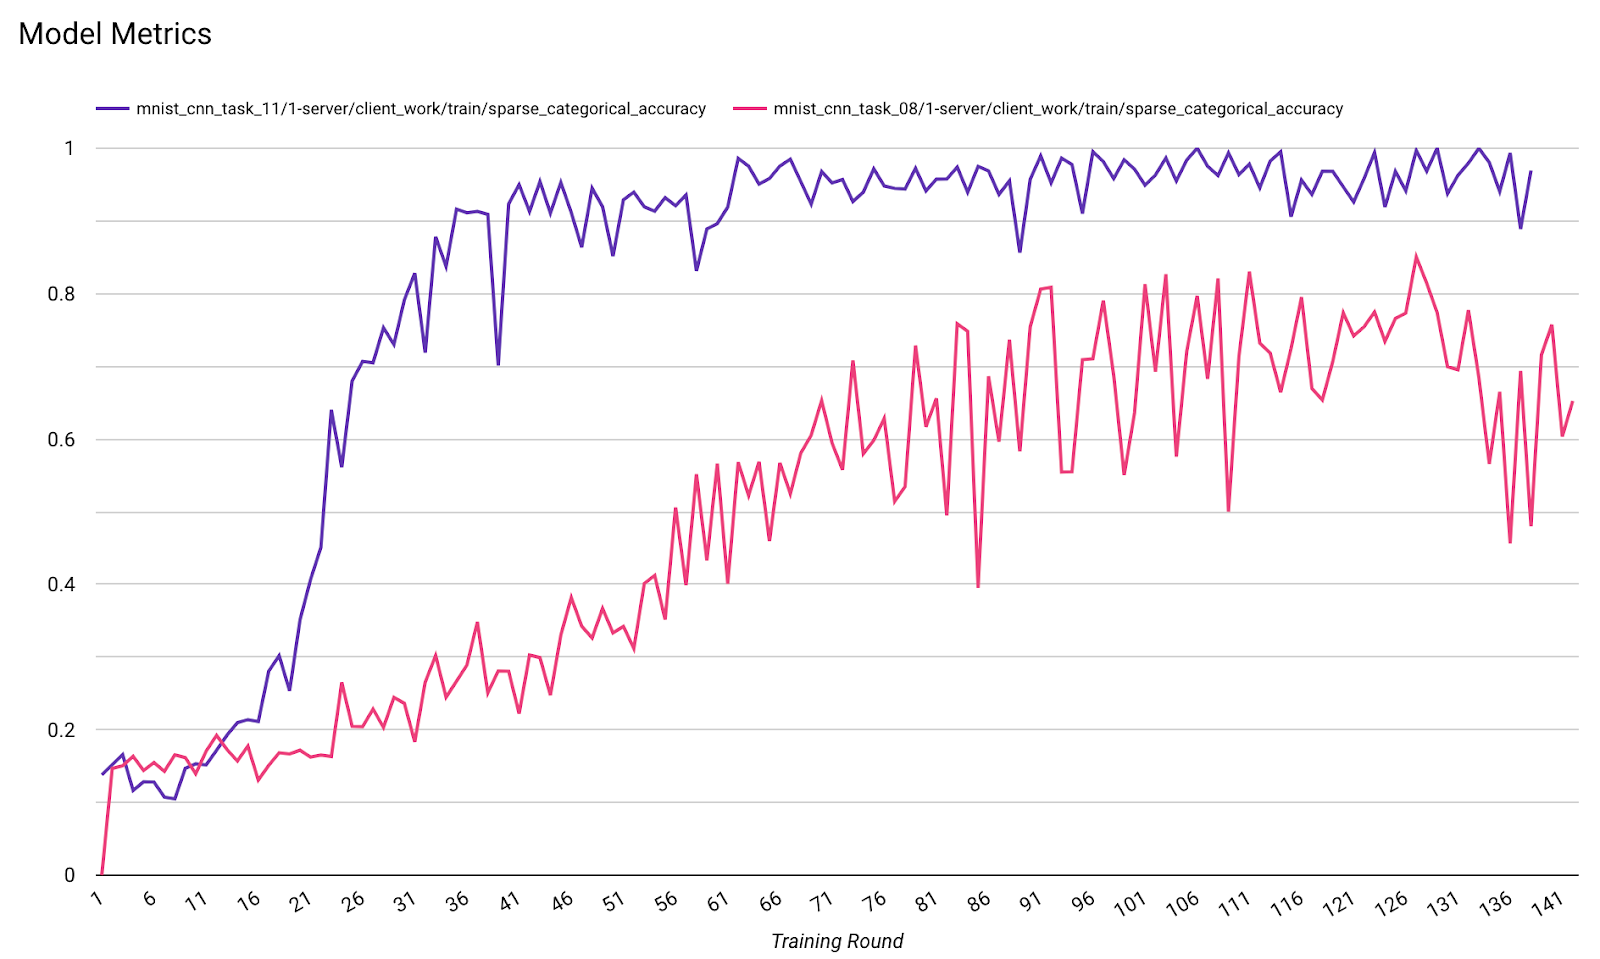
1 つの図で、異なる実行の指標を比較できます。次に例を示します。
- 紫色の線は
noise_multiplier0.1 です - ピンクの線は
noise_multipiler0.3 の場合です。