
इस पेज पर, On-Device Personalization की ओर से उपलब्ध कराए गए फ़ेडरेटेड लर्निंग एपीआई का इस्तेमाल करने का तरीका बताया गया है. इनकी मदद से, फ़ेडरेटेड ऐवरेजिंग लर्निंग प्रोसेस और फ़िक्स्ड गॉसियन नॉइज़ का इस्तेमाल करके मॉडल को ट्रेन किया जा सकता है.
शुरू करने से पहले
शुरू करने से पहले, अपने टेस्ट डिवाइस पर यह तरीका अपनाएं:
पक्का करें कि OnDevicePersonalization मॉड्यूल इंस्टॉल हो. यह मॉड्यूल, अप्रैल 2024 में अपने-आप अपडेट होने की सुविधा के तौर पर उपलब्ध हुआ.
# List the modules installed on the device
adb shell pm list packages --apex-only --show-versioncode
पक्का करें कि यह मॉड्यूल, 341717000 या इससे ज़्यादा के वर्शन कोड के साथ लिस्ट किया गया हो:
package:com.google.android.ondevicepersonalization versionCode:341717000अगर वह मॉड्यूल सूची में नहीं है, तो सेटिंग > सुरक्षा और निजता > अपडेट > Google Play का सिस्टम अपडेट पर जाएं. इससे यह पक्का किया जा सकेगा कि आपका डिवाइस अप-टू-डेट है. ज़रूरत के मुताबिक, अपडेट करें को चुनें.
फ़ेडरेटेड लर्निंग से जुड़ी सभी नई सुविधाएं चालू करें.
# Enable On-Device Personalization apk.
adb shell device_config put on_device_personalization global_kill_switch false
# Enable On-Device Personalization APIs.
adb shell device_config put on_device_personalization enable_ondevicepersonalization_apis true
# Enable On-Device Personalization overriding.
adb shell device_config put on_device_personalization enable_personalization_status_override true
adb shell device_config put on_device_personalization personalization_status_override_value true
# Enable Federated Compute apk.
adb shell device_config put on_device_personalization federated_compute_kill_switch false
फ़ेडरेटेड लर्निंग टास्क बनाना

डायग्राम में दिए गए नंबरों के बारे में ज़्यादा जानकारी, यहां दिए गए आठ चरणों में दी गई है.
फ़ेडरेटेड कंप्यूट सर्वर को कॉन्फ़िगर करना
फ़ेडरेटेड लर्निंग, मैप-रिड्यूस है. यह फ़ेडरेटेड कंप्यूट सर्वर (रिड्यूसर) और क्लाइंट के सेट (मैपर) पर काम करता है. फ़ेडरेटेड कंप्यूट सर्वर, फ़ेडरेटेड लर्निंग के हर टास्क के रनिंग मेटाडेटा और मॉडल की जानकारी को बनाए रखता है. सामान्य तौर पर:
- फ़ेडरेटेड लर्निंग डेवलपर, एक नया टास्क बनाता है. साथ ही, टास्क को चलाने वाले मेटाडेटा और मॉडल की जानकारी, दोनों को सर्वर पर अपलोड करता है.
- जब फ़ेडरेटेड कंप्यूट क्लाइंट, सर्वर को टास्क असाइन करने का नया अनुरोध करता है, तो सर्वर टास्क की ज़रूरी शर्तें पूरी होने की जांच करता है. इसके बाद, ज़रूरी शर्तें पूरी करने वाले टास्क की जानकारी देता है.
- जब फ़ेडरेटेड कंप्यूट क्लाइंट, लोकल कंप्यूटेशन पूरा कर लेता है, तो वह इन कंप्यूटेशन के नतीजों को सर्वर पर भेज देता है. इसके बाद, सर्वर इन कंप्यूटेशन के नतीजों को एग्रीगेट करता है और उनमें नॉइज़ जोड़ता है. इसके बाद, इस नतीजे को फ़ाइनल मॉडल पर लागू करता है.
इन कॉन्सेप्ट के बारे में ज़्यादा जानने के लिए, यहां जाएं:
- फ़ेडरेटेड लर्निंग: ट्रेनिंग के लिए डेटा को एक जगह इकट्ठा किए बिना, मशीन लर्निंग की मदद से मिलकर काम करना
- Towards Federated Learning at Scale: System Design (SysML 2019)
ओडीपी, फ़ेडरेटेड लर्निंग के बेहतर वर्शन का इस्तेमाल करता है. इसमें मॉडल पर लागू करने से पहले, एग्रीगेट पर कैलिब्रेट किया गया (सेंट्रलाइज़ किया गया) नॉइज़ लागू किया जाता है. नॉइज़ के स्केल से यह पक्का होता है कि एग्रीगेट, डिफ़रेंशियल प्राइवसी को बनाए रखें.
पहला चरण. फ़ेडरेटेड कंप्यूट सर्वर बनाना
अपना फ़ेडरेटेड कंप्यूट सर्वर सेट अप करने के लिए, फ़ेडरेटेड कंप्यूट प्रोजेक्ट में दिए गए निर्देशों का पालन करें.
दूसरा चरण. सेव किए गए FunctionalModel को तैयार करना
सेव की गई 'FunctionalModel' फ़ाइल तैयार करें. 'Model' को 'FunctionalModel' में बदलने के लिए, 'functional_model_from_keras' का इस्तेमाल किया जा सकता है. साथ ही, इस 'FunctionalModel' को 'SavedModel' के तौर पर क्रम से लगाने के लिए, 'save_functional_model' का इस्तेमाल किया जा सकता है.
functional_model = tff.learning.models.functional_model_from_keras(keras_model=model)
tff.learning.models.save_functional_model(functional_model, saved_model_path)
तीसरा चरण. फ़ेडरेटेड कंप्यूट सर्वर का कॉन्फ़िगरेशन बनाना
एक fcp_server_config.json तैयार करें. इसमें नीतियां, फ़ेडरेटेड लर्निंग सेटअप, और डिफ़रेंशियल प्राइवसी सेटअप शामिल हों. उदाहरण:
  # Identifies the set of client devices that will participate.
  population_name: "my_new_population"
  # Options you can choose:
  # * TRAINING_ONLY: Only one training task will be generated under this
  #                  population.
  # * TRAINING_AND_EVAL: One training task and one evaluation task will be
  #                      generated under this population.
  # * EVAL_ONLY: Only one evaluation task will be generated under this
  #              population.
  mode: TRAINING_AND_EVAL
  policies {
    # Policy for sampling on-device examples. It is checked every time a
    # device attempts to start a new training.
    min_separation_policy {
      # The minimum number of rounds before the same client participated.
      minimum_separation: 3
    }
    # Policy for releasing training results to developers. It is checked
    # when uploading a new task to the Federated Compute Server.
    model_release_policy {
      # Server stops training when number of training rounds reaches this
      # number.
      num_max_training_rounds: 1000
    }
  }
  # Federated learning setups. They are applied inside Task Builder.
  federated_learning {
    learning_process {
      # Use FED_AVG to build federated learning process. Options you can
      # choose:
      # * FED_AVG: Federated Averaging algorithm
      #            (https://arxiv.org/abs/2003.00295)
      # * FED_SDG: Federated SGD algorithm
      #            (https://arxiv.org/abs/1602.05629)
      type: FED_AVG
      # Optimizer used at client side training. Options you can choose:
      # * ADAM
      # * SGD
      client_optimizer: SGD
      # Learning rate used at client side training.
      client_learning_rate: 0.01
      # Optimizer used at server side training. Options you can choose:
      # * ADAM
      # * SGD
      server_optimizer: ADAM
      # Learning rate used at server side training.
      sever_learning_rate: 1
      runtime_config {
        # Number of participating devices for each round of training.
        report_goal: 2000
      }
      # List of metrics to be evaluated by the model during training and
      # evaluation. Federated Compute Server provides a list of allowed
      # metrics.
      metrics {
        name: "auc-roc"
      }
      metrics {
        name: "binary_accuracy"
      }
    }
    # Whether or not to generate a corresponding evaluation task under the same
    # population. If this field isn't set, only one training task is
    # generated under this population.
    evaluation {
      # The task id under the same population of the source training task that
      # this evaluation task evaluates.
      source_training_task_id: 1
      # Decides how checkpoints from the training task are chosen for
      # evaluation.
      # * every_k_round: the evaluation task randomly picks one checkpoint
      #                  from the past k rounds of training task checkpoints.
      # * every_k_hour: the evaluation task randomly picks one checkpoint
      #                 from the past k hours of training task checkpoints.
      checkpoint_selector: "every_1_round"
      # The traffic of this evaluation task in this population.
      evaluation_traffic: 0.1
      # Number of participating devices for each round of evaluation.
      report_goal: 200
    }
  }
  # Differential Privacy setups. They are applied inside the Task Builder.
  differential_privacy {
    # The DP aggregation algorithm you want to use. Options you can choose:
    # * FIXED_GAUSSIAN: Federated Learning DP-SGD with fixed clipping norm
    #                   described in "Learning Differentially Private Recurrent
    #                   Language Models" (https://arxiv.org/abs/1710.06963).
    # * ADAPTIVE_GAUSSIAN: Federated Learning DP-SGD with quantile-based clip
    #                      norm estimation described in "Differentially Private
    #                      Learning with Adaptive Clipping"
    #                      (https://arxiv.org/abs/1905.03871).
    # * TREE: DP-FTRL algorithm described in "Practical and Private (Deep)
    #         Learning without Sampling or Shuffling"
    #         (https://arxiv.org/abs/2103.00039).
    # * ADADPTIVE_TREE: DP-FTRL with adaptive clipping norm descirbed in
    #                  "Differentially Private Learning with Adaptive Clipping"
    #                  (https://arxiv.org/abs/1905.03871).
    type: FIXED_GAUSSIAN
    # Noise multiplier for the Gaussian noise.
    noise_multiplier: 0.1
    #   The value of the clipping norm.
    clip_norm: 0.1
  }
चरण 4. ज़िप कॉन्फ़िगरेशन को फ़ेडरेटेड कंप्यूट सर्वर पर सबमिट करें.
ज़िप फ़ाइल और fcp_server_config.json को फ़ेडरेटेड कंप्यूट सर्वर पर सबमिट करें.
task_builder_client --task_builder_server='http://{federated_compute_server_endpoint}' --saved_model='saved_model' --task_config='fcp_server_config.json'
फ़ेडरेटेड कंप्यूट सर्वर एंडपॉइंट वह सर्वर होता है जिसे आपने पहले चरण में सेट अप किया था.
LiteRT में पहले से मौजूद ऑपरेटर लाइब्रेरी, सिर्फ़ सीमित संख्या में TensorFlow ऑपरेटर के साथ काम करती है (TensorFlow ऑपरेटर चुनें). OnDevicePersonalization मॉड्यूल के अलग-अलग वर्शन में, काम करने वाले ऑपरेटर सेट अलग-अलग हो सकते हैं. टास्क बिल्डर में टास्क बनाते समय, ऑपरेटर की पुष्टि करने की प्रोसेस पूरी की जाती है. इससे यह पक्का किया जाता है कि टास्क, ऑपरेटर के साथ काम करता है.
OnDevicePersonalization मॉड्यूल का कम से कम वह वर्शन इस्तेमाल किया जाएगा जो टास्क के मेटाडेटा में शामिल है. यह जानकारी, टास्क बिल्डर के सूचना मैसेज में देखी जा सकती है.
I1023 22:16:53.058027 139653371516736 task_builder_client.py:109] Success! Tasks are built, and artifacts are uploaded to the cloud.
I1023 22:16:53.058399 139653371516736 task_builder_client.py:112] applied_algorithms {
  learning_algo: FED_AVG
  client_optimizer: SGD
  server_optimizer: SGD
  dp_aggregator: FIXED_GAUSSIAN
}
metric_results {
  accepted_metrics: "binary_accuracy, binary_crossentropy, recall, precision, auc-roc, auc-pr"
}
dp_hyperparameters {
  dp_delta: 0.000001
  dp_epsilon: 6.4
  noise_multiplier: 1.0
  dp_clip_norm: 1.0
  num_training_rounds: 10000
}

I1023 22:16:53.058594 139653371516736 task_builder_client.py:113] training_task {
  min_client_version: "341912000"
}
eval_task {
  min_client_version: "341812000"
}
फ़ेडरेटेड कंप्यूट सर्वर, इस टास्क को उन सभी डिवाइसों को असाइन करेगा जिनमें OnDevicePersonalization मॉड्यूल इंस्टॉल है और उसका वर्शन 341812000 से ज़्यादा है.
अगर आपके मॉडल में ऐसे ऑपरेशन शामिल हैं जो OnDevicePersonalization के किसी भी मॉड्यूल के साथ काम नहीं करते हैं, तो टास्क बनाते समय गड़बड़ी का मैसेज जनरेट होगा.
common.TaskBuilderException: Cannot build the ClientOnlyPlan: Please contact Google to register these ops: {'L2Loss': 'L2LossOp<CPUDevice, float>'}
. Stop building remaining artifacts.
GitHub पर, इस्तेमाल किए जा सकने वाले फ़्लेक्स ऑप्स की पूरी सूची देखी जा सकती है.
Android फ़ेडरेटेड कंप्यूट APK बनाना
Android फ़ेडरेटेड कंप्यूट एपीके बनाने के लिए, आपको अपने AndroidManifest.xml में फ़ेडरेटेड कंप्यूट सर्वर यूआरएल एंडपॉइंट तय करना होगा. इससे आपका फ़ेडरेटेड कंप्यूट क्लाइंट कनेक्ट होता है.
चरण 5. फ़ेडरेटेड कंप्यूट सर्वर के यूआरएल एंडपॉइंट के बारे में जानकारी देना
अपने AndroidManifest.xml में फ़ेडरेटेड कंप्यूट सर्वर का यूआरएल एंडपॉइंट डालें. इसे आपने पहले चरण में सेट अप किया था. इससे आपका फ़ेडरेटेड कंप्यूट क्लाइंट कनेक्ट होता है.
<!-- Contents of AndroidManifest.xml -->
<manifest xmlns:android="http://schemas.android.com/apk/res/android"
          package="com.example.odpsample" >
    <application android:label="OdpSample">
        <!-- XML resource that contains other ODP settings. -->
        <property android:name="android.ondevicepersonalization.ON_DEVICE_PERSONALIZATION_CONFIG"
                  android:resource="@xml/OdpSettings"></property>
        <!-- The service that ODP will bind to. -->
        <service android:name="com.example.odpsample.SampleService"
                android:exported="true" android:isolatedProcess="true" />
    </application>
</manifest>
<property> टैग में बताई गई एक्सएमएल रिसॉर्स फ़ाइल को भी <service> टैग में सेवा क्लास का एलान करना होगा. साथ ही, फ़ेडरेटेड कंप्यूट सर्वर के उस यूआरएल एंडपॉइंट के बारे में बताना होगा जिससे फ़ेडरेटेड कंप्यूट क्लाइंट कनेक्ट होगा:
<!-- Contents of res/xml/OdpSettings.xml -->
<on-device-personalization>
   <!-- Name of the service subclass -->
   <service name="com.example.odpsample.SampleService">
     <!-- If you want to use federated compute feature to train a model,
          specify this tag. -->
     <federated-compute-settings url="https://fcpserver.com/" />
   </service>
</on-device-personalization>
छठा चरण. IsolatedWorker#onTrainingExample API लागू करना
ट्रेनिंग डेटा जनरेट करने के लिए, On-Device Personalization के सार्वजनिक एपीआई IsolatedWorker#onTrainingExample को लागू करें.
IsolatedProcess में चलने वाले कोड के पास, नेटवर्क, लोकल डिस्क या डिवाइस पर चल रही अन्य सेवाओं का सीधा ऐक्सेस नहीं होता. हालांकि, ये एपीआई उपलब्ध हैं:
- 'getRemoteData' - रिमोट से डाउनलोड किया गया, न बदलने वाला कुंजी-वैल्यू वाला डेटा. अगर लागू हो, तो डेवलपर के बैकएंड से यह डेटा डाउनलोड किया जाता है.
- 'getLocalData' - डेवलपर की ओर से स्थानीय तौर पर सेव किया गया, बदला जा सकने वाला कुंजी-वैल्यू डेटा. यह तब लागू होता है, जब इसकी ज़रूरत हो.
- 'UserData' - प्लैटफ़ॉर्म से मिला उपयोगकर्ता का डेटा.
- 'getLogReader' - यह REQUESTS और EVENTS टेबल के लिए DAO दिखाता है.
उदाहरण:
@Override public void onTrainingExample(
            @NonNull TrainingExampleInput input,
            @NonNull Consumer<TrainingExampleOutput> consumer) {
    // Check if the incoming training task is the task we want.
    if (input.getPopulationName() == "my_new_population") {
        TrainingExampleOutput result = new TrainingExampleOutput.Builder():
        RequestLogRecord record = this.getLogReader().getRequestLogRecord(1);
        int count = 1;
        // Iterate logging event table.
        for (ContentValues contentValues: record.rows()) {
            Features features = Features.newBuilder()
                // Retrieve carrier from user info.
                .putFeature("carrier", buildFeature(mUserData.getCarrier()))
                // Retrieve features from logging info.
                .putFeature("int_feature_1",
                    buildFeature(contentValues.get("int_feature_1")
            result.addTrainingExample(
                    Example.newBuilder()
                        .setFeatures(features).build().toByteArray())
                .addResumptionToken(
                    String.format("token%d", count).getBytes()))
                .build();
            count++;
        }
        consumer.accept(result.build());
    }
}
सातवां चरण. बार-बार होने वाली ट्रेनिंग का टास्क शेड्यूल करें.
On-Device Personalization, डेवलपर को फ़ेडरेटेड कंप्यूट जॉब शेड्यूल करने या रद्द करने के लिए FederatedComputeScheduler उपलब्ध कराता है. IsolatedWorker के ज़रिए इसे कॉल करने के अलग-अलग विकल्प हैं. जैसे, शेड्यूल के हिसाब से या एसिंक डाउनलोड पूरा होने पर. दोनों के उदाहरण यहां दिए गए हैं.
शेड्यूल के हिसाब से विकल्प.
IsolatedWorker#onExecuteमेंFederatedComputeScheduler#scheduleको कॉल करें.@Override public void onExecute( @NonNull ExecuteInput input, @NonNull Consumer<ExecuteOutput> consumer ) { if (input != null && input.getAppParams() != null && input.getAppParams().getString("schedule_training") != null) { if (input.getAppParams().getString("schedule_training").isEmpty()) { consumer.accept(null); return; } TrainingInterval interval = new TrainingInterval.Builder() .setMinimumInterval(Duration.ofSeconds(10)) .setSchedulingMode(2) .build(); FederatedComputeScheduler.Params params = new FederatedComputeScheduler .Params(interval); FederatedComputeInput fcInput = new FederatedComputeInput.Builder() .setPopulationName( input.getAppParams().getString("schedule_training")).build(); mFCScheduler.schedule(params, fcInput); ExecuteOutput result = new ExecuteOutput.Builder().build(); consumer.accept(result); } }डाउनलोड पूरा होने का विकल्प. अगर ट्रेनिंग टास्क को शेड्यूल करना, किसी एसिंक्रोनस डेटा या प्रोसेस पर निर्भर करता है, तो
IsolatedWorker#onDownloadCompletedमेंFederatedComputeScheduler#scheduleको कॉल करें.
पुष्टि
यहां बताया गया है कि फ़ेडरेटेड लर्निंग टास्क ठीक से चल रहा है या नहीं, इसकी पुष्टि कैसे करें.
चरण 8. पुष्टि करें कि फ़ेडरेटेड लर्निंग टास्क सही तरीके से चल रहा है.
सर्वर साइड एग्रीगेशन के हर राउंड में, एक नया मॉडल चेकपॉइंट और एक नई मेट्रिक फ़ाइल जनरेट होती है.
ये मेट्रिक, की-वैल्यू पेयर वाली JSON फ़ॉर्मैट की फ़ाइल में होती हैं. यह फ़ाइल, चरण 3 में तय किए गए Metrics की सूची से जनरेट होती है. प्रतिनिधि मेट्रिक की JSON फ़ाइल का उदाहरण यहां दिया गया है:
{"server/client_work/train/binary_accuracy":0.5384615659713745, "server/client_work/train/binary_crossentropy":0.694046676158905, "server/client_work/train/recall":0.20000000298023224, "server/client_work/train/precision":0.3333333432674408, "server/client_work/train/auc-roc":0.3500000238418579, "server/client_work/train/auc-pr":0.44386863708496094, "server/finalizer/update_non_finite":0.0}
मॉडल की मेट्रिक पाने और ट्रेनिंग की परफ़ॉर्मेंस को मॉनिटर करने के लिए, इस तरह की स्क्रिप्ट का इस्तेमाल किया जा सकता है:
import collections
import json
import matplotlib.pyplot as plt
from google.cloud import storage

# The population_name you set in fcp_server_config.json in Step 3.
POPULATION_NAME = 'my_new_population'
# The Google Cloud storage you set in Step 1.
GCS_BUCKET_NAME = 'fcp-gcs'
NUM_TRAINING_ROUND = 1000

storage_client = storage.Client()
bucket = storage_client.bucket(GCS_BUCKET_NAME)

metrics = collections.defaultdict(list)
for i in range(NUM_TRAINING_ROUND):
    blob = bucket.blob('{}/{}/1/{}/s/0/metrics'.format(GCS_BUCKET_NAME, POPULATION_NAME, i+1))
    with blob.open("r") as f:
                     metric = json.loads(f.read())
                    for metric_name in metric.keys():
                             metrics[metric_name].append(metric[metric_name])

for metric_name in metrics:
         print(metric_name)
         plt.plot(metrics[metric_name])
         plt.show()
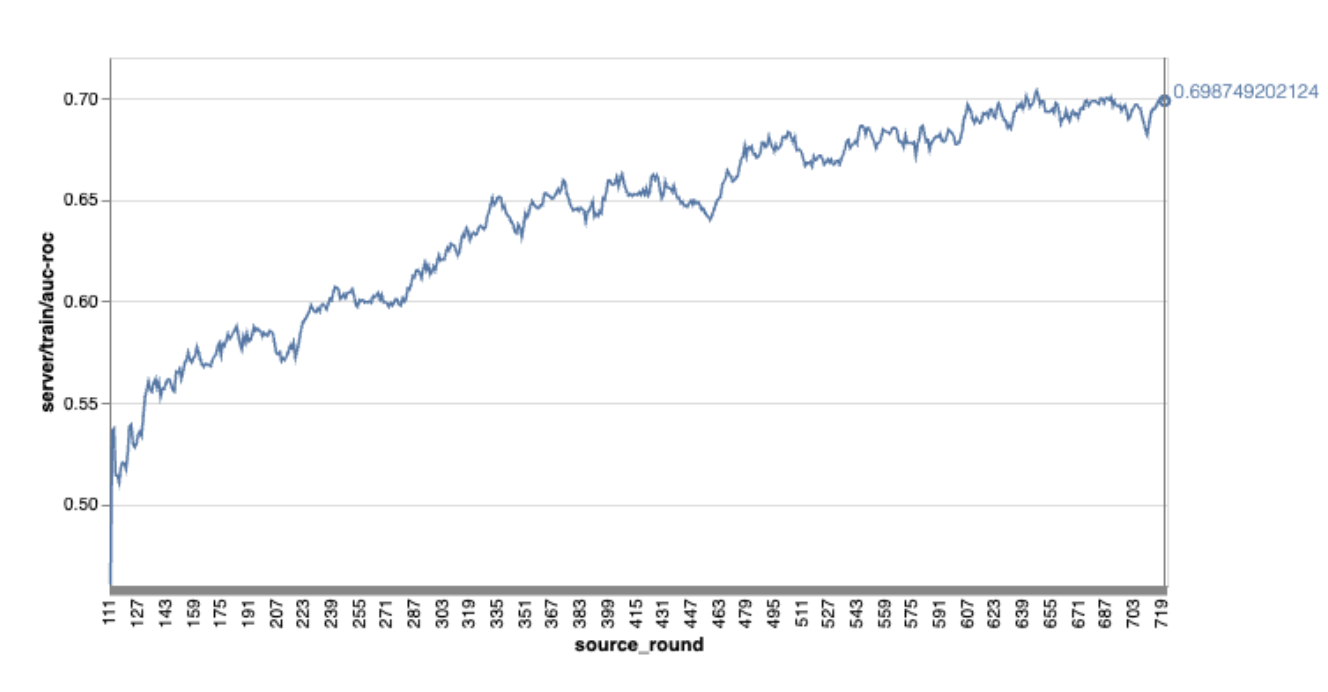
ध्यान दें कि ऊपर दिए गए उदाहरण ग्राफ़ में:
- X-ऐक्सिस, राउंड ट्रेनिंग की संख्या है.
- y-ऐक्सिस, हर राउंड के एयूसी-आरओसी की वैल्यू है.
उपयोगकर्ता के डिवाइस पर सेव किए गए डेटा के आधार पर, इमेज क्लासिफ़िकेशन मॉडल को ट्रेनिंग देना
इस ट्यूटोरियल में, EMNIST डेटासेट का इस्तेमाल किया गया है. इससे यह दिखाया गया है कि ओडीपी पर फ़ेडरेटेड लर्निंग टास्क को कैसे चलाया जाता है.
पहला चरण. tff.learning.models.FunctionalModel बनाएं
def get_image_classification_input_spec():
  return (
      tf.TensorSpec([None, 28, 28, 1], tf.float32),
      tf.TensorSpec([None, 1], tf.int64),
  )

def create_and_save_image_classification_functional_model(
    model_path: str,
) -> None:
  keras_model =  emnist_models.create_original_fedavg_cnn_model(
      only_digits=True
  )
  functional_model = tff.learning.models.functional_model_from_keras(
      keras_model=keras_model,
      input_spec=get_image_classification_input_spec(),
      loss_fn=tf.keras.losses.SparseCategoricalCrossentropy(),
  )
  tff.learning.models.save_functional_model(functional_model, model_path)
- आपको emnist_models में, emnist keras मॉडल की जानकारी मिल सकती है.
- TfLite में, फ़िलहाल tf.sparse.SparseTensor या tf.RaggedTensor के लिए बेहतर सपोर्ट उपलब्ध नहीं है. मॉडल बनाते समय, जितना हो सके tf.Tensor का इस्तेमाल करें.
- ओडीपी टास्क बिल्डर, लर्निंग प्रोसेस को तैयार करते समय सभी मेट्रिक को बदल देगा. इसलिए, किसी भी मेट्रिक को तय करने की ज़रूरत नहीं है. इस विषय के बारे में ज़्यादा जानकारी दूसरे चरण में दी जाएगी. टास्क बिल्डर कॉन्फ़िगरेशन बनाएं.
मॉडल में दो तरह के इनपुट इस्तेमाल किए जा सकते हैं:
टाइप 1. टपल(features_tensor, label_tensor).
- मॉडल बनाते समय, input_spec इस तरह दिखता है:
def get_input_spec(): return ( tf.TensorSpec([None, 28, 28, 1], tf.float32), tf.TensorSpec([None, 1], tf.int64), )- डिवाइस पर ट्रेनिंग डेटा जनरेट करने के लिए, ODP के सार्वजनिक एपीआई IsolatedWorker#onTrainingExamples को लागू करने के लिए, यहां दिए गए कोड का इस्तेमाल करें:
return tf.train.Example(
    features=tf.train.Features(
        feature={
            'x': tf.train.Feature(
                float_list=tf.train.FloatList(value=[1.0] * 784)
            ),
            'y': tf.train.Feature(
                int64_list=tf.train.Int64List(
                    value=[1]
                )
            ),
        }
    )
).SerializeToString()
टाइप 2.
Tuple(Dict[feature_name, feature_tensor], label_tensor)- मॉडल बनाते समय, input_spec इस तरह दिखता है:
def get_input_spec() -> ( Tuple[collections.OrderedDict[str, tf.TensorSpec], tf.TensorSpec] ): return ( collections.OrderedDict( [('feature-1', tf.TensorSpec([None, 1], tf.float32)), ('feature-2', tf.TensorSpec([None, 1], tf.float32))] ), tf.TensorSpec([None, 1], tf.int64), )- ट्रेनिंग डेटा जनरेट करने के लिए, ODP के सार्वजनिक एपीआई IsolatedWorker#onTrainingExamples के इस तरीके को ऊपर दिए गए तरीके के साथ इस्तेमाल करें:
return tf.train.Example( features=tf.train.Features( feature={ 'feature-1': tf.train.Feature( float_list=tf.train.FloatList(value=[1.0]) ), 'feature-2': tf.train.Feature( float_list=tf.train.FloatList(value=[2.0]) ), 'my_label': tf.train.Feature( int64_list=tf.train.Int64List( value=[1] ) ), } ) ).SerializeToString()- टास्क बिल्डर कॉन्फ़िगरेशन में label_name को रजिस्टर करना न भूलें.
mode: TRAINING_AND_EVAL  # Task execution mode
population_name: "my_example_model"
label_name: "my_label"
ओडीपी, लर्निंग प्रोसेस बनाते समय डीपी को अपने-आप मैनेज करता है. इसलिए, फ़ंक्शनल मॉडल बनाते समय किसी भी तरह का नॉइज़ जोड़ने की ज़रूरत नहीं है.
सेव किए गए इस फ़ंक्शनल मॉडल का आउटपुट, हमारी GitHub रिपॉज़िटरी में मौजूद सैंपल की तरह दिखना चाहिए.
दूसरा चरण. टास्क बिल्डर कॉन्फ़िगरेशन बनाना
हमारी GitHub रिपॉज़िटरी में, आपको टास्क बिल्डर कॉन्फ़िगरेशन के सैंपल मिल सकते हैं.
ट्रेनिंग और आकलन की मेट्रिक
मेट्रिक से उपयोगकर्ता का डेटा लीक हो सकता है. इसलिए, टास्क बिल्डर के पास मेट्रिक की एक सूची होगी. इस सूची में वे मेट्रिक शामिल होंगी जिन्हें लर्निंग प्रोसेस जनरेट और रिलीज़ कर सकती है. पूरी सूची हमारी GitHub रिपॉज़िटरी में देखी जा सकती है.
टास्क बिल्डर का नया कॉन्फ़िगरेशन बनाते समय, मेट्रिक की सूची का एक उदाहरण यहां दिया गया है:
federated_learning {
  learning_process {
    metrics {
      name: "binary_accuracy"
    }
    metrics {
      name: "binary_crossentropy"
    }
    metrics {
      name: "recall"
    }
    metrics {
      name: "precision"
    }
    metrics {
      name: "auc-roc"
    }
    metrics {
      name: "auc-pr"
    }
  }
}
अगर आपकी दिलचस्पी वाली मेट्रिक, इस सूची में नहीं है, तो हमसे संपर्क करें.
डीपी कॉन्फ़िगरेशन
डीपी से जुड़े कुछ कॉन्फ़िगरेशन हैं जिन्हें सेट करना ज़रूरी है:
policies { min_separation_policy { minimum_separation: 1 } model_release_policy { num_max_training_rounds: 1000 dp_target_epsilon: 10 dp_delta: 0.000001 } } differential_privacy { type: FIXED_GAUSSIAN clip_norm: 0.1 noise_multiplier: 0.1 }- पुष्टि करने के लिए,
dp_target_epsilonयाnoise_mulitipilerमें से कोई एक मौजूद होना चाहिए: (noise_to_epsilonepislon_to_noise). - आपको ये डिफ़ॉल्ट सेटिंग, हमारे GitHub रिपॉज़िटरी में मिलेंगी.
- पुष्टि करने के लिए,
तीसरा चरण. सेव किए गए मॉडल और टास्क बिल्डर के कॉन्फ़िगरेशन को किसी भी डेवलपर के क्लाउड स्टोरेज में अपलोड करें
टास्क बिल्डर कॉन्फ़िगरेशन अपलोड करते समय, artifact_building फ़ील्ड अपडेट करना न भूलें.
चरण 4. (ज़रूरी नहीं) नया टास्क बनाए बिना, टेस्ट आर्टफ़ैक्ट बनाना
cd ${odp_fcp_github_repo}/python
bazel run //python/taskbuilder:task_builder_client -- --saved_model=${path_of_cloud_storage}/mnist_model/ --task_config=${path_of_cloud_storage}/mnist_cnn_task_config_build_artifact_only.pbtxt --build_artifact_only=true --task_builder_server=${task_builder_server_endpoint}
सैंपल मॉडल की पुष्टि, फ़्लेक्स ऑप्स चेक और डीपी चेक, दोनों के ज़रिए की जाती है. पुष्टि के दौरान बाईपास करने के लिए, skip_flex_ops_check और skip_dp_check जोड़े जा सकते हैं. हालांकि, कुछ फ़्लेक्स ऑप्स मौजूद न होने की वजह से, इस मॉडल को ओडीपी क्लाइंट के मौजूदा वर्शन पर डिप्लॉय नहीं किया जा सकता.
cd ${odp_fcp_github_repo}/python
bazel run //python/taskbuilder:task_builder_client -- --saved_model=${path_of_cloud_storage}/mnist_model/ --task_config=${path_of_cloud_storage}/mnist_cnn_task_config_build_artifact_only.pbtxt --build_artifact_only=true --task_builder_server=${task_builder_server_endpoint} --skip_flex_ops_check=True --skip_dp_check=True
flex_ops_check: TensorFlow Lite की बिल्ट-इन ऑपरेटर लाइब्रेरी, सिर्फ़ सीमित संख्या में TensorFlow ऑपरेटर के साथ काम करती है (TensorFlow Lite और TensorFlow ऑपरेटर के साथ काम करने की सुविधा). TensorFlow के साथ काम न करने वाले सभी ऑपरेशनों को, फ़्लेक्स डेलिगेट (Android.bp) का इस्तेमाल करके इंस्टॉल करना होगा. अगर किसी मॉडल में ऐसे ऑप्स शामिल हैं जो काम नहीं करते, तो उन्हें रजिस्टर करने के लिए हमसे संपर्क करें:
Cannot build the ClientOnlyPlan: Please contact Google to register these ops: {...}टास्क बिल्डर को डीबग करने का सबसे अच्छा तरीका यह है कि इसे स्थानीय तौर पर शुरू किया जाए:
# Starts a server at localhost:5000
bazel run //python/taskbuilder:task_builder
# Links to a server at localhost:5000 by removing task_builder_server flag
bazel run //python/taskbuilder:task_builder_client -- --saved_model=${path_of_cloud_storage}/mnist_model/ --task_config=${path_of_cloud_storage}/mnist_cnn_task_config_build_artifact_only.pbtxt --build_artifact_only=true --skip_flex_ops_check=True --skip_dp_check=True
आपको कॉन्फ़िगरेशन में बताए गए क्लाउड स्टोरेज में, नतीजे के तौर पर मिले आर्टफ़ैक्ट दिखेंगे. यह हमारी GitHub रिपॉज़िटरी में दिए गए उदाहरण जैसा होना चाहिए.
चरण 5. आर्टफ़ैक्ट बनाएं. साथ ही, FCP सर्वर पर ट्रेनिंग और आकलन के टास्क का नया जोड़ा बनाएं.
build_artifact_only फ़्लैग हटाने पर, बनाए गए आर्टफ़ैक्ट FCP सर्वर पर अपलोड हो जाएंगे. आपको यह देखना चाहिए कि ट्रेनिंग और आकलन के टास्क का पेयर सही तरीके से बनाया गया हो
cd ${odp_fcp_github_repo}/python
bazel run //python/taskbuilder:task_builder_client -- --saved_model=${path_of_cloud_storage}/mnist_model/ --task_config=${path_of_cloud_storage}/mnist_cnn_task_config.pbtxt --task_builder_server=${task_builder_server_endpoint}
छठा चरण. FCP क्लाइंट साइड को इस्तेमाल करने के लिए तैयार करना
- ट्रेनिंग डेटा जनरेट करने के लिए, ODP public API
IsolatedWorker#onTrainingExamplesलागू करें. FederatedComputeScheduler#scheduleपर कॉल करें.- हमारे Android सोर्स रिपॉज़िटरी में, कुछ उदाहरण देखें.
सातवां चरण. मॉनिटर करने के लिए
सर्वर मेट्रिक
हमारी GitHub रिपॉज़िटरी में, सेटअप करने के निर्देश देखें.
- मॉडल मेट्रिक
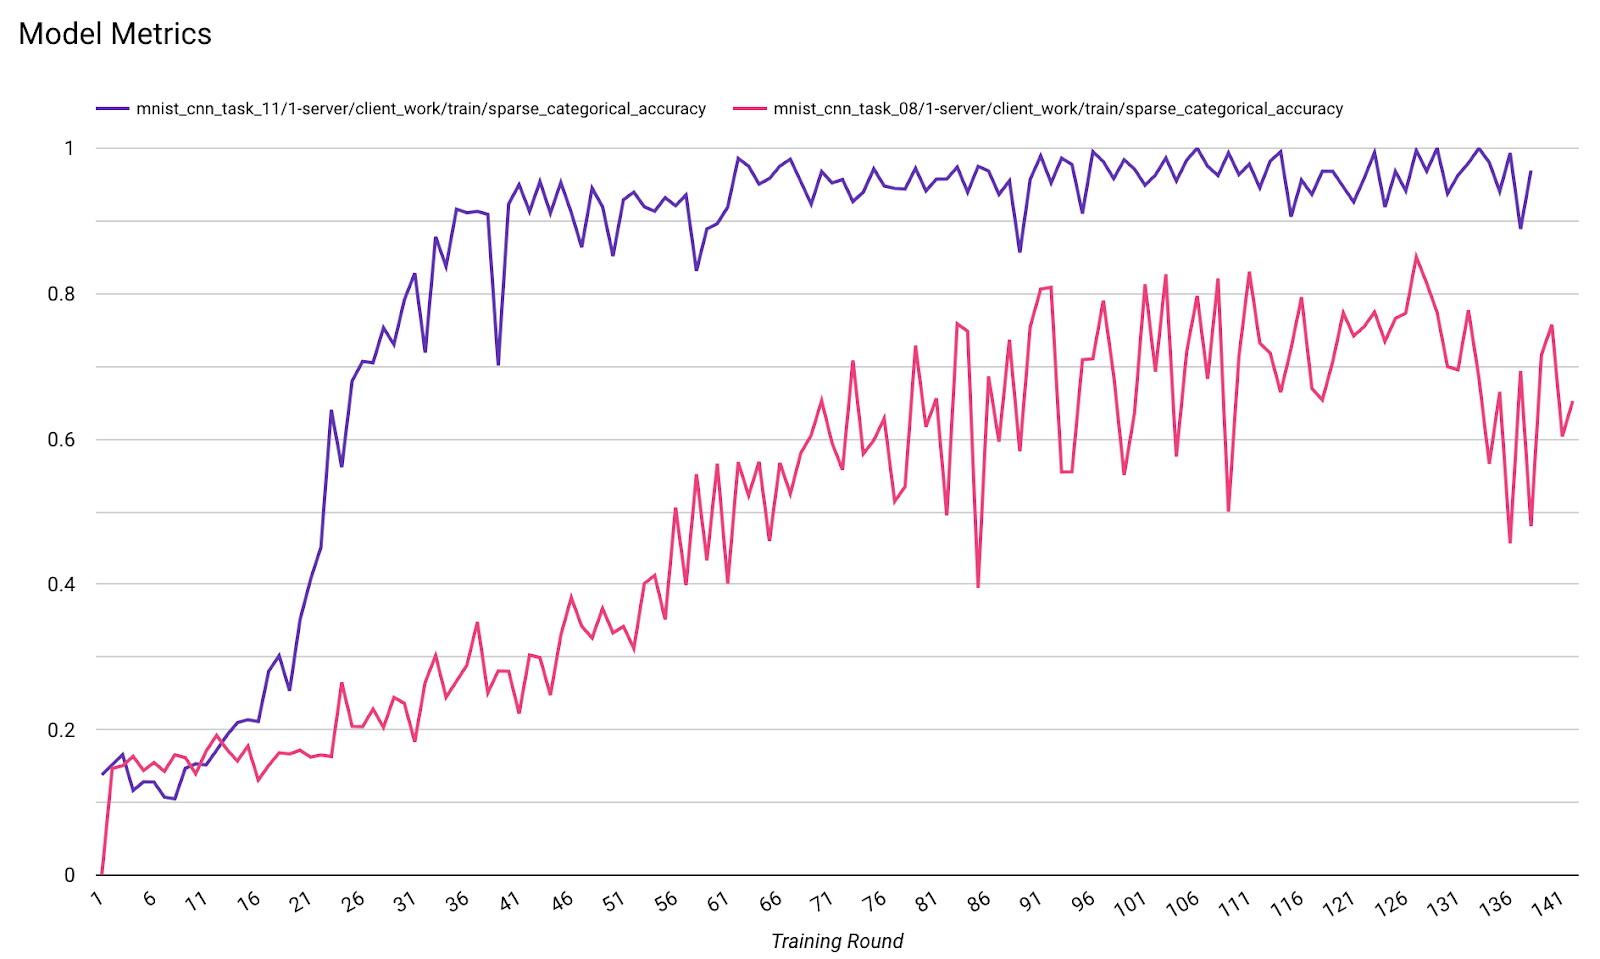
एक डायग्राम में, अलग-अलग रन की मेट्रिक की तुलना की जा सकती है. उदाहरण के लिए:
- बैंगनी लाइन
noise_multiplier0.1 के साथ है - गुलाबी लाइन,
noise_multipiler0.3 के साथ है