

1. 1. 先決條件
預計完成時間:1 到 2 小時
本程式碼研究室提供 2 種模式:本機測試或匯總服務。本機測試模式需要本機和 Chrome 瀏覽器 (不需建立/使用 Google Cloud 資源)。匯總服務模式需要在 Google Cloud 上完整部署匯總服務。
如要在任一模式下完成本程式碼研究室,請務必符合以下條件:系統會根據需求是否適用於本機測試或匯總服務,標示各項需求。
1.1. 完成註冊和認證 (匯總服務)
如要使用 Privacy Sandbox API,請確認您已完成 Chrome 和 Android 的註冊和認證。
1.2. 啟用廣告隱私權 API (本機測試和匯總服務)
由於我們會使用 Privacy Sandbox,建議您啟用 Privacy Sandbox 廣告 API。
在瀏覽器中前往 chrome://settings/adPrivacy,然後啟用所有廣告隱私權 API。
並確認已啟用第三方 Cookie。
在 chrome://settings/cookies 中,確認系統「未」封鎖第三方 Cookie。視 Chrome 版本而定,這個設定選單可能會顯示不同選項,但可接受的設定包括:
- 「封鎖所有第三方 Cookie」= 停用
- 「封鎖第三方 Cookie」= 停用
- 「在無痕模式中封鎖第三方 Cookie」= ENABLED
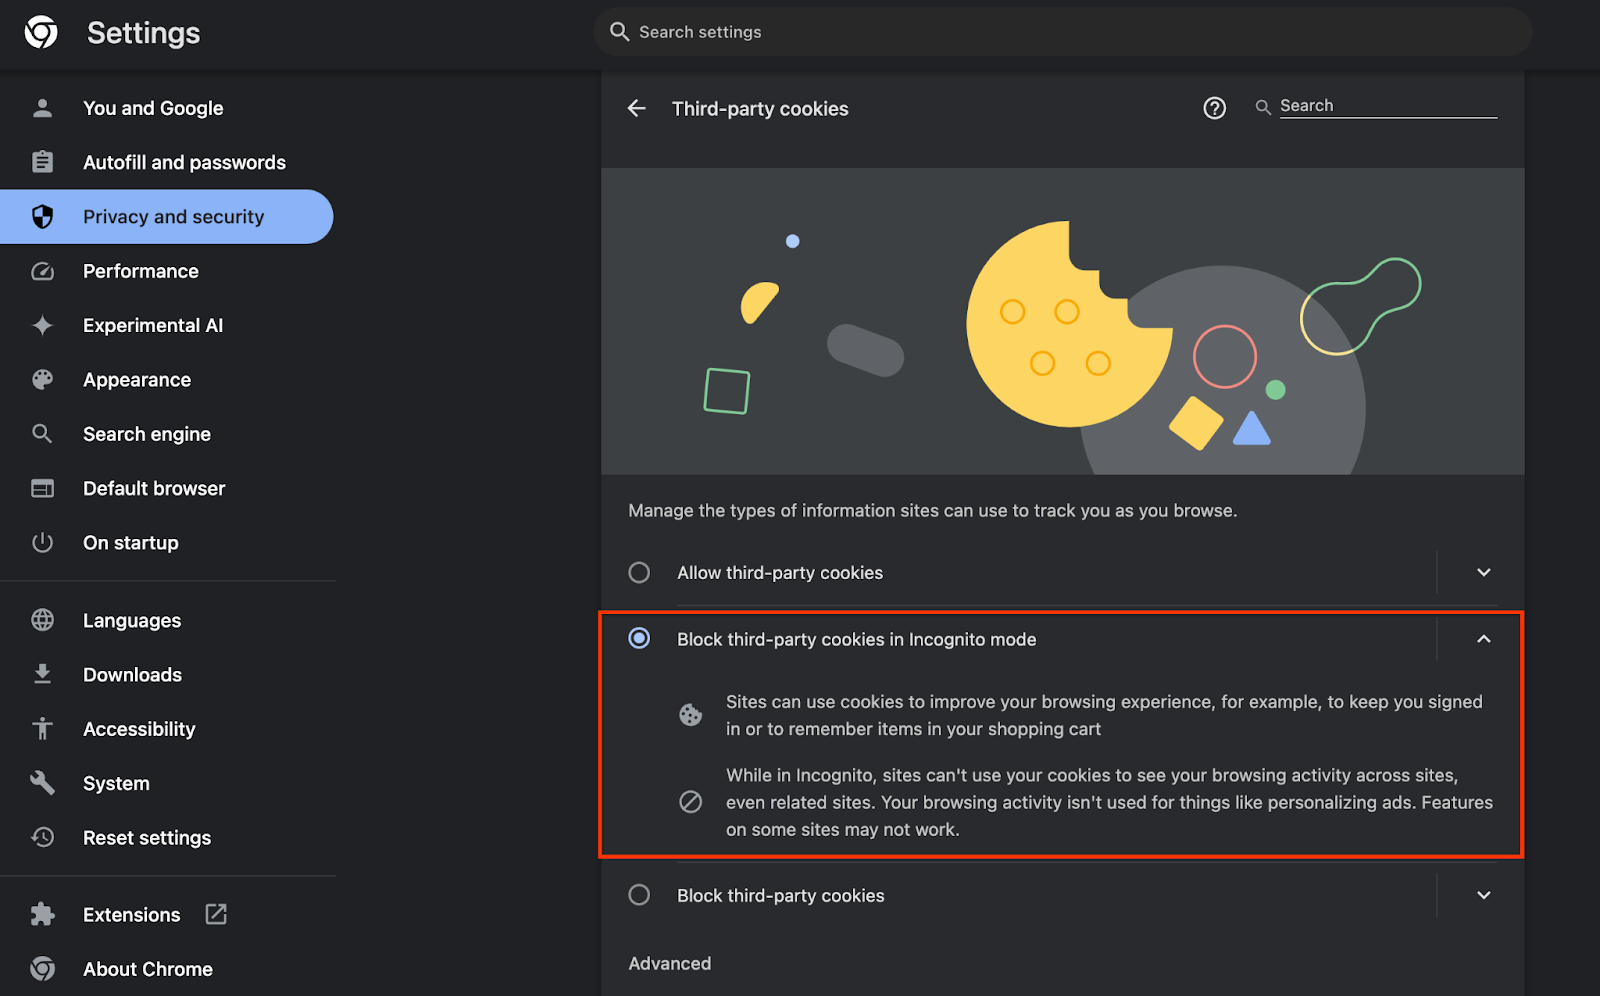 啟用 Cookie
1.3. 下載本機測試工具 (本機測試)
如要進行本機測試,請下載本機測試工具。這項工具會根據未加密的偵錯報表產生摘要報表。
您可以前往 GitHub 中的 Cloud Function JAR 封存檔下載本機測試工具。名稱應為 LocalTestingTool_{version}.jar。
1.4. 確認已安裝 JAVA JRE (本機測試和匯總服務)
開啟「終端機」,並使用 java --version 檢查機器是否已安裝 Java 或 openJDK。
 檢查 Java 版本。
如果尚未安裝,請從 Java 網站或 openJDK 網站下載並安裝。
1.5. 下載 aggregatable_report_converter (本機測試和匯總服務)
您可以從 Privacy Sandbox Demos GitHub 存放區下載 aggregatable_report_converter 的副本。GitHub 存放區提到使用 IntelliJ 或 Eclipse,但這兩者都不是必要條件。如果沒有使用這些工具,請改為將 JAR 檔案下載至本機環境。
1.6. 設定 Cloud Platform 環境 (匯總服務)
匯總服務需要使用雲端服務供應商提供的受信任執行環境。在本程式碼研究室中,匯總服務會部署在 Google Cloud,但也支援 AWS。
請按照 GitHub 中的部署說明操作,設定 gcloud CLI、下載 Terraform 二進位檔和模組,並為匯總服務建立 Google Cloud 資源。
部署作業操作說明的重要步驟:
- 在環境中設定「gcloud」CLI 和 Terraform。
- 建立 Cloud Storage bucket,用來儲存 Terraform 狀態。
- 下載依附元件。
- 更新
adtech_setup.auto.tfvars並執行adtech_setupTerraform。如需範例adtech_setup.auto.tfvars檔案,請參閱附錄。記下這裡建立的資料 bucket 名稱,這個名稱將用於程式碼研究室,儲存我們建立的檔案。 - 更新
dev.auto.tfvars、模擬部署服務帳戶,然後執行devTerraform。如需範例dev.auto.tfvars檔案,請參閱附錄。 - 部署完成後,請從 Terraform 輸出內容擷取
frontend_service_cloudfunction_url,後續步驟中向匯總服務發出要求時會用到。
1.7. 完成匯總服務新手上路程序 (匯總服務)
您必須先加入協調器,才能使用匯總服務。填寫匯總服務新手上路表單,提供您的報表網站和其他資訊,選取「Google Cloud」,然後輸入服務帳戶地址。這個服務帳戶是在先決條件 (1.6 節) 中建立。設定 Google Cloud 環境)。(提示:如果您使用提供的預設名稱,這個服務帳戶會以「worker-sa@」開頭)。
完成新手上路程序最多需要 2 週。
1.8. 決定呼叫 API 端點 (匯總服務) 的方法
本程式碼研究室提供 2 個選項,可呼叫匯總服務 API 端點:cURL 和 Postman。cURL 是從終端機呼叫 API 端點的快速簡單方法,因為只需要最少的設定,不需要額外軟體。不過,如果您不想使用 cURL,可以改用 Postman 執行及儲存 API 要求,以供日後使用。
第 3.2 節「匯總服務用量」一節,詳細說明如何使用這兩種選項。您可以先預覽,再決定要使用哪種方法。如果選取 Postman,請執行下列初始設定。
1.8.1. 設定工作區
註冊 Postman 帳戶。註冊完成後,系統會自動為你建立工作區。
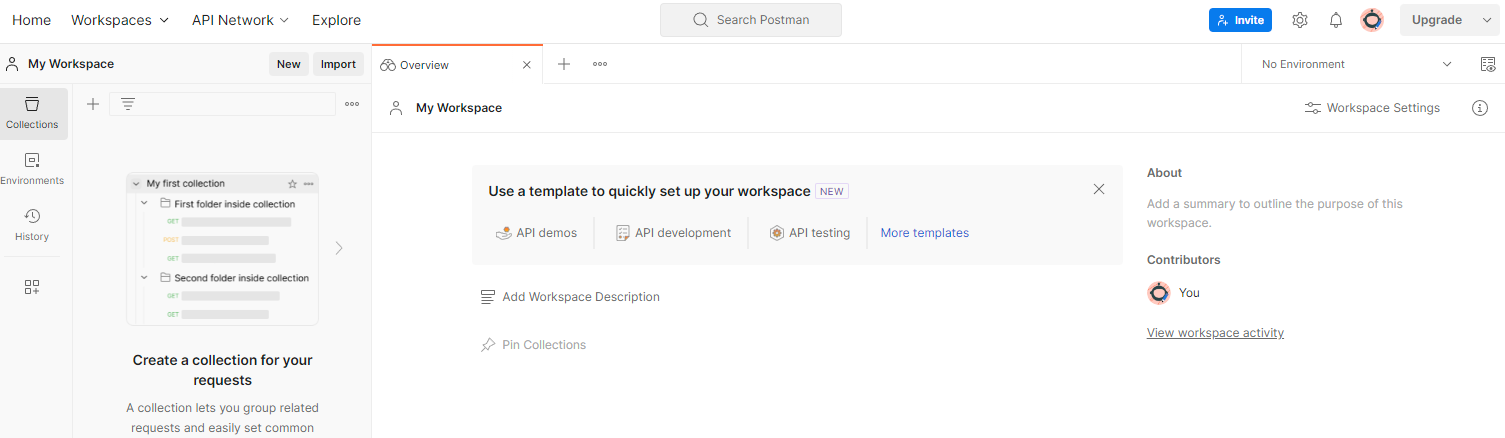 Postman 工作區。
如果系統未為您建立工作區,請前往「工作區」頂端導覽項目,然後選取「建立工作區」。
選取「空白工作區」,按一下「下一步」,然後將工作區命名為「GCP Privacy Sandbox」。選取「個人」,然後按一下「建立」。
使用「匯入」按鈕,將兩個 JSON 檔案匯入「我的工作區」。
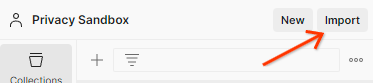 「匯入」按鈕。
系統會為您建立「GCP Privacy Sandbox」集合,以及 createJob 和 getJob HTTP 要求。
1.8.2. 設定授權
按一下「GCP Privacy Sandbox」集合,然後前往「Authorization」分頁標籤。
 「授權」按鈕。
您將使用「Bearer Token」方法。在終端機環境中執行這項指令,並複製輸出內容。
gcloud auth print-identity-token
然後將這個權杖值貼到 Postman 授權分頁的「權杖」欄位:
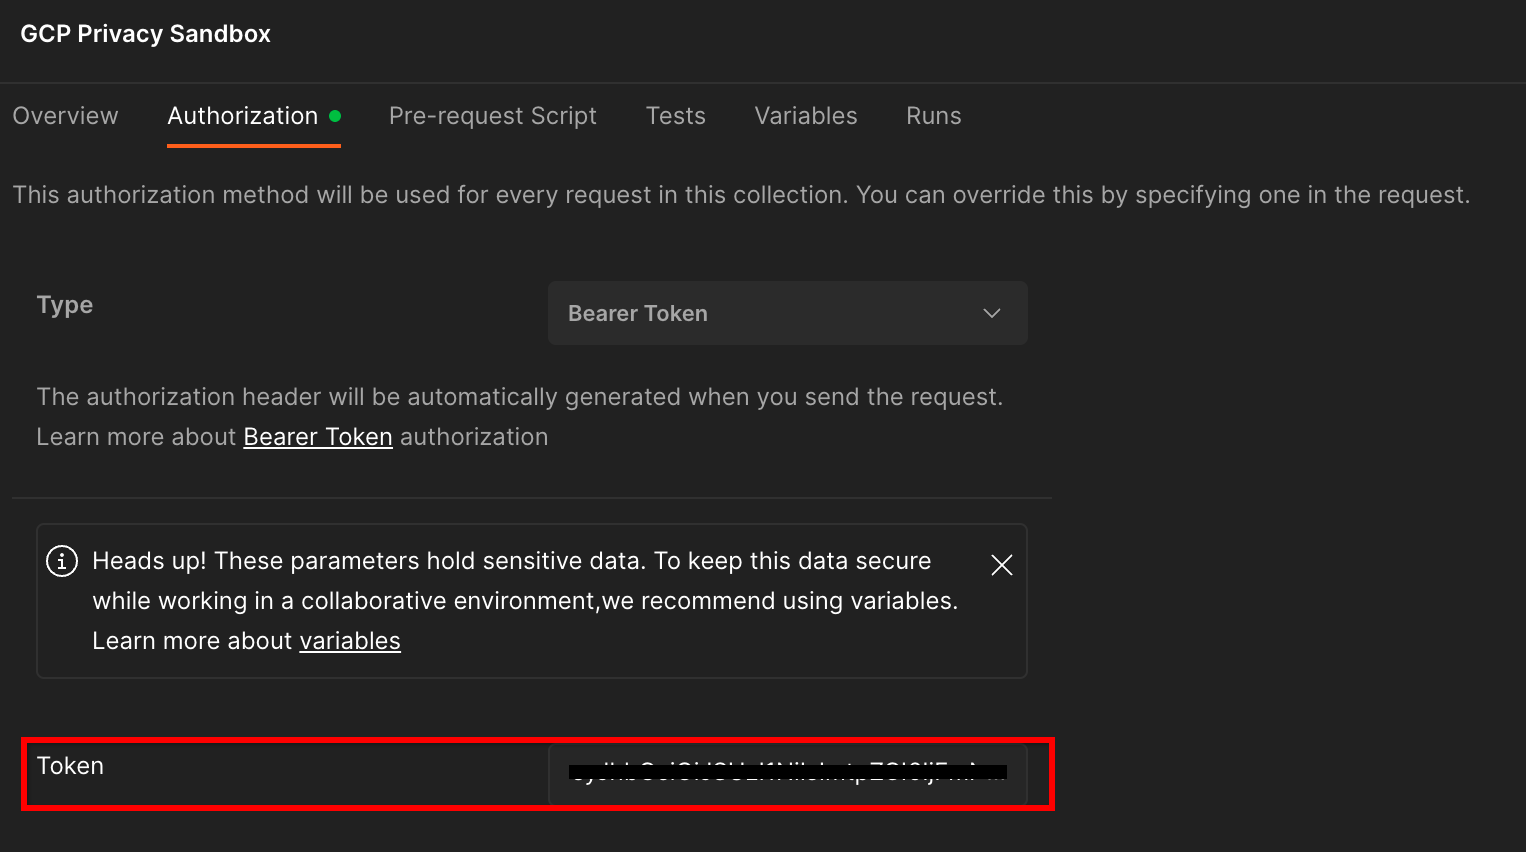 「權杖」欄位。
1.8.3. 設定環境
前往右上角的「環境快速查看」:
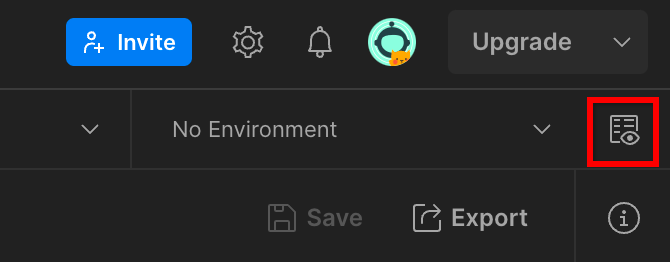 環境快速查看按鈕。
按一下「編輯」,然後更新「environment」、「region」和「cloud-function-id」的「目前值」:
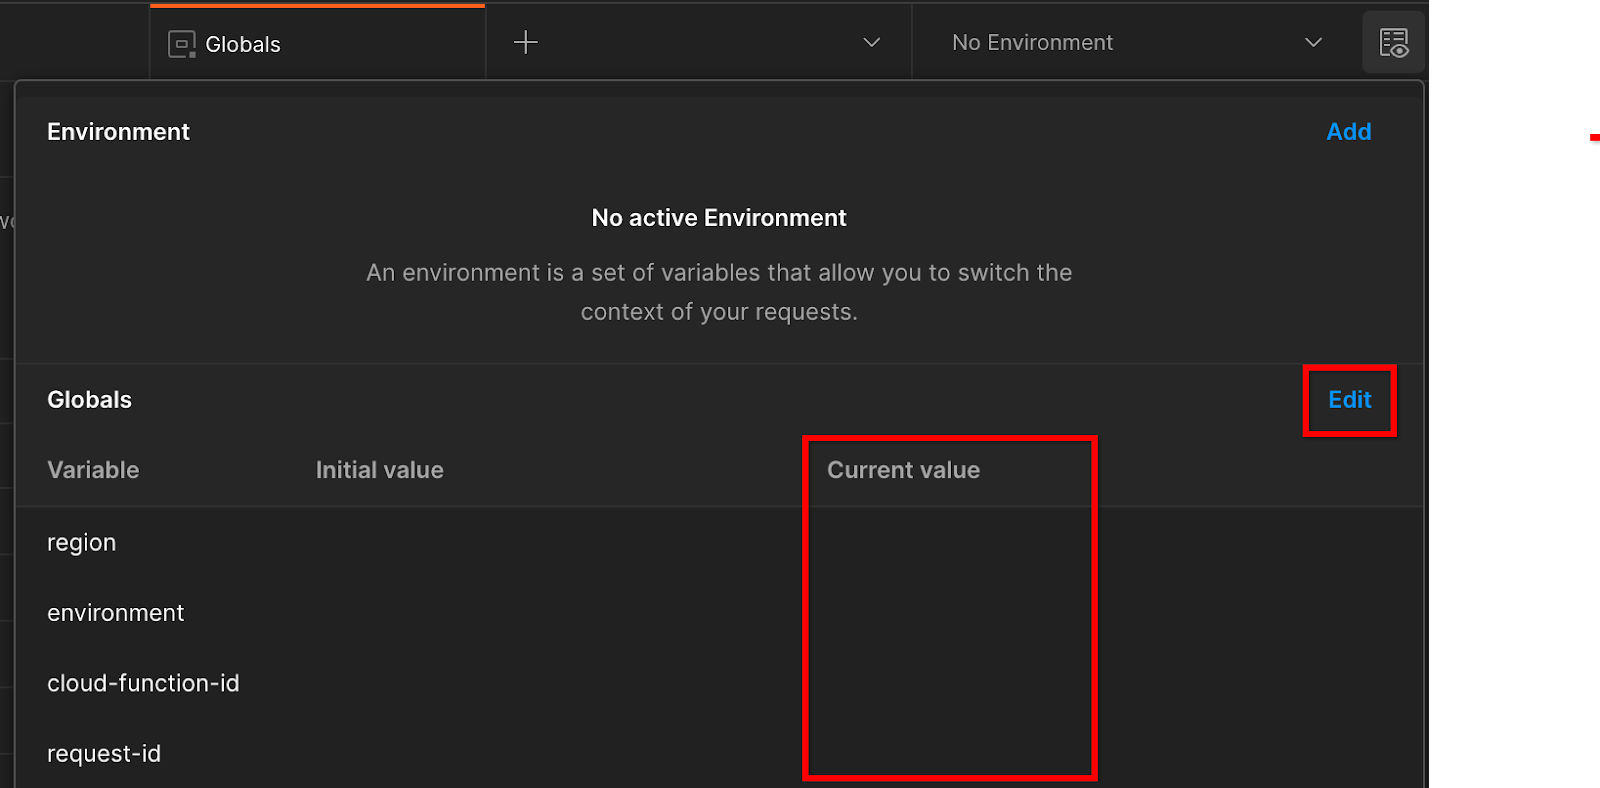 設定目前值。
目前可以將「request-id」留空,稍後再填入。其他欄位請使用 frontend_service_cloudfunction_url 中的值,這是先決條件 1.6 中 Terraform 部署作業成功完成後傳回的值。網址格式如下:https://
2. 2. 本機測試程式碼研究室
預計完成時間:不到 1 小時
您可以使用電腦上的本機測試工具執行匯總作業,並使用未加密的偵錯報告產生摘要報表。開始前,請確認您已完成標示為「本機測試」的所有必要條件。
程式碼研究室步驟
步驟 2.1:觸發報表:觸發私密匯總報表,以便收集報表。
步驟 2.2:建立偵錯 AVRO 報表:將收集到的 JSON 報表轉換為 AVRO 格式的報表。這個步驟與廣告技術從 API 報表端點收集報表,並將 JSON 報表轉換為 AVRO 格式報表時類似。
步驟 2.3:擷取 Bucket 鍵:Bucket 鍵是由廣告技術設計。在本程式碼研究室中,由於值區是預先定義,請按照提供的內容擷取值區鍵。
步驟 2.4:建立輸出網域 AVRO:擷取 bucket 金鑰後,建立輸出網域 AVRO 檔案。
步驟 2.5:建立摘要報告:使用本機測試工具,在本機環境中建立摘要報告。
步驟 2.6:查看摘要報表:查看當地測試工具建立的摘要報表。
2.1. 觸發條件報表
如要觸發私有匯總報表,可以使用 Privacy Sandbox 示範網站 (https://privacy-sandbox-demos-news.dev/?env=gcp) 或您自己的網站 (例如 https://adtechexample.com)。如果您使用自己的網站,且尚未完成註冊與認證和匯總服務新手上路程序,則必須使用 Chrome 旗標和 CLI 切換。
在本示範中,我們會使用 Privacy Sandbox 示範網站。請按照連結前往網站,然後在 chrome://private-aggregation-internals 查看報表:
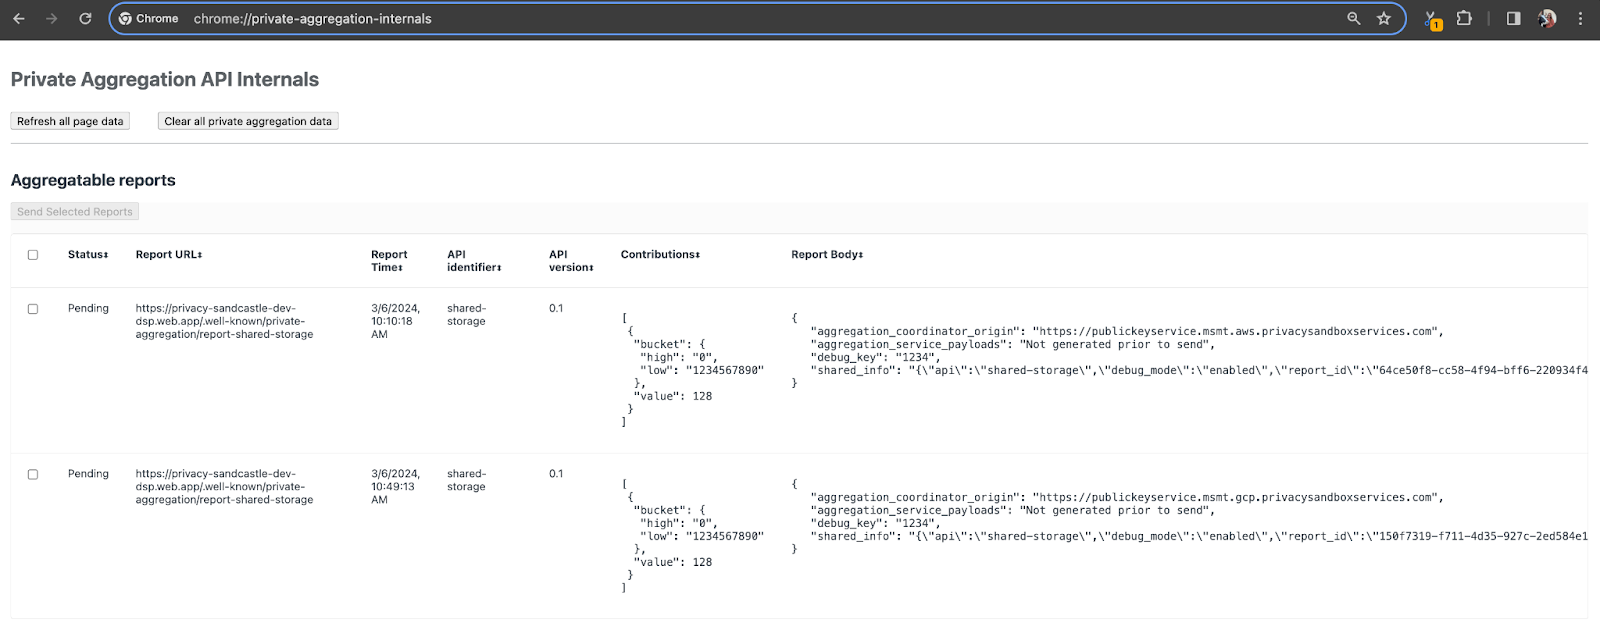 Chrome 內部頁面。
傳送至 {reporting-origin}/.well-known/private-aggregation/debug/report-shared-storage 端點的報表也會顯示在 Chrome 內部頁面的「報表主體」中。
您可能會在這裡看到許多報表,但在本程式碼研究室中,請使用 Google Cloud 專用且由偵錯端點產生的可匯總報表。「報表網址」會包含「/debug/」,而「報表主體」的 aggregation_coordinator_origin field 則會包含這個網址:https://publickeyservice.msmt.gcp.privacysandboxservices.com。
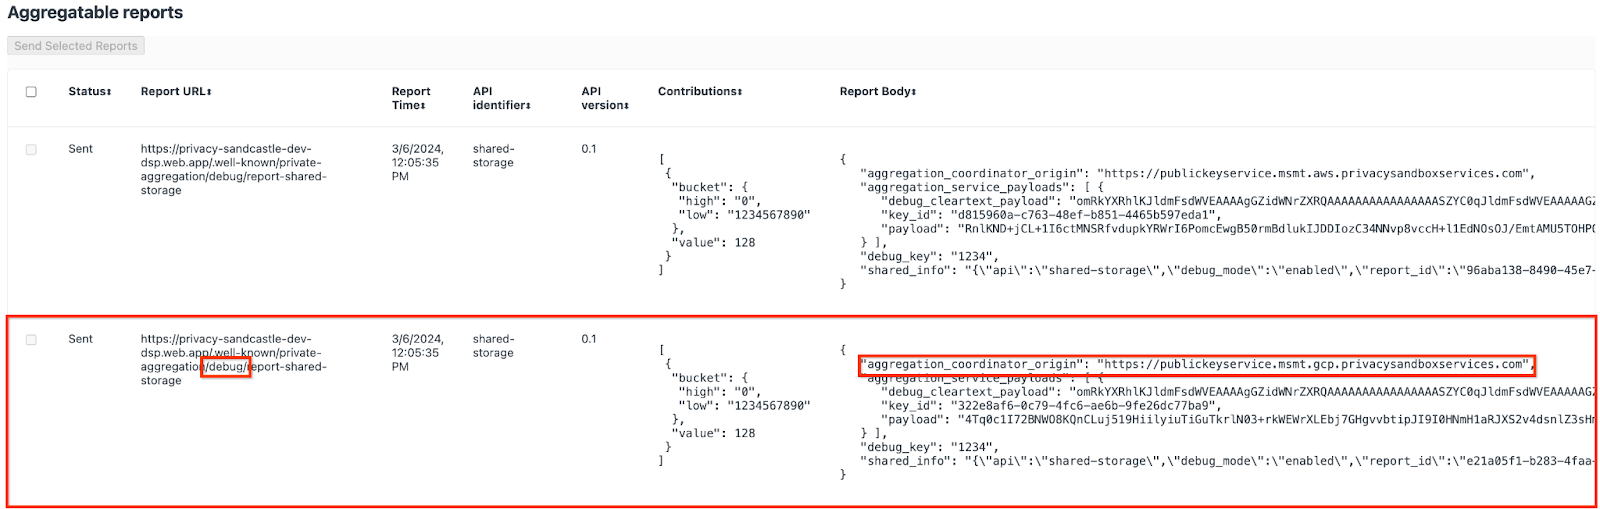 Google Cloud 偵錯報告。
2.2. 建立可匯總的偵錯報表
複製 chrome://private-aggregation-internals「Report Body」中的報表,並在 privacy-sandbox-demos/tools/aggregatable_report_converter/out/artifacts/aggregatable_report_converter_jar 資料夾中建立 JSON 檔案 (位於先決條件 1.5 中下載的存放區內)。
在本範例中,我們使用 vim,因為我們使用的是 Linux。但你可以使用任何文字編輯器。
vim report.json
將報表貼到 report.json 中,然後儲存檔案。
 報表 JSON 程式碼。
取得這項資訊後,請使用 aggregatable_report_converter.jar 協助建立可彙整的偵錯報表。這會在目前的目錄中建立名為 report.avro 的可匯總報表。
java -jar aggregatable_report_converter.jar \
  --request_type convertToAvro \
  --input_file report.json \
  --debug
2.3. 從報表擷取 Bucket 金鑰
如要建立 output_domain.avro 檔案,您需要可從報表擷取的值區金鑰。
儲存區金鑰是由廣告技術設計,但在此情況下,儲存區金鑰是由網站 Privacy Sandbox 示範建立。由於這個網站的私密匯總功能處於偵錯模式,我們可以從「報表主體」使用 debug_cleartext_payload 取得 bucket 鍵。
請從報表內文複製 debug_cleartext_payload。
 偵錯明文酬載。
開啟 goo.gle/ags-payload-decoder,將 debug_cleartext_payload 貼到「INPUT」方塊中,然後按一下「Decode」。
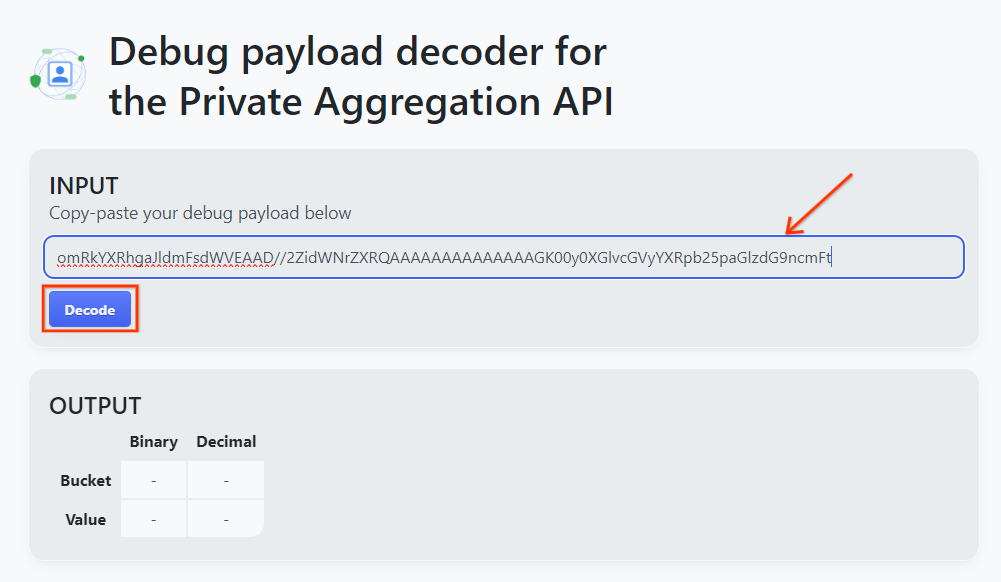 解碼按鈕。
解碼按鈕。
網頁會傳回 bucket 鍵的十進位值。以下是值區金鑰範例。
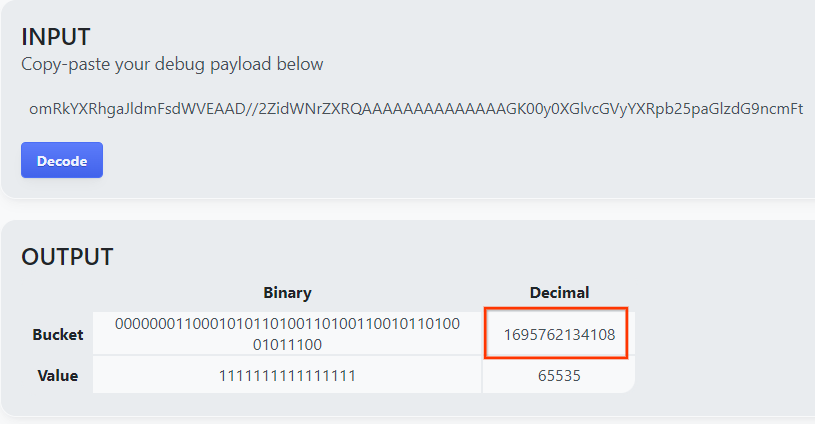 範例 bucket 金鑰。
2.4. 建立輸出網域 AVRO
有了 bucket 金鑰後,我們在同一個資料夾中建立 output_domain.avro。確認您已將 bucket 金鑰替換為擷取的 bucket 金鑰。
java -jar aggregatable_report_converter.jar \
  --request_type createDomainAvro \
  --bucket_key <bucket key>
指令碼會在目前的資料夾中建立 output_domain.avro 檔案。
2.5. 使用本機測試工具建立摘要報表
我們將使用先決條件 1.3 中下載的 LocalTestingTool_{version}.jar,透過下列指令建立摘要報表。將 {version} 替換為您下載的版本。請記得將 LocalTestingTool_{version}.jar 移至目前目錄,或新增相對路徑來參照目前位置。
java -jar LocalTestingTool_{version}.jar \
  --input_data_avro_file report.avro \
  --domain_avro_file output_domain.avro \
  --output_directory .
執行指令後,畫面應會顯示類似下列的內容。完成後,系統會建立報表 output.avro。
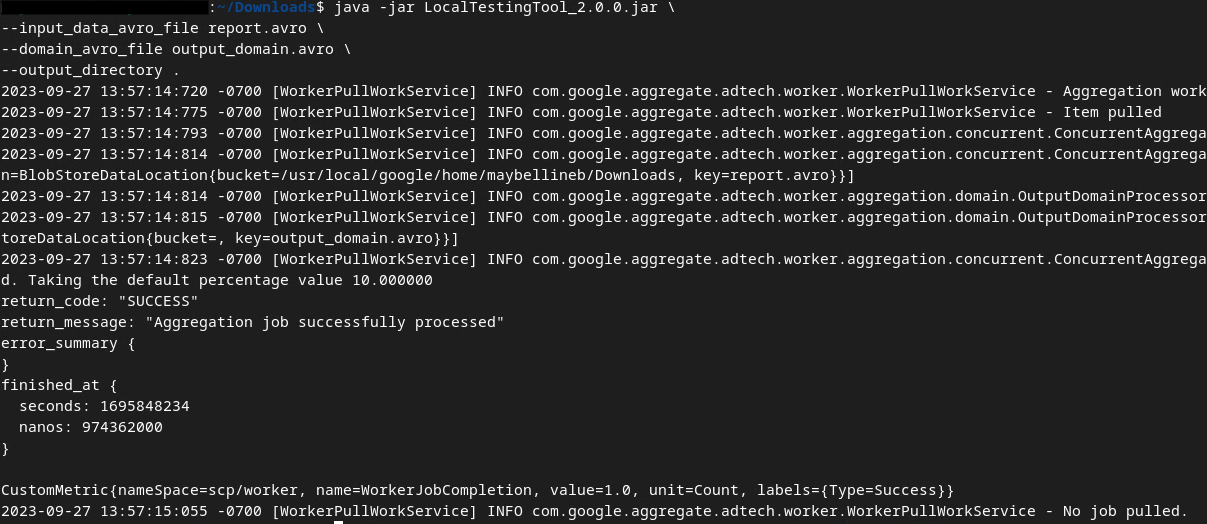 輸出 AVRO
2.6. 查看摘要報表
產生的摘要報表為 AVRO 格式。如要讀取這項資料,您必須將 AVRO 轉換為 JSON 格式。理想情況下,廣告技術應編寫程式碼,將 AVRO 報表轉換回 JSON。
我們會使用 aggregatable_report_converter.jar 將 AVRO 報表轉換回 JSON。
java -jar aggregatable_report_converter.jar \
  --request_type convertToJson \
  --input_file output.avro
這會傳回類似以下的報表。以及在同一個目錄中建立的報表 output.json。
 輸出 JSON
程式碼研究室完成!
摘要:您已收集偵錯報告、建構輸出網域檔案,並使用本機測試工具產生摘要報告,模擬匯總服務的匯總行為。
後續步驟:您已試用本機測試工具,現在可以嘗試在自己的環境中,對匯總服務的實際部署作業執行相同練習。請重新查看必要條件,確認您已為「匯總服務」模式完成所有設定,然後繼續執行步驟 3。
3. 3. 匯總服務程式碼研究室
預計完成時間:1 小時
事前準備:請確認您已完成標示為「匯總服務」的所有必要條件。
程式碼研究室步驟
步驟 3.1:建立匯總服務輸入內容:建立匯總服務報表,並批次傳送至匯總服務。
- 步驟 3.1.1. 觸發條件報告
- 步驟 3.1.2. 收集可匯總報表
- 步驟 3.1.3:將報表轉換為 AVRO
- 步驟 3.1.4. 建立 output_domain AVRO
- 步驟 3.1.5. 將報表移至 Cloud Storage bucket
步驟 3.2:匯總服務使用情形:使用匯總服務 API 建立摘要報表,並查看摘要報表。
- 步驟 3.2.1:使用
createJob端點將資料分批處理 - 步驟 3.2.2. 使用
getJob端點擷取批次狀態 - 步驟 3.2.3. 查看摘要報表
3.1. 建立匯總服務輸入內容
接著,請建立 AVRO 報表,以便批次傳送至匯總服務。您可以在 Google Cloud 的 Cloud Shell 中執行這些步驟的殼層指令 (前提是已將「必要條件」中的依附元件複製到 Cloud Shell 環境),也可以在本機執行環境中執行。
3.1.1. 觸發條件報告
請按照連結前往網站,然後在 chrome://private-aggregation-internals 查看報表:
Chrome 內部頁面
傳送至 {reporting-origin}/.well-known/private-aggregation/debug/report-shared-storage 端點的報表也會顯示在 Chrome 內部頁面的「報表主體」中。
您可能會在這裡看到許多報表,但在本程式碼研究室中,請使用 Google Cloud 專用且由偵錯端點產生的可匯總報表。「報表網址」會包含「/debug/」,而「報表主體」的 aggregation_coordinator_origin field 則會包含這個網址:https://publickeyservice.msmt.gcp.privacysandboxservices.com。
Google Cloud 偵錯報告。
3.1.2. 收集可匯總報表
從相應 API 的 .well-known 端點收集可匯總報表。
- 私密匯總:
{reporting-origin}/.well-known/private-aggregation/report-shared-storage - 歸因報表 - 摘要報表:
{reporting-origin}/.well-known/attribution-reporting/report-aggregate-attribution
在本程式碼研究室中,我們會手動收集報表。在實際工作環境中,廣告技術應以程式輔助方式收集及轉換報表。
請繼續從 chrome://private-aggregation-internals 複製「報表內文」中的 JSON 報表。
在本範例中,我們使用 vim,因為我們使用的是 Linux。但你可以使用任何文字編輯器。
vim report.json
將報表貼到 report.json 中,然後儲存檔案。
報表 JSON
3.1.3. 將報表轉換為 AVRO
從 .well-known 端點收到的報表為 JSON 格式,需要轉換為 AVRO 報表格式。取得 JSON 報表後,請前往 report.json 的儲存位置,並使用 aggregatable_report_converter.jar 建立可匯總的偵錯報表。這會在目前的目錄中建立名為 report.avro 的可匯總報表。
java -jar aggregatable_report_converter.jar \
  --request_type convertToAvro \
  --input_file report.json
3.1.4. 建立 output_domain AVRO
如要建立 output_domain.avro 檔案,您需要可從報表擷取的值區金鑰。
儲存區金鑰是由廣告技術設計,但在此情況下,儲存區金鑰是由網站 Privacy Sandbox 示範建立。由於這個網站的私密匯總功能處於偵錯模式,我們可以從「報表主體」使用 debug_cleartext_payload 取得 bucket 鍵。
請從報表內文複製 debug_cleartext_payload。
偵錯明文酬載。
開啟 goo.gle/ags-payload-decoder,將 debug_cleartext_payload 貼到「INPUT」方塊中,然後按一下「Decode」。
解碼按鈕。
網頁會傳回 bucket 鍵的十進位值。以下是值區金鑰範例。
範例 bucket 金鑰。
有了 bucket 金鑰後,我們在同一個資料夾中建立 output_domain.avro。確認您已將 bucket 金鑰替換為擷取的 bucket 金鑰。
java -jar aggregatable_report_converter.jar \
  --request_type createDomainAvro \
  --bucket_key <bucket key>
指令碼會在目前的資料夾中建立 output_domain.avro 檔案。
3.1.5. 將報表移至 Cloud Storage bucket
建立 AVRO 報表和輸出網域後,請將報表和輸出網域移至 Cloud Storage 中的 bucket (如必要條件 1.6 所述)。
如果您在本機環境中設定了 gcloud CLI,請使用下列指令將檔案複製到對應的資料夾。
gcloud storage cp report.avro gs://<bucket_name>/reports/

gcloud storage cp output_domain.avro gs://<bucket_name>/output_domain/
否則,請手動將檔案上傳至值區。建立名為「reports」的資料夾,然後將 report.avro 檔案上傳至該資料夾。建立名為「output_domains」的資料夾,然後將 output_domain.avro 檔案上傳至該資料夾。
3.2. 匯總服務使用情況
回想一下,在先決條件 1.8 中,您選取了 curl 或 Postman,向匯總服務端點發出 API 要求。以下分別說明這兩種方式。
如果工作失敗並出現錯誤,請參閱 GitHub 的疑難排解文件,進一步瞭解如何繼續操作。
3.2.1. 使用 createJob 端點將資料分批處理
請使用下列任一 curl 或 Postman 指令建立工作。
curl
在「終端機」中建立要求主體檔案 (body.json),然後貼上下列 JSON 物件。請務必更新預留位置值。如要進一步瞭解每個欄位代表的意義,請參閱這份 API 說明文件。
{
    "job_request_id": "<job_request_id>",
    "input_data_blob_prefix": "<report_folder>/<report_name>.avro",
    "input_data_blob_prefixes": [ // Mutually exclusive to input_data_blob_prefix as of v2.11.0
      "<report_folder>/<report_name-1>/",
      "<report_folder>/<report_name-2>/",
      "<report_folder>/<report_name>.avro"
    ],
    "input_data_bucket_name": "<bucket_name>",
    "output_data_blob_prefix": "<output_folder>/<summary_report_prefix>",
    "output_data_bucket_name": "<bucket_name>",
    "job_parameters": {
      "output_domain_blob_prefix": "<output_domain_folder>/<output_domain>.avro",
      "output_domain_bucket_name": "<bucket_name>",
      "attribution_report_to": "<reporting origin of report>",
      "reporting_site": "<domain of reporting origin(s) of report>", // Mutually exclusive to attribution_report_to as of v2.7.0
      "report_error_threshold_percentage": "10",
      "debug_run": "true"
    }
}
執行下列要求。將 curl 要求的網址中的預留位置,替換為先決條件 1.6 中成功完成 Terraform 部署後輸出的 frontend_service_cloudfunction_url 值。
curl -H "Authorization: Bearer $(gcloud auth print-identity-token)" \
  -d @body.json \
  https://<environment>-<region>-frontend-service-<cloud-function-id>-uc.a.run.app/v1alpha/createJob
要求獲聚合服務接受後,您應該會收到 HTTP 202 回應。其他可能的回應代碼請參閱 API 規格。
Postman
對於 createJob 端點,您必須提供要求主體,才能向匯總服務提供可匯總報表、輸出網域和摘要報表的位置和檔案名稱。
前往要求「Body」分頁:createJob
 「Body」分頁
請替換所提供 JSON 中的預留位置。如要進一步瞭解這些欄位及其代表的意義,請參閱 API 說明文件。
{
    "job_request_id": "<job_request_id>",
    "input_data_blob_prefix": "<report_folder>/",
    "input_data_blob_prefixes": [ // Mutually exclusive to input_data_blob_prefix as of v2.11.0
      "<report_folder>/<report_name-1>/",
      "<report_folder>/<report_name-2>/",
      "<report_folder>/<report_name>.avro"
    ],
    "input_data_bucket_name": "<bucket_name>",
    "output_data_blob_prefix": "<output_folder>/<summary_report_prefix>",
    "output_data_bucket_name": "<bucket_name>",
    "job_parameters": {
      "output_domain_blob_prefix": "<output_domain_folder>/<output_domain>.avro",
      "output_domain_bucket_name": "<bucket_name>",
      "attribution_report_to": "<reporting origin of report>",
      "reporting_site": "<domain of reporting origin(s) of report>", // Mutually exclusive to attribution_report_to as of v2.7.0
      "report_error_threshold_percentage": "10",
      "debug_run": "true"
    }
}
「傳送」createJob API 要求:
![[傳送] 按鈕](https://privacysandbox.google.com/static/codelab/aggregation-service-gcp/send-button.png?authuser=758840678&hl=zh-tw) 「傳送」按鈕
「傳送」按鈕
您可以在頁面下半部找到回應碼:
 回應代碼
回應代碼
要求獲聚合服務接受後,您應該會收到 HTTP 202 回應。其他可能的回應代碼請參閱 API 規格。
3.2.2. 使用 getJob 端點擷取批次狀態
請使用下列任一 curl 或 Postman 指令來取得工作。
curl
在終端機中執行下列要求。將網址中的預留位置替換為 frontend_service_cloudfunction_url 中的值,這個網址與您用於 createJob 要求的網址相同。如為「job_request_id」,請使用您透過 createJob 端點建立工作時的值。
curl -H "Authorization: Bearer $(gcloud auth print-identity-token)" \
  https://<environment>-<region>-frontend-service-<cloud-function-id>-uc.a.run.app/v1alpha/getJob?job_request_id=<job_request_id>
結果應會傳回工作要求狀態,以及 HTTP 狀態 200。要求「Body」包含必要資訊,例如 job_status、return_message 和 error_messages (如果工作發生錯誤)。
Postman
如要查看工作要求狀態,可以使用 getJob 端點。在 getJob 要求的「Params」部分,將 job_request_id 值更新為 createJob 要求中傳送的 job_request_id。
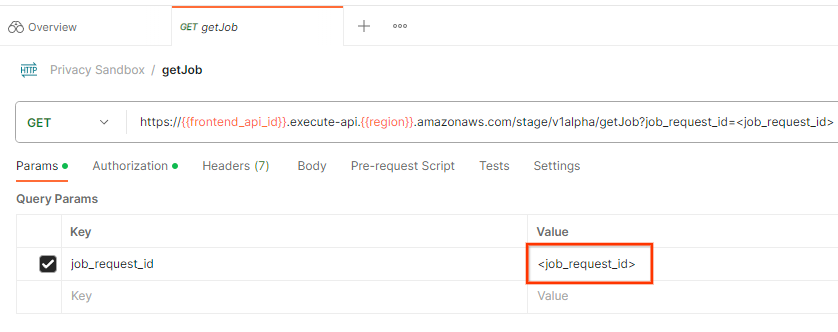 工作要求 ID
「傳送」getJob 要求:
![[傳送] 按鈕](https://privacysandbox.google.com/static/codelab/aggregation-service-gcp/send-get.png?authuser=758840678&hl=zh-tw) 「傳送」按鈕
「傳送」按鈕
結果應會傳回工作要求狀態,以及 HTTP 狀態 200。要求「Body」包含必要資訊,例如 job_status、return_message 和 error_messages (如果工作發生錯誤)。
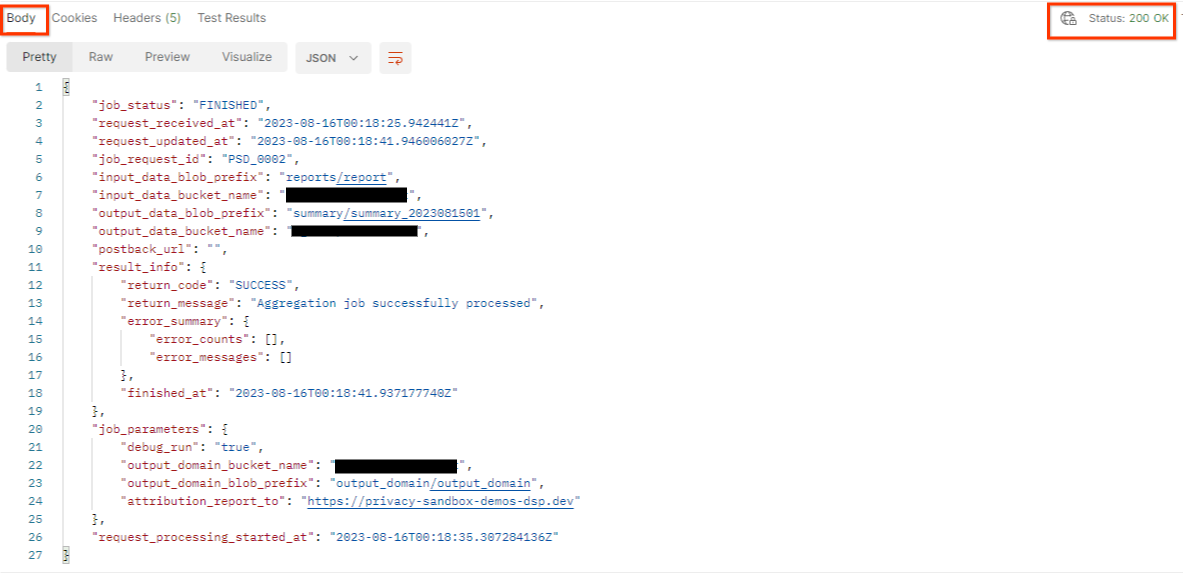 回應 JSON
3.2.3. 查看摘要報表
在輸出 Cloud Storage bucket 中收到摘要報表後,即可下載至本機環境。摘要報表採用 AVRO 格式,可轉換回 JSON 格式。您可以使用 aggregatable_report_converter.jar,透過這項指令讀取報表。
java -jar aggregatable_report_converter.jar \
  --request_type convertToJson \
  --input_file <summary_report_avro>
這會傳回每個值區鍵的匯總值 JSON,類似於下列內容。
 摘要報表。
摘要報表。
如果您的 createJob 要求包含 debug_run 為 true,您可以在 output_data_blob_prefix 的偵錯資料夾中收到摘要報表。報表採用 AVRO 格式,可使用上述指令轉換為 JSON。
報表包含區隔鍵、未加入干擾的指標,以及加入未加入干擾指標的干擾,以形成摘要報表。報表內容如下所示。
 經過雜訊處理的報表
註解也包含「in_reports」或「in_domain」(或兩者),表示:
- in_reports - 儲存區金鑰可在可匯總報表中取得。
- in_domain - bucket 金鑰位於 output_domain AVRO 檔案中。
程式碼研究室完成!
摘要:您已在自己的雲端環境中部署匯總服務、收集偵錯報告、建構輸出網域檔案、將這些檔案儲存在 Cloud Storage bucket 中,並成功執行工作!
後續步驟:繼續在環境中使用匯總服務,或按照步驟 4 的清除說明,刪除您剛建立的雲端資源。
4. 4. 清除
如要刪除使用 Terraform 為匯總服務建立的資源,請在 adtech_setup 和 dev (或其他環境) 資料夾中使用 destroy 指令:
$ cd <repository_root>/terraform/gcp/environments/adtech_setup
$ terraform destroy
$ cd <repository_root>/terraform/gcp/environments/dev
$ terraform destroy
如要刪除存放可匯總報表和摘要報表的 Cloud Storage 值區,請按照下列步驟操作:
$ gcloud storage buckets delete gs://my-bucket
您也可以選擇將先決條件 1.2 中的 Chrome Cookie 設定還原為先前的狀態。
5. 5. 附錄
範例 adtech_setup.auto.tfvars 檔案
/**
 * Copyright 2023 Google LLC
 *
 * Licensed under the Apache License, Version 2.0 (the "License");
 * you may not use this file except in compliance with the License.
 * You may obtain a copy of the License at
 *
 *      http://www.apache.org/licenses/LICENSE-2.0
 *
 * Unless required by applicable law or agreed to in writing, software
 * distributed under the License is distributed on an "AS IS" BASIS,
 * WITHOUT WARRANTIES OR CONDITIONS OF ANY KIND, either express or implied.
 * See the License for the specific language governing permissions and
 * limitations under the License.
 */

project = "my-project-id"

# Required to generate identity token for access of Adtech Services API endpoints
service_account_token_creator_list = ["user:me@email.com"]

# Uncomment the below line if you like Terraform to create an Artifact registry repository
# for self-build container artifacts. "artifact_repo_location" defaults to "us".
artifact_repo_name     = "my-ags-artifacts"

# Note: Either one of [1] or [2] must be uncommented.

# [1] Uncomment below lines if you like Terraform grant needed permissions to
# pre-existing service accounts
# deploy_service_account_email = "<YourDeployServiceAccountName>@<ProjectID>.iam.gserviceaccount.com"
# worker_service_account_email = "<YourWorkerServiceAccountName>@<ProjectID>.iam.gserviceaccount.com"

# [2] Uncomment below lines if you like Terraform to create service accounts
# and needed permissions granted e.g "deploy-sa" or "worker-sa"
deploy_service_account_name = "deploy-sa"
worker_service_account_name = "worker-sa"
# Uncomment the below line if you want Terraform to create the
# below bucket. "data_bucket_location" defaults to "us".
data_bucket_name     = "my-ags-data"

# Uncomment the below lines if you want to specify service account customer role names
# deploy_sa_role_name = "<YourDeploySACustomRole>"
# worker_sa_role_name = "<YourWorkerSACustomRole>"
範例 dev.auto.tfvars 檔案
/**
 * Copyright 2022 Google LLC
 *
 * Licensed under the Apache License, Version 2.0 (the "License");
 * you may not use this file except in compliance with the License.
 * You may obtain a copy of the License at
 *
 *      http://www.apache.org/licenses/LICENSE-2.0
 *
 * Unless required by applicable law or agreed to in writing, software
 * distributed under the License is distributed on an "AS IS" BASIS,
 * WITHOUT WARRANTIES OR CONDITIONS OF ANY KIND, either express or implied.
 * See the License for the specific language governing permissions and
 * limitations under the License.
 */

# Example values required by job_service.tf
#
# These values should be modified for each of your environments.
region      = "us-central1"
region_zone = "us-central1-c"

project_id  = "my-project-id"
environment = "operator-demo-env"

# Co-locate your Cloud Spanner instance configuration with the region above.
# https://cloud.google.com/spanner/docs/instance-configurations#regional-configurations
spanner_instance_config = "regional-us-central1"

# Adjust this based on the job load you expect for your deployment.
# Monitor the spanner instance utilization to decide on scale out / scale in.
# https://console.cloud.google.com/spanner/instances
spanner_processing_units = 100

# Uncomment the line below at your own risk to disable Spanner database protection.
# This needs to be set to false and applied before destroying all resources is possible.
spanner_database_deletion_protection = false

instance_type = "n2d-standard-8" # 8 cores, 32GiB

# Container image location that packages the job service application
# If not set otherwise, uncomment and edit the line below:
#worker_image = "<location>/<project>/<repository>/<image>:<tag or digest>"

# Service account created and onboarded for worker
user_provided_worker_sa_email = "worker-sa@my-project-id.iam.gserviceaccount.com"

min_worker_instances = 1
max_worker_instances = 20