


從 Chrome 126 開始,開發人員可以開始為一系列桌面聯邦憑證管理 API (FedCM) 功能執行來源試用,這些功能可啟用部分授權用途。這個套件包含 Continuation API 和 Parameters API,可啟用類似 OAuth 授權流程的體驗,其中包含由身分識別提供者 (IdP) 提供的權限對話方塊。套件也包含其他變更,例如 Fields API、多個 configURL 和自訂帳戶標籤。自 Chrome 126 起,我們也推出了 Storage Access API (SAA) 的來源測試,如果使用者先前曾成功使用 FedCM 登入,系統就會自動核准 SAA 要求。
來源試用:FedCM 接續 API 套件
FedCM 接續 API 套件包含多個 FedCM 擴充功能:
Continuation API
您可以查看 Glitch 上的 API 示範。
Continuation API 可讓 IdP 的 ID 斷言端點選擇性傳回 FedCM 會轉譯的網址,讓使用者繼續多步驟登入流程。這可讓 IdP 要求使用者授予依賴方 (RP) 權限,超出現有 FedCM UI 中可用的權限,例如存取使用者的伺服器端資源。
通常,ID 斷言端點會傳回驗證所需的權杖。
{
  "token": "***********"
}
不過,透過接續 API,ID 斷言端點可以傳回 continue_on 屬性,其中包含 ID 斷言端點的絕對路徑或相對路徑。
{
  // In the id_assertion_endpoint, instead of returning a typical
  // "token" response, the IdP decides that it needs the user to
  // continue on a pop-up window:
  "continue_on": "/oauth/authorize?scope=..."
}
瀏覽器收到 continue_on 回應後,就會開啟新的彈出式視窗,並將使用者導向指定路徑。
使用者與頁面互動後 (例如授予額外權限,以便與 RP 分享額外資訊),IdP 頁面可以呼叫 IdentityProvider.resolve() 來解析原始 navigator.credentials.get() 呼叫,並以引數的形式傳回權杖。
document.getElementById('allow_btn').addEventListener('click', async () => {
  let accessToken = await fetch('/generate_access_token.cgi');
  // Closes the window and resolves the promise (that is still hanging
  // in the relying party's renderer) with the value that is passed.
  IdentityProvider.resolve(accessToken);
});
瀏覽器會自行關閉彈出式視窗,並將權杖傳回給 API 呼叫端。
如果使用者拒絕要求,您可以呼叫 IdentityProvider.close() 關閉視窗。
IdentityProvider.close();
如果使用者基於某些原因在彈出式視窗中變更帳戶 (例如 IdP 提供「切換使用者」功能,或在委派案例中),則解析呼叫會採用可選的第二個引數,允許以下操作:
IdentityProvider.resolve(token, {accountId: '1234'});
Parameters API
Parameters API 可讓 RP 向ID 斷言端點提供其他參數。透過 Parameters API,RP 可將額外參數傳遞至 IdP,要求基本登入以外的資源權限。使用者會透過透過 Continuation API 啟動的 IdP 控管使用者體驗流程,授權這些權限。
如要使用 API,請在 navigator.credentials.get() 呼叫中將參數新增至 params 屬性,做為物件。
let {token} = await navigator.credentials.get({
  identity: {
    providers: [{
      clientId: '1234',
      configURL: 'https://idp.example/fedcm.json',
      // Key/value pairs that need to be passed from the
      // RP to the IdP but that don't really play any role with
      // the browser.
      params: {
        IDP_SPECIFIC_PARAM: '1',
        foo: 'BAR',
        ETC: 'MOAR',
        scope: 'calendar.readonly photos.write',
      }
    }],
  }
});
params 物件中的屬性名稱會在開頭加上 param_。在上例中,params 屬性包含 IDP_SPECIFIC_PARAM (以 '1' 為例)、foo (以 'BAR' 為例)、ETC (以 'MOAR' 為例) 和 scope (以 'calendar.readonly photos.write' 為例)。這會在要求的 HTTP 主體中轉譯為 param_IDP_SPECIFIC_PARAM=1¶m_foo=BAR¶m_ETC=MOAR¶m_scope=calendar.readonly%20photos.write:
POST /fedcm_assertion_endpoint HTTP/1.1
Host: idp.example
Origin: https://rp.example/
Content-Type: application/x-www-form-urlencoded
Cookie: 0x23223
Sec-Fetch-Dest: webidentity
account_id=123&client_id=client1234&nonce=234234&disclosure_text_shown=false¶m_IDP_SPECIFIC_PARAM=1¶m_foo=BAR¶m_ETC=MOAR¶m_scope=calendar.readonly%20photos.write
動態取得權限
一般來說,對使用者而言,在需要時要求權限最有幫助,而不是在開發人員認為最容易實作時。舉例來說,在使用者要拍照時要求存取相機權限,比在使用者造訪網站時要求權限更為恰當。同樣的做法也適用於伺服器資源。請只在使用者需要時要求權限。這就是所謂的「動態授權」。
如要透過 FedCM 動態要求授權,IdP 可以:
- 使用 IdP 可理解的必要參數 (例如
scope) 呼叫navigator.credentials.get()。 - ID 斷言端點會確認使用者已登入,並以
continue_on網址回應。 - 瀏覽器會開啟彈出式視窗,其中顯示 IdP 的權限頁面,要求使用者授予與要求的範圍相符的其他權限。
- 一旦由 IdP 透過
IdentityProvider.resolve()授權,視窗就會關閉,且 RP 的原始navigator.credentials.get()呼叫會取得相關權杖或授權碼,以便 RP 與適當的存取權杖交換。
Fields API
Fields API 可讓 RP 宣告要從 IdP 要求的帳戶屬性,以便瀏覽器在 FedCM 對話方塊中顯示適當的揭露 UI;IdP 有責任在傳回的權杖中加入要求的欄位。請考慮在 OpenID Connect 中要求「基本設定檔」,而不是在 OAuth 中要求「範圍」。
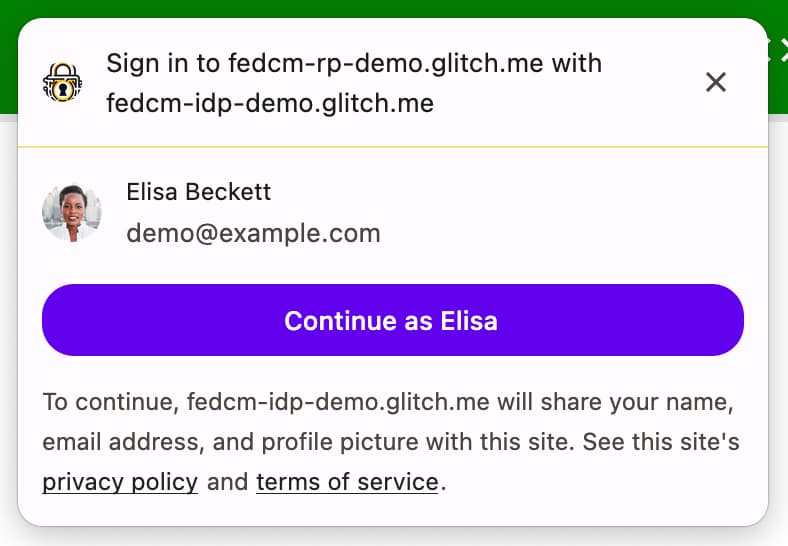
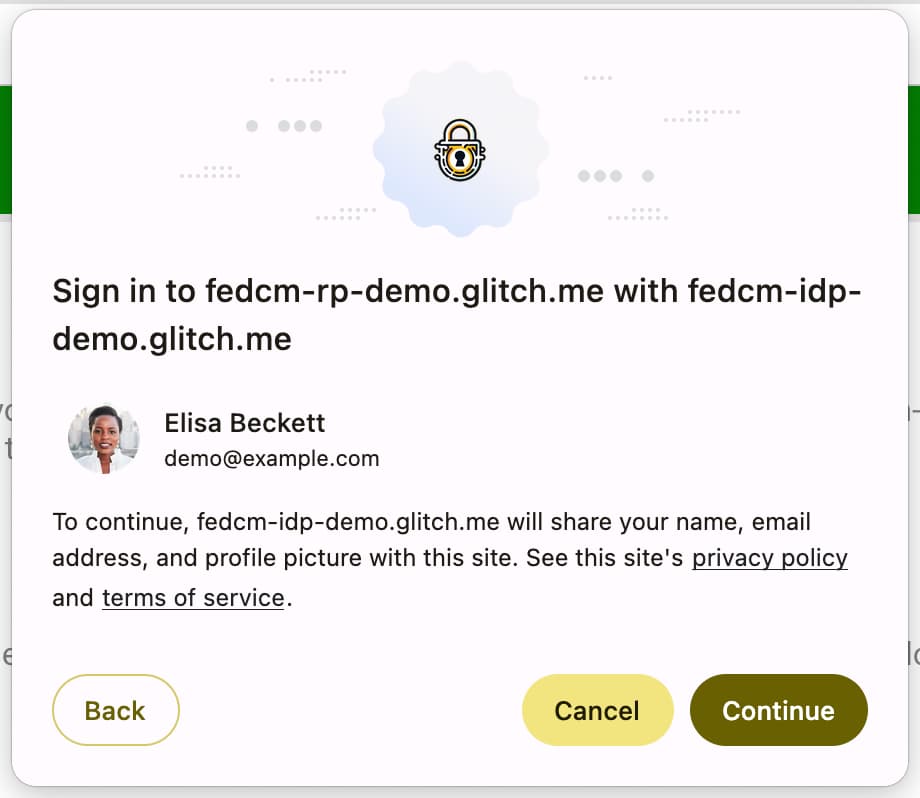
如要使用 Fields API,請在 navigator.credentials.get() 呼叫中將參數新增至 fields 屬性做為陣列。這些欄位目前可包含 'name'、'email' 和 'picture',但日後可擴充為包含更多值。
含有 fields 的請求如下所示:
let { token } = await navigator.credentials.get({
  identity: {
    providers: [{
      fields: ['name', 'email', 'picture'],
      clientId: '1234',
      configURL: 'https://idp.example/fedcm.json',
      params: {
        scope: 'drive.readonly calendar.readonly',
      }
    }],
  }
  mediation: 'optional',
});
向ID 斷言端點發出的 HTTP 要求包含 RP 指定的 fields 參數,如果不是回訪使用者,則 disclosure_text_shown 參數會設為 true,瀏覽器會在 disclosure_shown_for 參數中向使用者揭露的欄位如下:
POST /id_assertion_endpoint HTTP/1.1
Host: idp.example
Origin: https://rp.example/
Content-Type: application/x-www-form-urlencoded
Cookie: 0x23223
Sec-Fetch-Dest: webidentity

account_id=123&client_id=client1234&nonce=234234&disclosure_text_shown=true&fields=email,name,picture&disclosure_shown_for=email,name,picture
如果 RP 需要存取 IdP 的任何其他資料 (例如日曆存取權),則應使用上述自訂參數處理。IdP 會傳回 continue_on 網址,以便要求權限。
如果 fields 是空陣列,要求會如下所示:
let { token } = await navigator.credentials.get({
  identity: {
    providers: [{
      fields: [],
      clientId: '1234',
      configURL: 'https://idp.example/fedcm.json',
      params: {
        scope: 'drive.readonly calendar.readonly',
      }
    }],
  }
  mediation: 'optional',
});
如果 fields 是空陣列,使用者代理程式會略過揭露 UI。
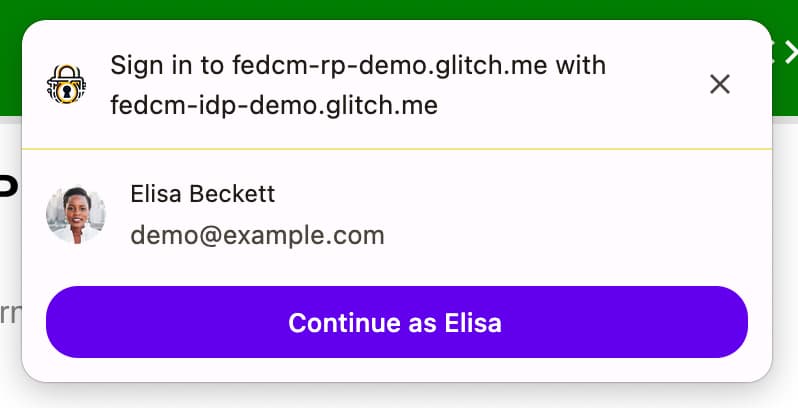
即使 accounts 端點的回應不含與 approved_clients 中的 RP 相符的客戶端 ID,也會發生這種情況。
在這種情況下,傳送至 ID 斷言端點的 disclosure_text_shown 在 HTTP 主體中為 false:
POST /id_assertion_endpoint HTTP/1.1
Host: idp.example
Origin: https://rp.example/
Content-Type: application/x-www-form-urlencoded
Cookie: 0x23223
Sec-Fetch-Dest: webidentity

account_id=123&client_id=client1234&nonce=234234&disclosure_text_shown=false
多個 configURL
多個 configURL 可讓 IdP 在已知檔案中指定 accounts_endpoint 和 login_url,以便為 IdP 提供多個設定檔。
如果 accounts_endpoint 和 login_url 已新增至 well-known 檔案,系統會忽略 provider_urls,讓 IdP 支援多個設定檔。如果不是,provider_urls 會繼續生效,以便向下相容。
支援多個 configURL 的 well-known 檔案如下所示:
{
  "provider_urls": [ "https://idp.example/fedcm.json" ],
  "accounts_endpoint": "https://idp.example/accounts",
  "login_url": "https://idp.example/login"
}
這麼做可讓我們:
- 維持與現有知名檔案和已部署於實際環境的舊版瀏覽器的回溯和前向相容性。
- 您可以有任意數量的設定檔,只要這些檔案都指向相同的
accounts_endpoint和login_url即可。 - 由於熵值必須在「.well-known」層級指定,因此無法將熵值新增至向
accounts_endpoint提出的憑證擷取要求。
支援多個 configURL 是選用功能,現有的 FedCM 實作內容可以保持不變。
自訂帳戶標籤
自訂帳戶標籤可讓 FedCM IdP 為帳戶加上註解,讓 RP 在設定檔中指定標籤來篩選帳戶。您可以使用 Domain Hint API 和 Login Hint API,在 navigator.credentials.get() 呼叫中指定這兩個 API,以便進行類似的篩選,但自訂帳戶標籤可透過指定設定檔來篩選使用者,這在使用多個 configURL 時特別實用。自訂帳戶標籤的另一個不同之處,在於這些標籤是由 IdP 伺服器提供,而非由 RP (例如登入或網域提示) 提供。
範例
IdP 分別支援消費者和企業的兩個 configURL。消費者設定檔有 'consumer' 標籤,企業設定檔則有 'enterprise' 標籤。
在這種設定下,well-known 檔案會包含 accounts_endpoint 和 login_url,以便允許多個 configURL。
{
  "provider_urls": [ "https://idp.example/fedcm.json" ],
  "accounts_endpoint": "https://idp.example/accounts",
  "login_url": "https://idp.example/login"
}
當 accounts_endpoint 在 well-known 檔案中提供時,系統會忽略 provider_urls。RP 可以直接指向 navigator.credentials.get() 呼叫中的相應設定檔。
消費者設定檔位於 https://idp.example/fedcm.json,其中包含 accounts 屬性,可使用 include 指定 'consumer'。
{
  "accounts_endpoint": "https://idp.example/accounts",
  "client_metadata_endpoint": "/client_metadata",
  "login_url": "https://idp.example/login",
  "id_assertion_endpoint": "/assertion",
  "accounts": {
    "include": "consumer"
  }
}
企業設定檔位於 https://idp.example/enterprise/fedcm.json,其中包含 accounts 屬性,可使用 include 指定 'enterprise'。
{
  "accounts_endpoint": "https://idp.example/accounts",
  "client_metadata_endpoint": "/enterprise/client_metadata",
  "login_url": "https://idp.example/login",
  "id_assertion_endpoint": "/assertion",
  "accounts": {
    "include": "enterprise"
  }
}
常見的 ID 提供者 帳戶端點 (在本例中為 https://idp.example/accounts) 會傳回帳戶清單,其中包含每個帳戶的陣列中已指派 labels 的標籤屬性。以下是擁有兩個帳戶的使用者回應範例。一個是消費者版,另一個是企業版:
{
 "accounts": [{
   "id": "123",
   "given_name": "John",
   "name": "John Doe",
   "email": "john_doe@idp.example",
   "picture": "https://idp.example/profile/123",
   "labels": ["consumer"]
  }], [{
   "id": "4567",
   "given_name": "Jane",
   "name": "Jane Doe",
   "email": "jane_doe@idp.example",
   "picture": "https://idp.example/profile/4567",
   "labels": ["enterprise"]
  }]
}
如果 RP 想要允許 'enterprise' 使用者登入,可以在 navigator.credentials.get() 呼叫中指定 'enterprise' configURL 'https://idp.example/enterprise/fedcm.json':
let { token } = await navigator.credentials.get({
  identity: {
    providers: [{
      clientId: '1234',
      nonce: '234234',
      configURL: 'https://idp.example/enterprise/fedcm.json',
    }],
  }
});
因此,使用者只能使用 '4567' 的帳戶 ID 登入。瀏覽器會自動隱藏 '123' 的帳戶 ID,以免使用者提供的帳戶不受此網站上的 IdP 支援。
來源試用:FedCM 做為 Storage Access API 的信任信號
Chrome 126 開始進行來源試用,將 FedCM 做為 Storage Access API 的信任信號。這項異動後,透過 FedCM 先前授予的權限,就會成為自動核准 Storage Access API 的儲存空間存取權要求的有效理由。
當嵌入的 iframe 想要存取個人化資源時,這項功能就很實用:舉例來說,如果 idp.example 已嵌入 rp.example,且需要顯示個人化資源,如果瀏覽器限制第三方 Cookie 的存取權,即使使用者已透過 FedCM 使用 idp.example 登入 rp.example,嵌入的 idp.example iframe 也無法要求個人化資源,因為請求不會包含第三方 Cookie。
為此,idp.example 需要透過嵌入網站的 iframe 取得儲存空間存取權限,且只能透過權限提示取得。
FedCM 可做為 Storage Access API 的信任信號,Storage Access API 權限檢查不僅會接受儲存空間存取提示提供的權限授予,也會接受 FedCM 提示提供的權限授予。
// In top-level rp.example:

// Ensure FedCM permission has been granted.
const cred = await navigator.credentials.get({
  identity: {
    providers: [{
      configURL: 'https://idp.example/fedcm.json',
      clientId: '123',
    }],
  },
  mediation: 'optional',
});

// In an embedded IdP iframe:

// No user gesture is needed to call this, and the call will be auto-granted.
await document.requestStorageAccess();

// This returns `true`.
const hasAccess = await document.hasStorageAccess();
使用者登入 FedCM 後,只要 FedCM 驗證功能處於啟用狀態,系統就會自動授予權限。也就是說,一旦使用者與網路中斷連線,要求權限時就會顯示提示。
參與來源試用
您可以在 Chrome 126 以上版本中開啟 Chrome 旗標
chrome://flags#fedcm-authz,在本機試用 FedCM 接續 API 套件。您也可以在 Chrome 126 以上版本中開啟 #fedcm-with-storage-access-api,將 FedCM 當做 Storage Access API 的本機信任訊號。
這些功能也提供原始測試版本。來源試用計畫可讓您試用新功能,並針對其可用性、實用性和成效提供意見回饋。詳情請參閱「開始使用原點試播功能」。
如要試用 FedCM Continuation API bundle 來源試用,請建立兩個來源試用權杖:
- 註冊試用。將權杖嵌入 ID 提供者來源。
- 勾選第三方比對核取方塊,註冊來源試用。請按照「為 RP 註冊第三方來源試用版」一節中的說明,為 RP 嵌入權杖。
如果您想啟用 Continuation API 和按鈕流程,請一併啟用按鈕模式 API 來源測試版:
- 以第三方身分註冊來源試用。請按照「為 RP 註冊第三方來源試用版」中的說明,為 RP 嵌入權杖。
如要嘗試將 FedCM 做為 Storage Access API 來源試用版的信任訊號,請按照下列步驟操作:
- 註冊參加來源試用。將權杖嵌入 ID 提供者來源。
Continuation API 套件來源試用和 FedCM 可做為 Storage Access API 來源試用的信任信號,皆可從 Chrome 126 開始使用。
為 RP 註冊第三方來源試用
- 前往原始測試註冊頁面。
- 按一下「註冊」按鈕,然後填寫表單,即可索取權杖。
- 將 IdP 的來源輸入為「Web Origin」。
- 勾選「第三方比對」選項,即可在其他來源中使用 JavaScript 插入符記。
- 按一下「提交」。
- 在第三方網站上嵌入已核發的權杖。
如要在第三方網站上嵌入權杖,請將下列程式碼新增至 IdP 的 JavaScript 程式庫或從 IdP 來源提供的 SDK。
const tokenElement = document.createElement('meta');
tokenElement.httpEquiv = 'origin-trial';
tokenElement.content = 'TOKEN_GOES_HERE';
document.head.appendChild(tokenElement);
將 TOKEN_GOES_HERE 替換為您自己的符記。